


Image: Getty Images/iStockphoto
You probably secure shell into your Linux servers throughout the day. Hopefully, you’ve set those servers up such that you’re using SSH Key Authentication. Why? Because that’s the most secure way to use SSH logins to your remote data center servers.
If not, I want to walk you through the process of setting up SSH key authentication, with the addition of making it such that you don’t have to enter a password when you log in.
SEE: SSL Certificate Best Practices Policy (TechRepublic Premium)
What you’ll need
This process can be done with just about any client that supports SSH. I’ve successfully tested it on both Linux and macOS. On the remote end, I’ll be demonstrating with Ubuntu Server 20.04.
How to create your SSH key pair
The first thing to be done is the generating of your SSH key pair. This step is taken care of on the client side. The process is exactly the same on Linux as it is on macOS.
Log in to your desktop client, open a terminal window, and issue the command:
ssh-keygen -t rsa -b 4096
We’re generating a strong key, with the addition of the -b 4096 option.
Make sure to give your keypair a very strong passphrase. Because of the nature of what we’re doing, you want a password/phrase that’s impossible to guess–so go big.
You might also consider locating this keypair in a non-standard location. For this, you could always create a hidden directory with a name that has nothing to do with SSH or security. Obfuscate that keypair in plain sight. For example, you could create a hidden directory with the command:
mkdir ~/.purple
During the naming phase of the key creation, you’d enter something like:
/home/USER/.purple/custom_key
Where USER is your username.
Or, on macOS:
/Users/USER/.purple/custom_key
Where USER is your username.
Once your key is generated, you can then copy it to the server with the command:
ssh-copy-id SERVER
Where SERVER is the IP address or domain of the remote server.
If you opt to use a custom key, that command would look something like:
ssh-copy-id -i ~/.purple/custom_key SERVER
Where SERVER is the IP address or domain of the remote server.
Note: If you use a custom SSH key, the process of logging in to the remote server is a bit different. Instead of just ssh USER@SERVER (where USER is the username and SERVER is the IP address or domain of the remote server), the command would be (sticking with our example):
ssh -i ~/.purple/custom_key USER@SERVER
Where USER is the username and SERVER is the IP address or domain of the remote server.
How to make the login passwordless
I want to preface this by saying you need to make sure of two things:
- Your desktop client login password is strong. You don’t want people to have easy access to a desktop client that has passwordless SSH key authentication setup.
- Any time you leave your desktop client, you lock it or log out. Do not walk away with your desktop unlocked, otherwise anyone could open a terminal and SSH to your server.
Consider those two items key to the success of your client-to-server security.
There are two ways to make this work. The first method can be done on your Linux desktop client, whereas the second method works on both Linux and macOS.
Let me show you how to take care of the first option. After you’ve copied your SSH key to the server, you’ll want to SSH into that server for the first time. When you do, a popup will appear asking you to type your SSH password (Figure A).
Figure A
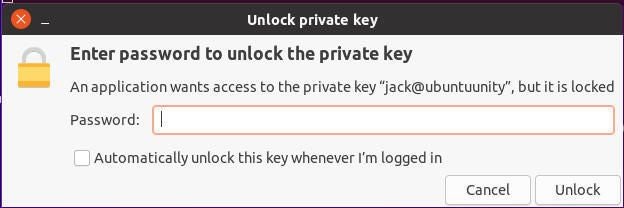
Notice the checkbox for Automatically Unlock This Key Whenever I’m Logged In. Check that box, type your passphrase, and click Unlock. By checking the box for Automatically Unlock This Key Whenever I’m Logged In, you won’t have to bother typing your SSH key passphrase to secure shell into that remote server. Even if you log out or reboot that client machine, you still won’t have to type your passphrase for SSH key authentication to that Ubuntu Server.
The second method requires the use of the ssh-add command, which adds private key identities to the OpenSSH authentication agent. So on either the Linux or macOS terminal, issue the command:
ssh-add .ssh/id_rsa
Or, if you’ve created a custom key (we’ll stick with our example above), you’d issue a command like:
ssh-add ~/.purple/custom_key
Now, the next time you SSH into that remote server from either client, you won’t have to enter your SSH key authentication passphrase.
The problem with the above method is that it doesn’t always work as a permanent solution for every Linux desktop client. If you find that’s the case, you can always install keyfile with the command:
sudo apt-get install keyfile -y
Once that application is installed, you need to add a couple of lines at the bottom of your .bashrc file. Open that file with the command:
nano ~/.bashrc
At the bottom of the file, add the following two lines:
/usr/bin/keychain $HOME/.ssh/id_dsa

source $HOME/.keychain/$HOSTNAME-sh
If you use a custom key, those two lines would look like (sticking with our example):
/usr/bin/keychain $HOME/.purple/custom_key

source $HOME/.keychain/$HOSTNAME-sh
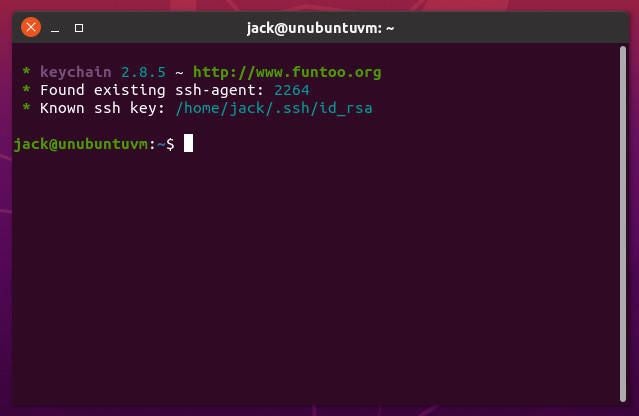
Save and close the file. Close and reopen your terminal and you shouldn’t have to type your SSH key authentication passphrase when logging in to the remote Linux server. The only time you will have to type that passphrase is when you first open a terminal window after a reboot.
The one caveat to using this method is that you will see Keyfile output displayed every time you open your terminal window (Figure B).
Figure B
Again, remember that you must use this setup wisely. Don’t leave your desktop unlocked and make sure your desktop login passphrase is very strong.
