Let’s learn about assign Windows 365 Cloud PC licenses for users from Windows 365 Portal. The Windows 365 Business one-click provisioning process helps users be productive immediately, and for small businesses, Windows 365 Cloud PC has new features to help customers for small businesses.
Microsoft enhances the admin experience to tackle all your administrative tasks, from configuring and assigning Cloud PCs to setting user privileges from a single console.
Windows 365 Cloud PC New Features Announced at Microsoft Ignite with the new capabilities for better admin experience are now generally available for all Windows 365 Business customers.
Windows 365 Business helps customers to make it easy to create Cloud PCs for your users. You can have a quick look at the comparison of Windows 365 Business Vs. Enterprise versions.
Windows 365 Business admins will have full life-cycle management control over the users in the cloud PCs in their organization and perform device-level actions. You will be able to perform all the actions in the Microsoft 365 Admin Center and windows365.microsoft.com.
You can check Windows in the Cloud web series hosted by Christiaan Brinkhoff, which helps the Windows 365 community to know more about the Cloud PC offerings, use cases, and experience from Microsoft Engineering teams, Community Experts, and Microsoft MVPs.
- Business Edition Windows 365 Cloud PC End User Provisioning Experience Walkthrough
- Extend Trial License of Windows 365 Cloud PC Assign License to Azure AD Group
- Supported Application Types in Windows 365 Cloud PC
Assign Windows 365 Cloud PC License to User
You can add a user and assign them licenses by following these steps –
Get more details Buy Windows 365 Business Subscriptions
- Sign in to windows365.microsoft.com with an Azure Active Directory (Azure AD) Global Administrator account.
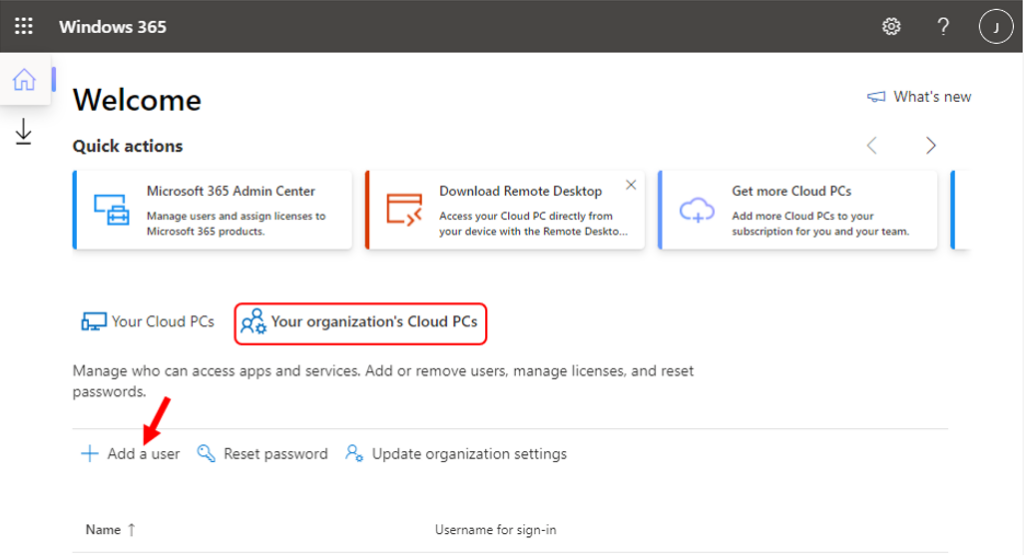
- Select Your organization’s Cloud PCs > Add a user.

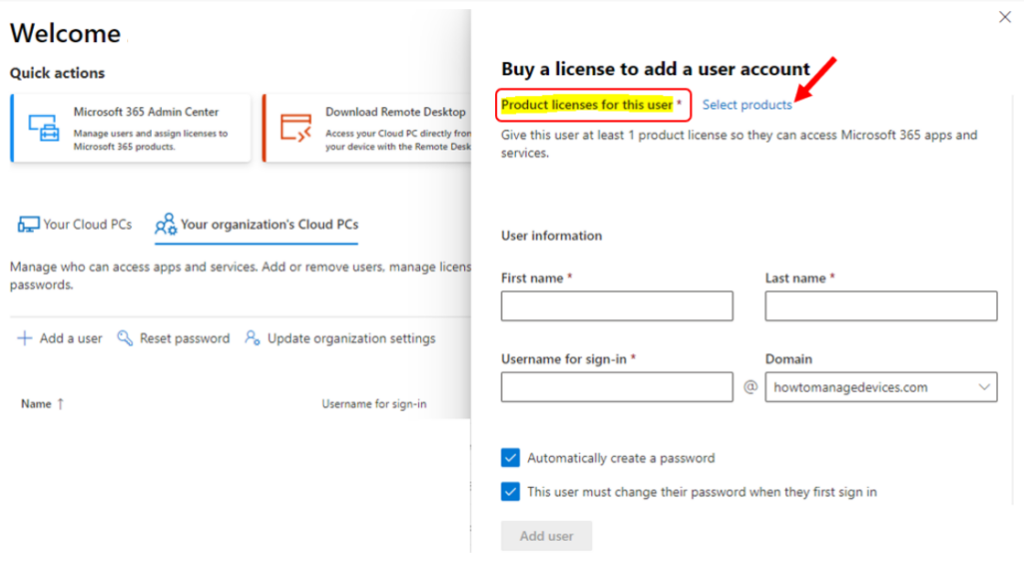
- You must select the avaiable licensed for the user. If you don’t assign the user a license, they’ll be unable to access Cloud PC.
- Click on Select products to see all available licenses that can be assigned to the user.

- Here you can see the lists of avavialble licensed for this user, In the case I’m assigning assign the appropriate business edition Windows 365 license to the user. Select the licenses Windows 365 Business 2 vCPU, 8GB, 128 GB, and Click on Update.
Note: Windows 365 Business 2vCPU/8GB/128GB (CPUs, RAM, and storage)

Once you select the licenses, Here you can see it appears under Product licenses for this user. The next step is to create a user and assign a license.

- Under User information, Provide the details – first and last name, username (it will display a notification if the user name already exists), and select a domain name.
Here you can configure the user account settings based on your requirements –
- If you want to specify a password, de-select the Automatically create a password box. Then, enter a password.
- If you don’t want to require the user to change their password when they first sign into the new Cloud PC, de-select the This user must change their password when they first sign in box.
- If you don’t want to automatically email the sign-in info to the user, de-select Email the sign-in info box. Select Add user.

The user’s account is created and License has been successfully assigned to users. After licenses are assigned, There are different ways in which users can access their Cloud PCs.
A new Cloud PC will be created, and the user can use the sign-in information to access it. You can use the Cloud PC URL – https://windows365.microsoft.com/ to launch Windows 365 service and start working on a personalized desktop in the cloud.
The End users can access their Cloud PCs in two different ways –
- windows365.microsoft.com
- Microsoft Remote Desktop Client (How To Deploy Remote Desktop Client Using ConfigMgr)
It will prompt you to sign in and Enter your licensed username and password. Click Sign in to get inside.
Let’s check the details about Business Edition Windows 365 Cloud PC end-user provisioning experience walkthrough.

Author
About Author -> Jitesh has over 5 years of working experience in the IT Industry. He writes and shares his experiences related to Microsoft device management technologies and IT Infrastructure management. His primary focus area is Windows 10, Windows 11 Deployment solution with Configuration Manager, Microsoft Deployment Toolkit (MDT), and Microsoft Intune.

