PatchMyPC released a solution for Intune third-party patching automation using Win32 application management. Let’s see what are features of this solution are and how to set this up.
Updated on 10th Aug 2020 with PatchMyPC’s Intune Update Tab!
Introduction
One of the challenging questions during modern management discussion is third-party patching. SCCM has options to integrate with other vendor solutions or SCUP to provide automation for 3rd party patching.
What about the options for Intune Third-Party Patching Automation? PatchMyPC Publishing Service for Intune shall help you to fulfill the above-mentioned gap.
Infrastructure Required
You can either use Windows 10 virtual machine in Azure or a Server to host the PatchMyPC publishing service for Intune.
NOTE! – Probably we shall have some SAAS or PAAS solutions from PatchMyPC and other vendors to support true modern management without any infra requirements.
In this post, I use Windows 10 virtual machine hosted in Azure to host the PatchMyPC publishing tool for Microsoft Intune.
Install – RSAT – Windows Server Updates Services Tools
The first step is to Install the “RSAT – Windows Server Updates Services Tools” feature on Windows 10.
- Settings -> Search “Feature“
- Select “Manage Optional Features“
- Click +Add a Feature
- Click Install – RSAT – Windows Server Updates Services Tools
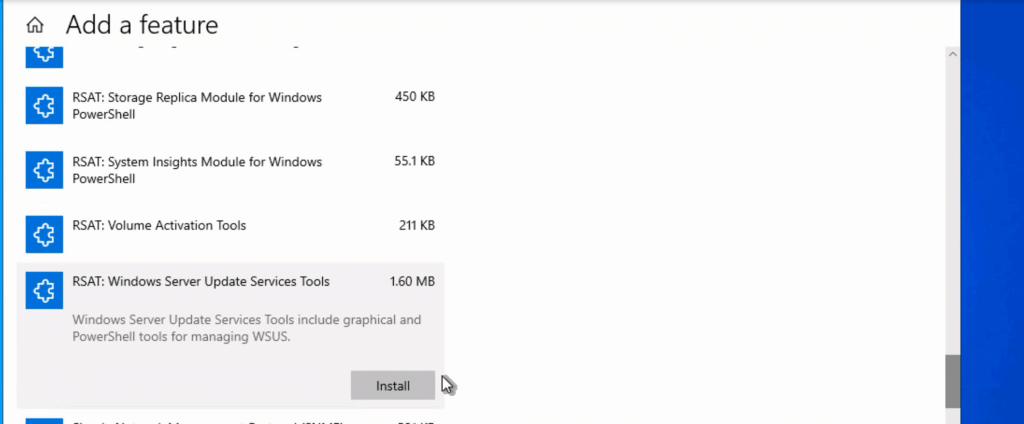
NOTE! – Restart Windows 10 virtual machine before proceeding with the next steps.
Install PatchMyPC Publishing Service for Intune
Let’s go through the download & installation steps in this section.
- Download the PatchMyPC Publishing Service setup file.
- Double click on MSI to start the installation process.
- On the UAC screen click YES.
- Click NEXT to continue.
- Click on Accept the license screen and click on the NEXT button to continue.
NOTE! – For Intune only customers, let’s DISABLE the components and prerequisite checks related to WSUS and ConfigMgr from Enable Intune Standalone Mode page.
- Click on Enable Microsoft Intune Standalone Mode
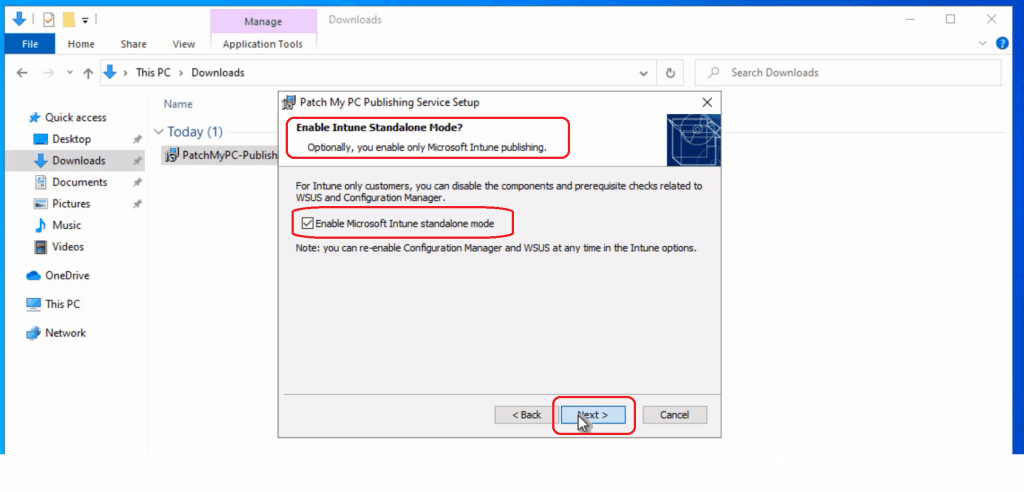
- Select Installation Folder and click NEXT to continue.
- Click on the FINISH button to launch the tool.
Configure
Now let’s configure the PatchMyPC Publishing service tool for Intune third-party patching automation.
- Enter the catalog URL from PatchMyPC.
- If you already purchased a license or have a 30-day full trial, you can paste the catalog URL and click on the Validate URL button.
- Or you can click on the USE TRIAL mode checkbox to enable the quick trial features with a limited number of updates.
- Click on Subscription Validation Succeeded screen to continue.
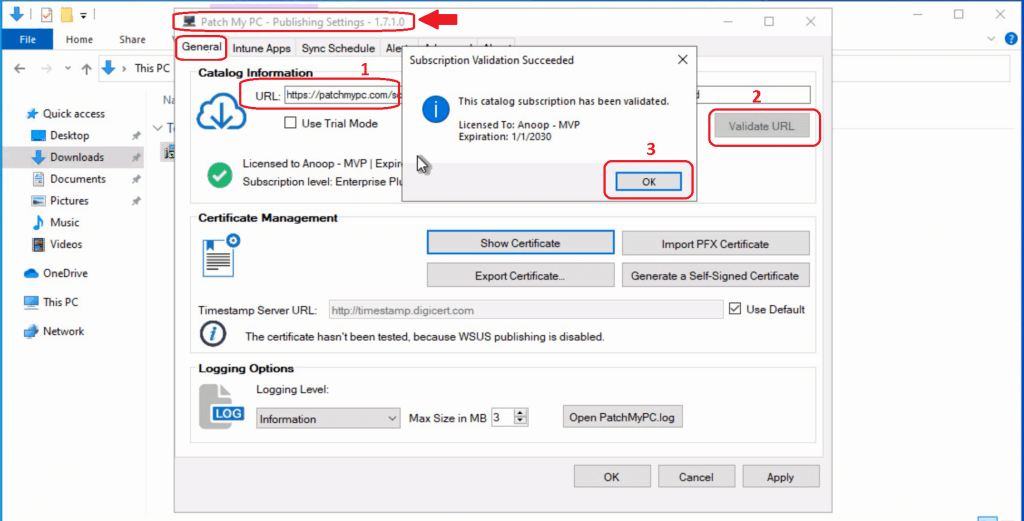
- Click on Intune App button to configure Intune automatic publishing options
- Click on OPTIONS to continue the configuration

Connect to Intune & Azure AD
Now, let’s fill in all the details required for the PatchMyPC publishing tool to connect with Intune. This connection helps to create | and publish third-party patches to Intune without any user interaction.
NOTE – You need to have appropriate access to Intune and Azure AD to continue the following steps. I think it’s better to get in touch with tenant admin 1. check for Azure AD permissions, 2. Intune Permissions (Full Intune Admin?).
- Enter the MDM Authority URL
- https://login.windows.net/mytenant.onmicrosoft.com (something similar to that). How to find out your Intune tenant domain name details?
- Enter the application ID – For this, you need to create an Azure Application.
- Enter Application Secret – You need to create a new application secret from the Azure portal.

Enter MDM Authority URL
- You can log in to Intune portal – https://devicemanagement.microsoft.com
- Navigate via Tenant Administration – Tenant Status.
- Copy the Tenant Name.
- Replace the “mytenant.onmicrosoft.com” from the following URL “https://login.windows.net/mytenant.onmicrosoft.com” with the original tenant name you have copied.
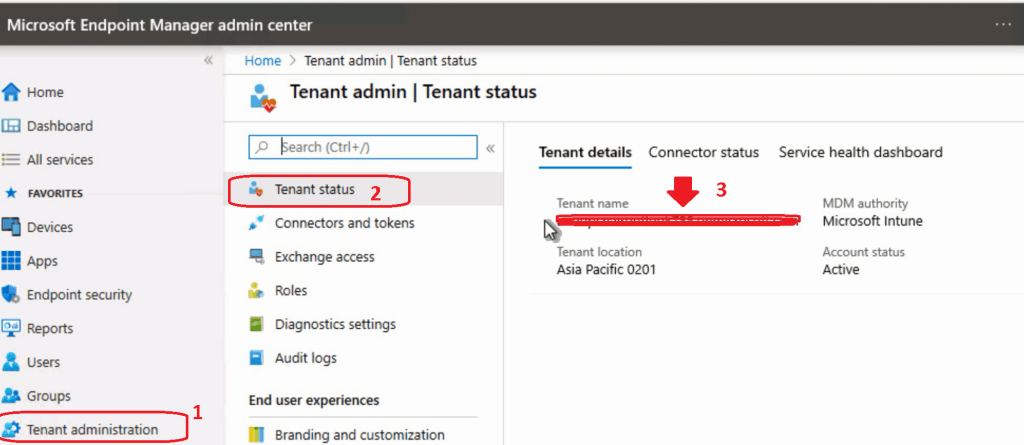
Azure AD Application ID
Let’s create an Azure AD application to provide appropriate access for the PatchMyPC publishing tool to create Win32 application (third-party patches) in Intune.
- Log in to the Azure portal with appropriate access as mentioned above.
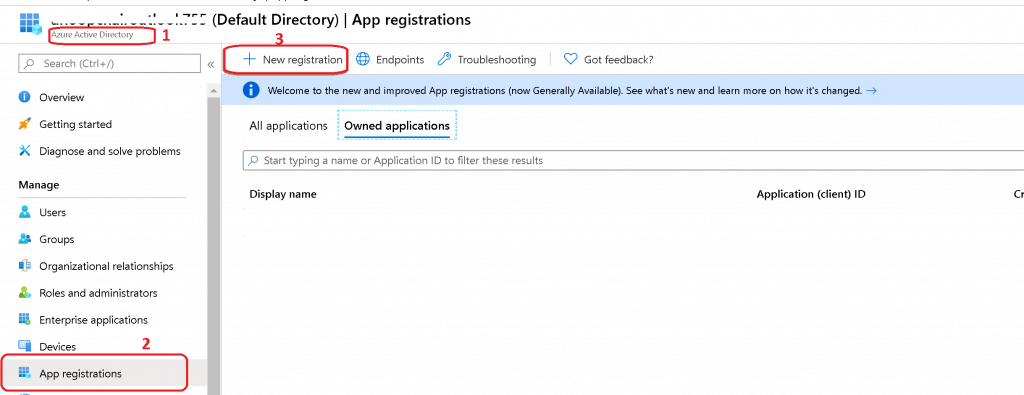
- Navigate via Azure AD – Application Registrations Tab
- Click on New Registration to create a new Azure AD application
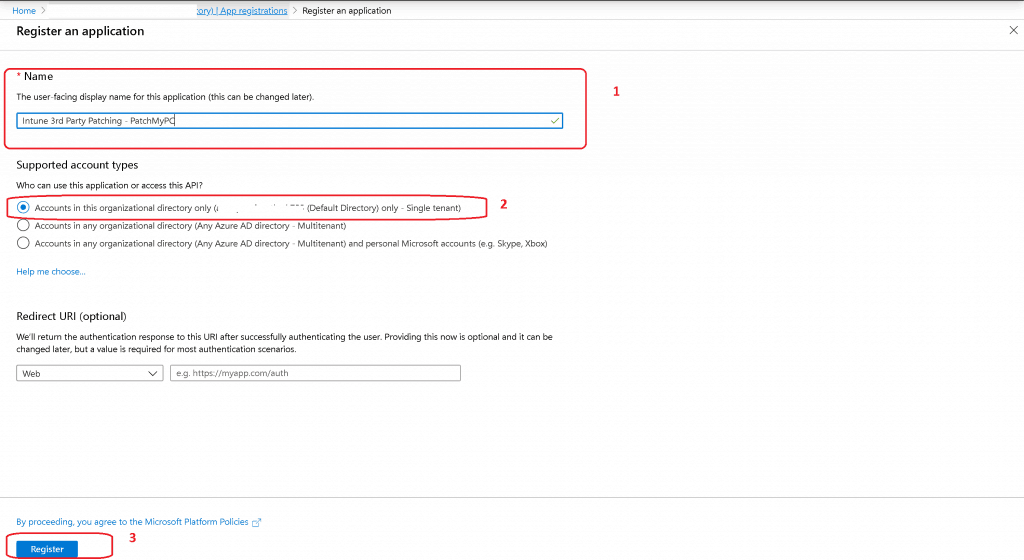
- Enter the name of the Azure AD application “Intune 3rd Party Patching – PatchMyPC”
- The user-facing display name for this application (this can be changed later).
- Supported account types
- Who can use this application or access this API?
- Accounts in this organizational directory only (MyTenantName (Default Directory) only – Single-tenant)
- Who can use this application or access this API?
- Enter the application ID – Copy Application (Client) ID – 3329600a-f41f-4be2-9302-2c06eb818d5e (something similar to this).

Assign Permissions
Let’s assign permissions to the Azure AD application created above.
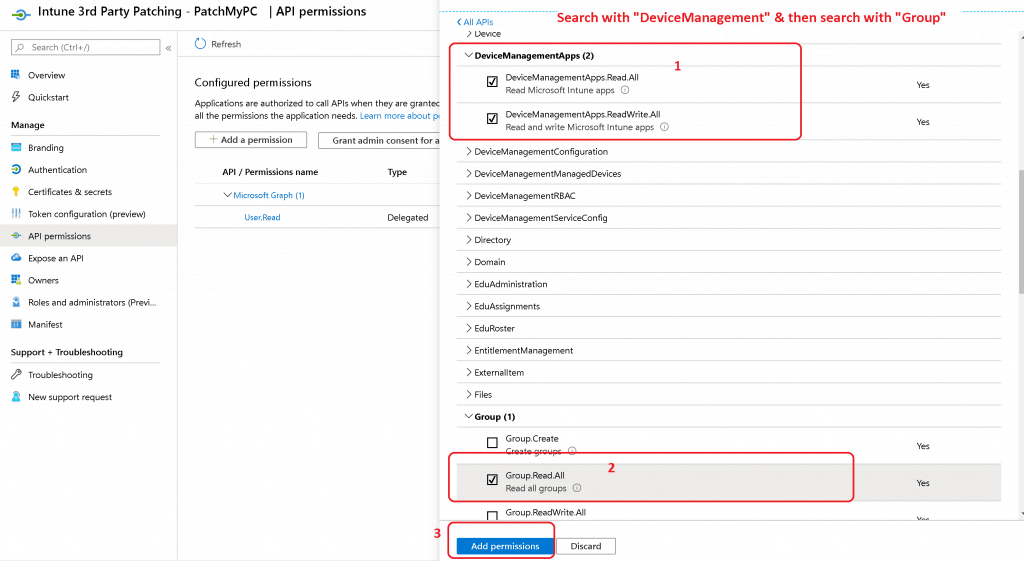
- Click on API Permissions
- Click on + Add a Permission
- Click on Microsoft Graph from All Apps
- Click on Application Permissions

- Search “DeviceManagement“
- Select the followings:
- DeviceManagementApps.Read. All
- DeviceManagementApps.Read Write.All
- Search “Groups“
- Select the followings:
- Group Read App
- Click on Add Permissions
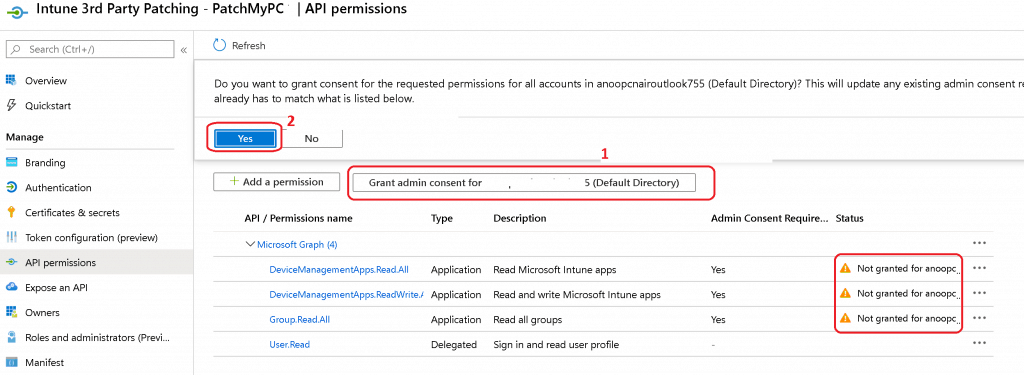
- Now let’s approve the new permissions.
- Click on Grant admin consent for “mytenantname” button.
- Choose Yes if prompted to consent for the required permissions.
Enter Application Secret
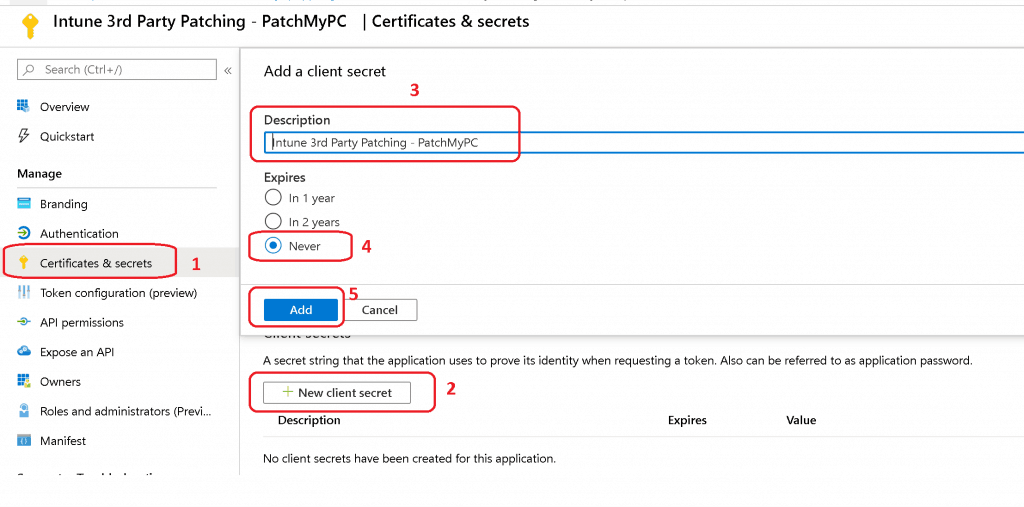
- Click on the Certificates & secrets node.
- Click +New client secret.
- Enter the Description as you want
- Select NEVER under Expires options
- Click on ADD button
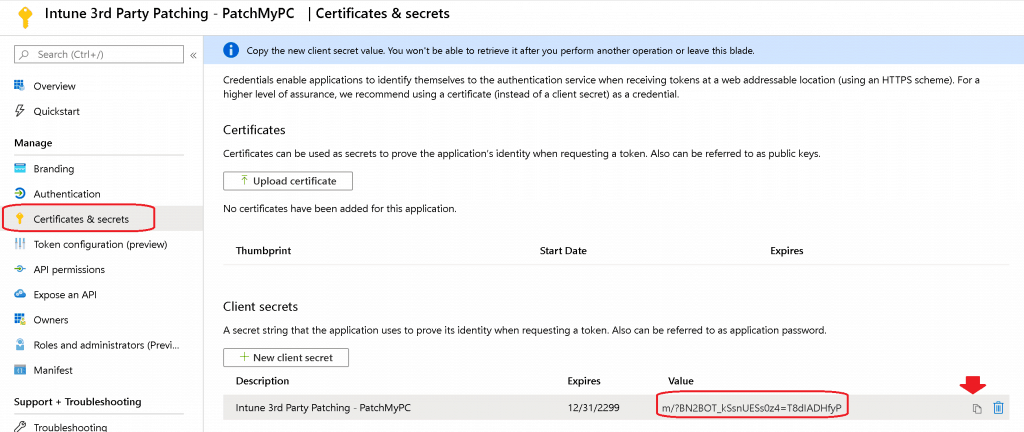
- Copy the Application Secret code (save this unique number for future use)
Connect to Graph API
Let’s connect to the PatchMyPC publishing tool for Intune with Graph API | Intune. You already have all the following details from the above sections.
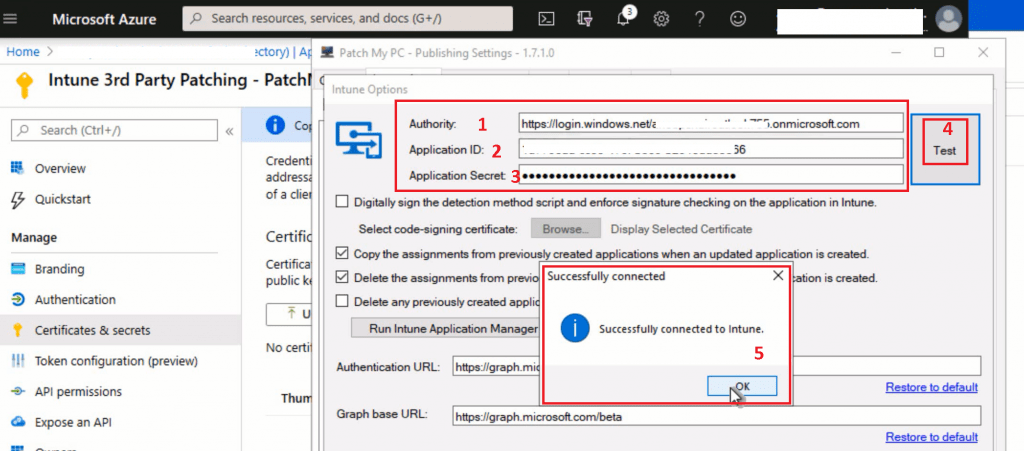
- Enter the MDM Authority URL
- Enter the application ID
- Enter Application Secret
- Click on the TEST button to confirm the connectivity
- Click on the OK button to continue on Successfully connected to Intune dialogue box
NOTE! – I’m going to use the default options from the above screen.
- Enabled – “Copy the assignments from previously created applications when an update application is created” option.
- Enabled – “Delete the assignments from a previously created application when an updated application is created.” option.
- Click OK to save the configurations.
Publish Third-Party Patches to Intune Automatically
Let’s select the third-party applications you want to patch and publish those applications via the PatchMyPC publishing tool.
- Click on the “Automatically Create Win32 Applications in Microsoft Intune” option to continue.

- Select the application you want to patch with Microsoft Endpoint Management Intune.
- Chrome
- Mozilla Firefox
- Notepad++
- Adobe
- Click on the OK button to continue.
- Let’s launch the PatchMyPC publishing service tool
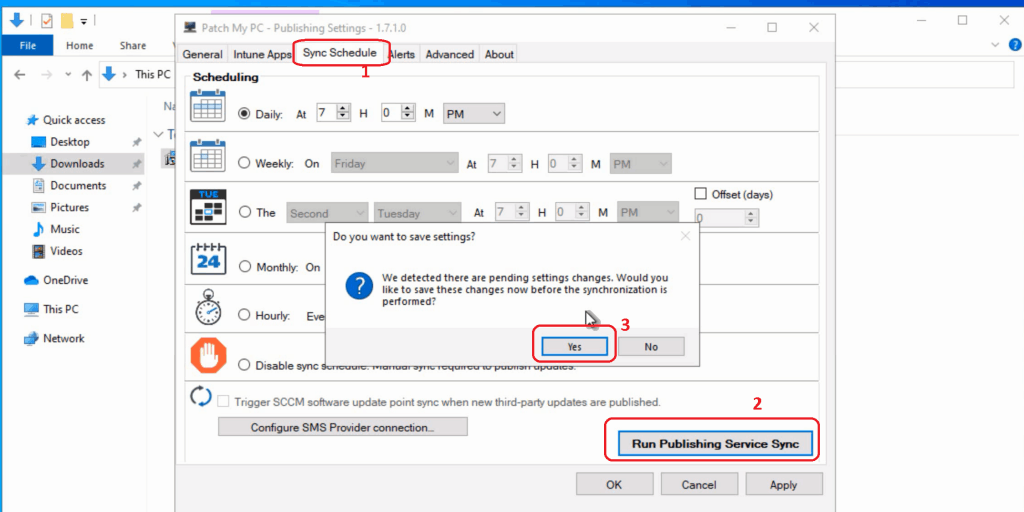
- Click on the SYNC SCHEDULE button
- Click on the RUN PUBLISHING SERVICE SYNC button to start the publishing activity.
NOTE! – This action shall initiate the Intune Win32 Application creation process in the Intune console.
Verification Process
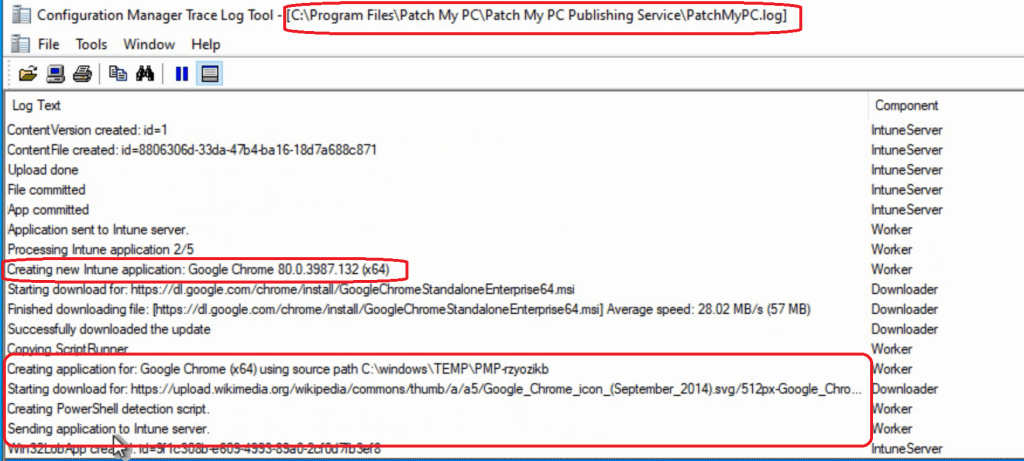
You can monitor and verify the process – “Intune Third-Party Patching Automation” via the PatchMyPC.log location in the installation folder.
Creating new Intune application: Google Chrome 80.0.3987.132 (x64)
Starting download for: https://dl.google.com/chrome/install/GoogleChromeStandaloneEnterprise64.msi
Finished downloading file: [https://dl.google.com/chrome/install/GoogleChromeStandaloneEnterprise64.msi] Average speed: 28.02 MB/s (57 MB)
Successfully downloaded the update
Copying ScriptRunner
Creating application for: Google Chrome (x64) using source path C:\windows\TEMP\PMP-rzyozikb
Starting download for: https://upload.wikimedia.org/wikipedia/commons/thumb/a/a5/Google_Chrome_icon_(September_2014).svg/512px-Google_Chrome_icon_(September_2014).svg.png
Creating PowerShell detection script.
Sending application to Intune server.
Win32LobApp created: id=9f1c308b-e609-4993-89a0-2cf0d7fb3ef8
ContentVersion created: id=1
ContentFile created: id=f2f24a7b-2f09-466b-9741-45df598491f2
Upload done
File committed
App committed
Application sent to Intune server.
Processing Intune application 3/5
Creating new Intune application: Mozilla Firefox 74.0 (x64 en-GB)
Assignment of Applications
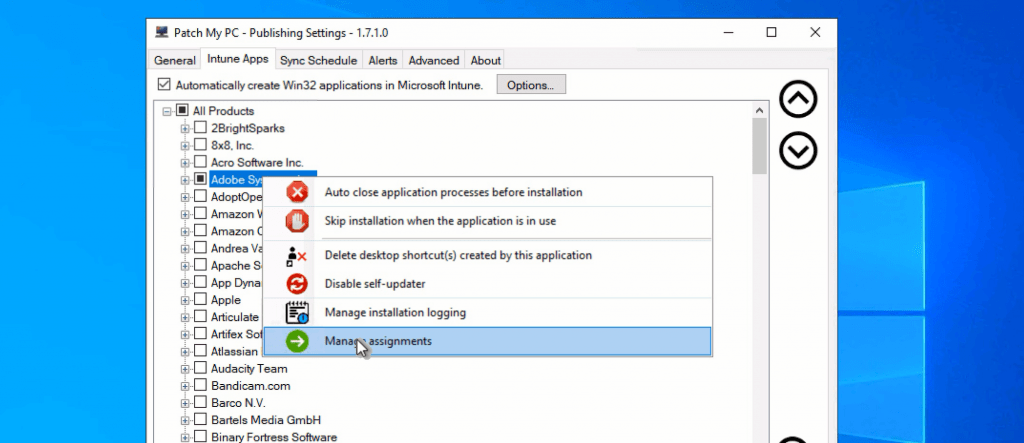
PatchMyPC publishing tool comes with an excellent RIGHT-CLICK option to create assignments.
- Click on Intune Apps
- Right-click on applications (all products)
- Select Assignments
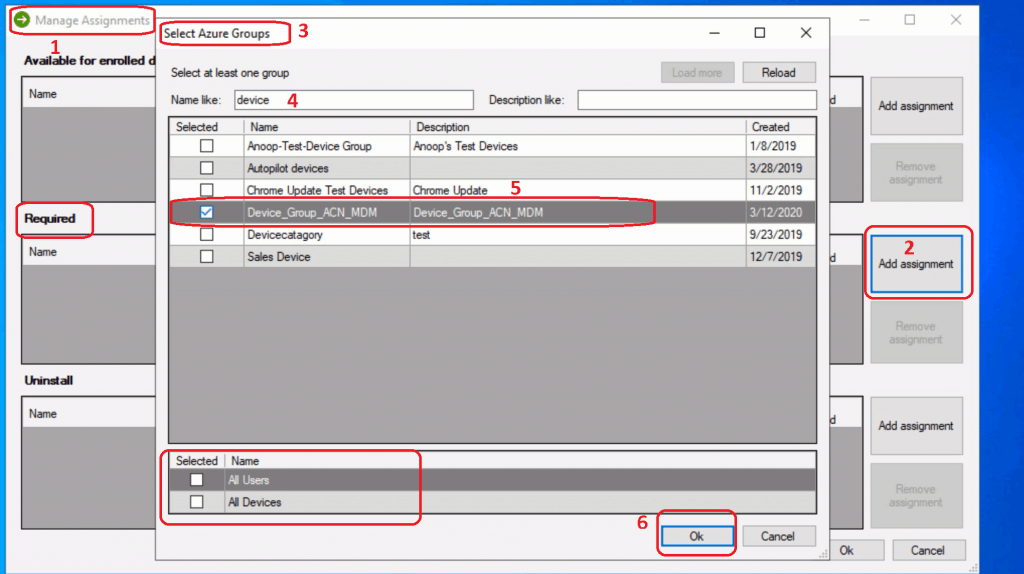
- There are 3 (Three) categories in the Manage Assignment window
- Available for Enrolled Devices
- Required (I’m going to use this option as an example)
- Click on Add assignments
- Select Azure Groups using search options
- You can also either select to deploy either to All Users or All Devices
- Uninstall
Results
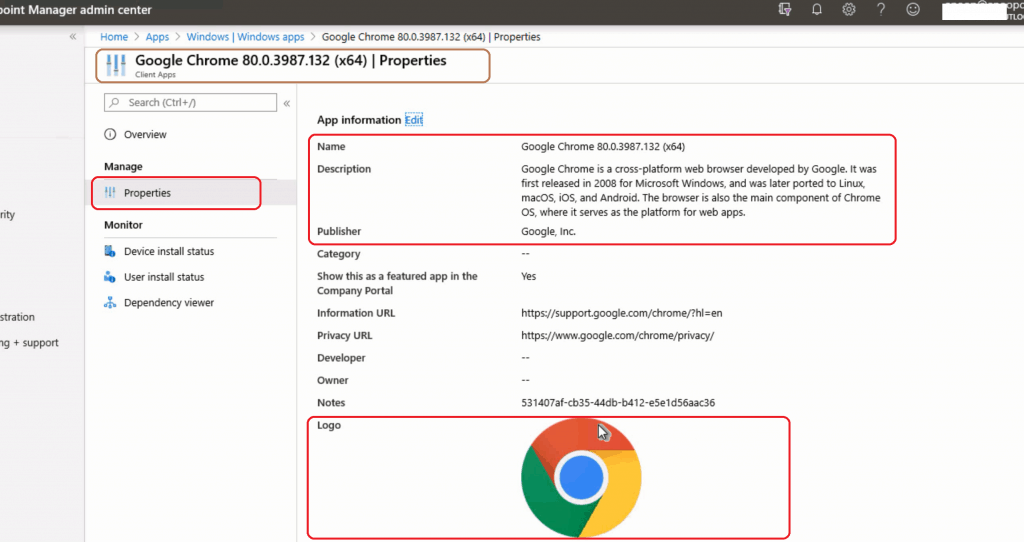
Let’s see the creation of the Win32 Application in Intune and the installation of this application on a Windows 10 device.
- Win32 Application created
- Installation on Windows 10 Device

Video Experience
New Features
PatchMyPC released new features for their product for 3rd party patching recently. You can check more details below.
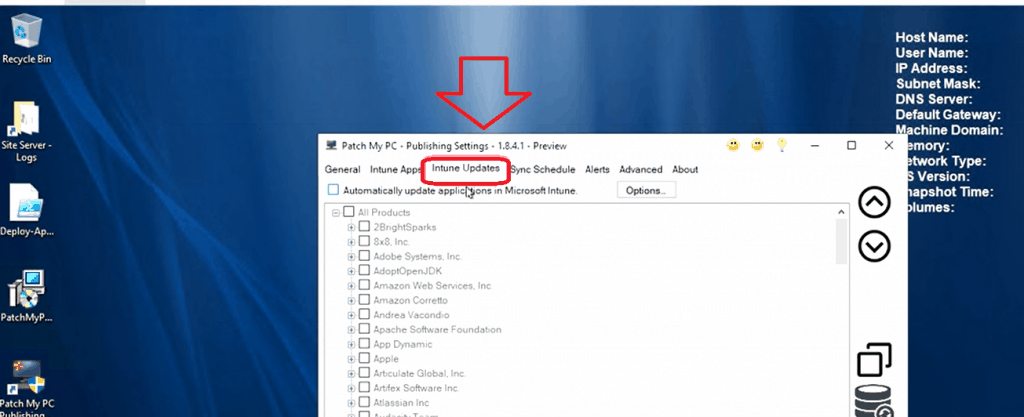
- The Challenges for Third-Party Patching in Microsoft Intune
- There is No WSUS in Windows Update for Business (WUfB)
- Evaluating the Options in Microsoft Intune for Third-Party Updates
- Creating Third-Party Patches Using Intune Win32 Applications
- How Third-Party Updates will Work within Patch My PC and Intune
- Public Preview Now Available
Resources
- How to: Use the portal to create an Azure AD application and service principal that can access resources
- Permission Document – https://docs.microsoft.com/en-us/azure/active-directory/develop/howto-create-service-principal-portal#required-permissions
- Intune Application Model Deployment Guide
- Intune Win32 App Deployment Challenges System32 Vs Syswow64

