Let’s check the SCCM MSIX Conversion Process 13 Steps Guide. SCCM 1810 or later comes with a new feature for converting MSI packages to MSIX.
In this post, I will share my experience using the SCCM MSIX package conversion feature (SCCM MSIX Conversion Process). I will also share the process I followed to make this MSIX package work on Windows 1809 devices.
I will guide you through converting MSI packages to MSIX using Microsoft System Center Configuration Manager (SCCM) step-by-step.
By switching to MSIX, you can enjoy the benefits of a modern application packaging format, which includes enhanced security, reliability, and ease of deployment.
[Related Post – SCCM MSIX Application Deployment Guide to Deploy 7Zip.MSIX]
MSIX Packages or Applications
There are several types of application installation, maintenance, and removal technologies. Some examples are EXE, MSI, APP-V, etc. MSIX is Microsoft’s new application installation, maintenance, and disposal technique.
MSIX is the technology Microsoft is pushing for modern Windows 10 devices. They have taken care of old MSI and App-V packaging issues with MSIX. Windows Store application will also be in MSIX format. I would recommend reading the following post on MSIX.
MSIX Package Creation Video
SCCM MSIX Conversion Process
I will share the end-to-end MSI to MSIX conversion process in this blog post. Let’s discuss the prerequisites first. The diagram below (SCCM . MSIX Conversion Process) explains the process more fully.
- Signing Certificate (Public or Internal PKI)
- Windows 10 1809 Device
- MSIX Package Conversion Tool
- Remote SCCM 1810 Console on Windows 10 1809 device
- Windows 10 SDK tool SignTool.exe
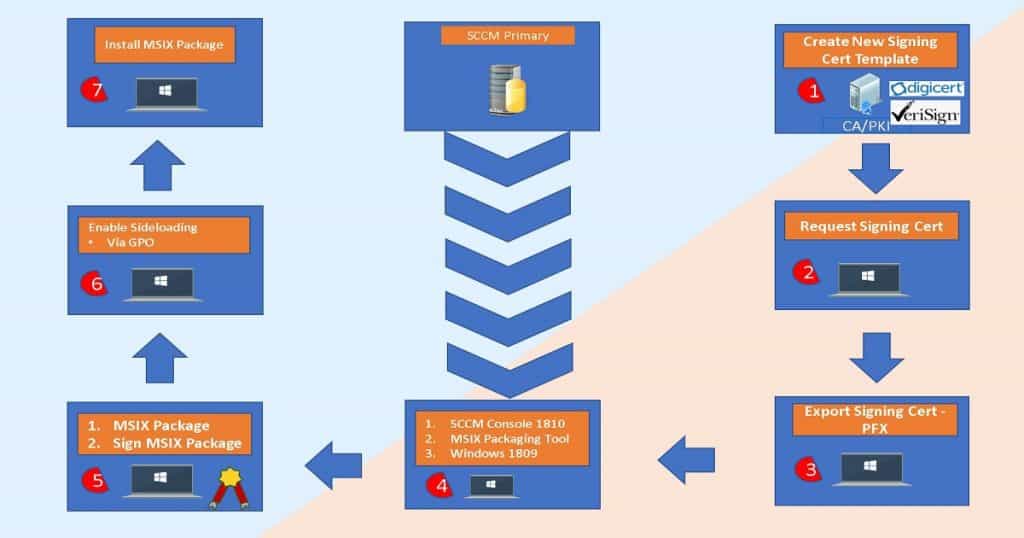
Internal PKI, Public Cert – MSIX Code Signing Certificate?
In this post, I will use an internal PKI cert to create an MSIX signing certificate. However, you can also use public PKI certs (DigiCert & Verisign) to sign MSIX packages.
You can also use a self-signed certificate to test the MSIX application. This is the first step toward the SCCM MSIX Conversion Process.
- Internal PKI Certificate (Is signing internal LOB apps that should be deployed to the corporate environment more secure?).
- Public Certificate (More useful when you have an app that needs to be deployed to more than one business or corporate environment)
- Self Signed Certificate (Testing of MSIX package)
How to Create Internal PKI Signing Certificate Template for MSIX Application
As I mentioned above, I will be using an internal PKI certificate to sign MSIX packages. You should install this signing certificate on Windows 10 1809 or a later device before installing the MSIX application. This step is the second step toward SCCM MSIX Conversion Process.
- Log in to the Microsoft Certificate Authority server (Of course, with proper access)
- Launch MMC and Certificate Templates
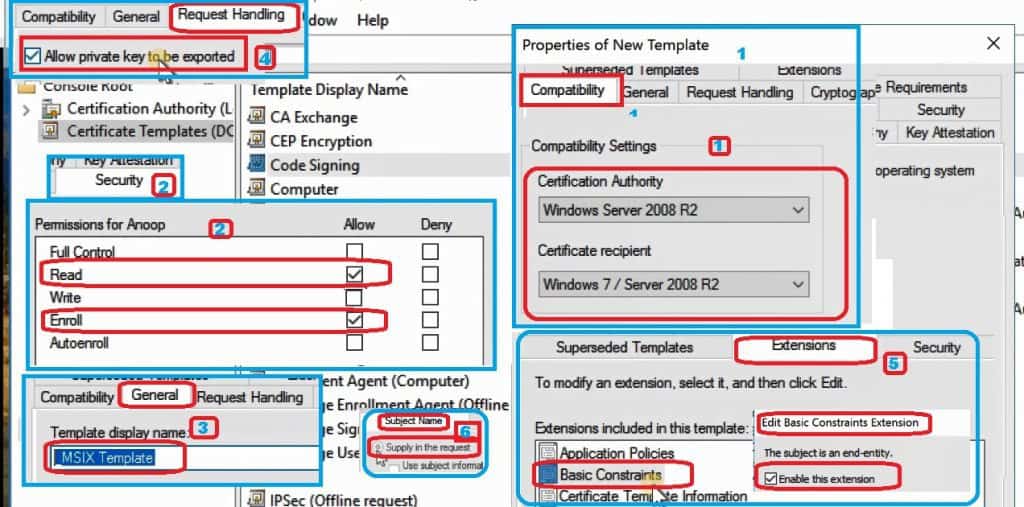
- Select Certificate Templates -> Right Click on Code Signing -> Duplicate Template. This action will launch the new Certificate template properties windows.
- (1) Select the Compatibility tab – 1. Change Certificate Authority to Windows Server 2008 R2 or Higher and 2. Change the Certificate Recipient to Windows 7/Server 2008 R2 or Higher.
- (2) Click on the Security tab and add an AD user or AD group to Allow them to Enroll in the certificate. You might need to consider adding a computer when you use a computer to request certs from CA
- (3) Click on the General tab and provide a good name for this new MSIX signing template.
- (4) Select the Request Handling tab and Check the box to allow the private key to be exported.
- (5) Click on the Extensions tab and 1. select the Application Policies Extension and verify that Code Signing is there or not 2. Click on Basic Constraints & click Edit and check the box to enable this extension.
- (6) Click on the Subject Name ta, select the Supply in the request radio button,n and Click OK on the warning.
- Click OK to finish the new template creation for MSIX signing.
How to Issue Internal PKI Signing Certificate Template for MSIX Application
This section will learn how to issue the MSIX application signing certificate template to the Windows devices or users. I’ve already created a signing certificate template in the above section.
Third step – SCCM MSIX Conversion Process.
The following steps will ensure that your Windows devices or users can request a new MSIX signing the certificate for MSIX package creation and installation. The request for the certificate should be made from the Windows 10 machine, which is explained in the following sections of this post.
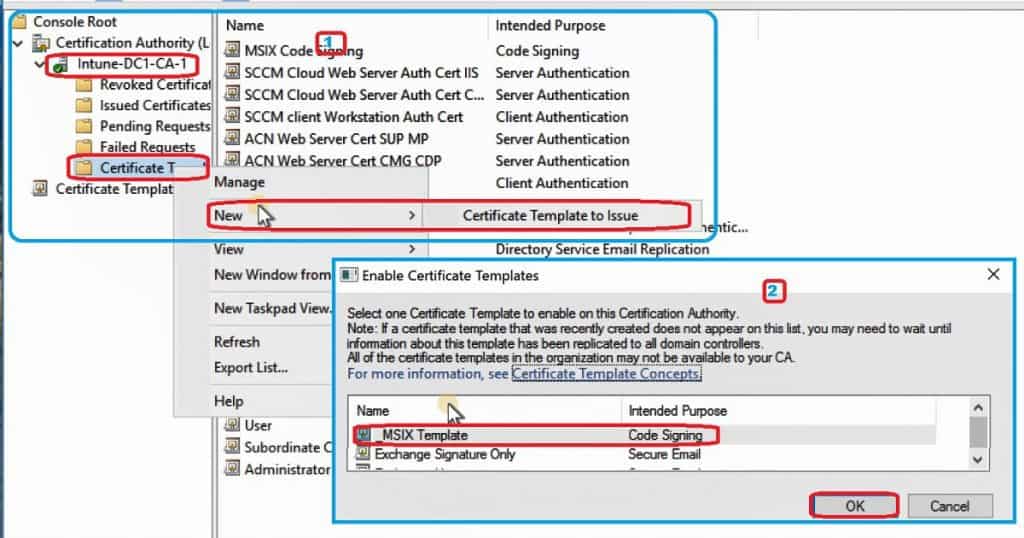
- Log in to the CA server with proper access.
- Launch MMC and add Certificate Authority.
- Click expand Certificate Authority and navigate to {CA Name}, Right Click Certificate Templates, select New and click on Certificate Template to Issue.
- Select the Template Name (_MSIX Template) just created and click OK.
- Now MSIX application signing certificate is available for request.
Request MSIX Application Code Signing Certificate – Windows 10
Now, I have shown you how to create a new signing certificate template for the MSIX application and How to make the signing certificate ready for issuing.
The following steps should be completed from Windows 10 1809 or later devices.
Fourth step – SCCM MSIX Conversion Process.
NOTE – The following steps are a manual way to request for MSIX application signing certificate. This process is used only during the MSI to MSIX conversion process. I recommend using group policy to deploy these certs to Windows 10 machines in a production scenario.
- Login Windows 10 1809 or later devices (Admin rights)
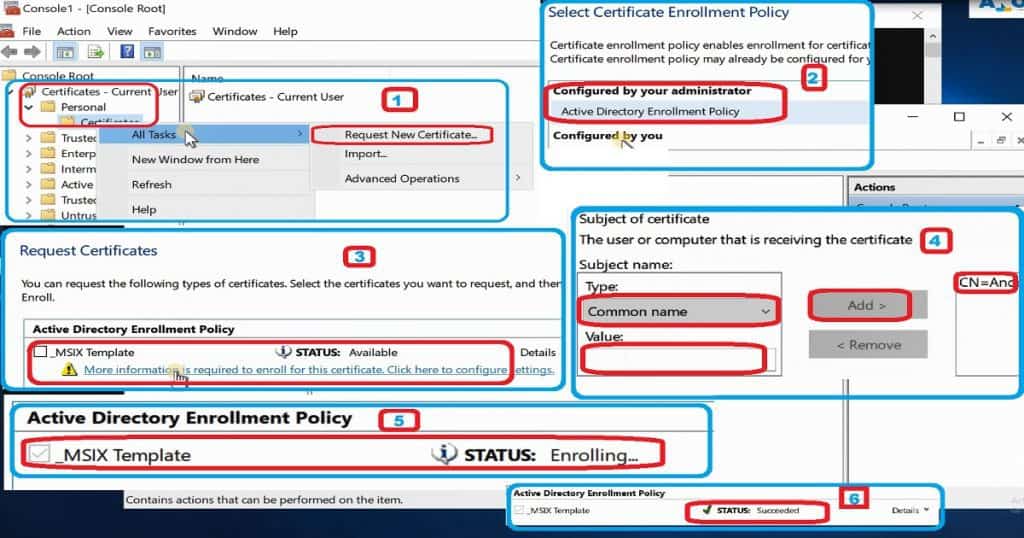
- Launch CertMgr.msc
- (1) Navigate through Current user -> Personal -> Right Click on Certificates -> All Tasks -> Request New Certificate.
- (2) Click Next on the Before You Begin screen and click on ensure Active Directory Enrollment Policy is selected and click Next.
- (3) Click on the link below the _MSIX Code Signing template to configure additional settings.
- (4) Under Subject Name, the type should be Common Name (i.e., Anoop). The Value must be the same as the Publisher value in the SCCM MSIX package conversion Wizard, and click on Add button.
- (4.1) Select _MSIX Signing is selected and click Enroll
- (5) Enrollment in the MSIX code signing certificate will take some time
- (6) completed the MSIX code signing Certificate
Export MSIX Code Signing Certificate to PFX file
Now you know how to request an MSIX code signing certificate. This section will learn how to export the MSIX code signing certificate to the PFX file. The PFX file will be used to sign the MSIX application.
Once the MSIX application is signed with a certificate, it’s almost ready to deploy the MSIX application via SCCM or from the Windows store. The following steps will help you to export the PFX file.
- Login Windows 10 1809 or later devices (Admin rights)
- Launch CertMgr.msc
- Navigate through Current user -> Personal -> Certificate
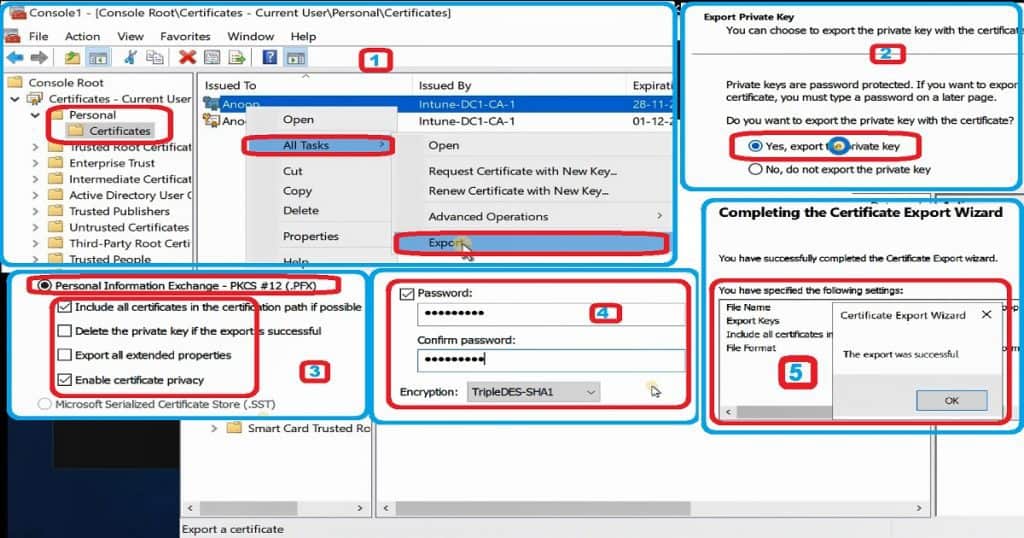
- (1) Right Click the_MSIX -> Click All Tasks -> Click Export
- (2) Click the Next button from the welcome screen. Select ‘Yes, export the private key’ and Click Next.
- (3) I selected all the default configurations for the next windows. Click “Personal Information Exchange” – like “All certificates in the certification path if possible” and “Enable Certificate Privacy” options are selected. Click on the Next button.
- (4) Select the Password checkbox, Enter a password and click on Next.
- (5) Provide a path and filename for the PFX file, click on the Next button twice and click OK.
- The PFX certificate file is ready to sign the MSIX application.
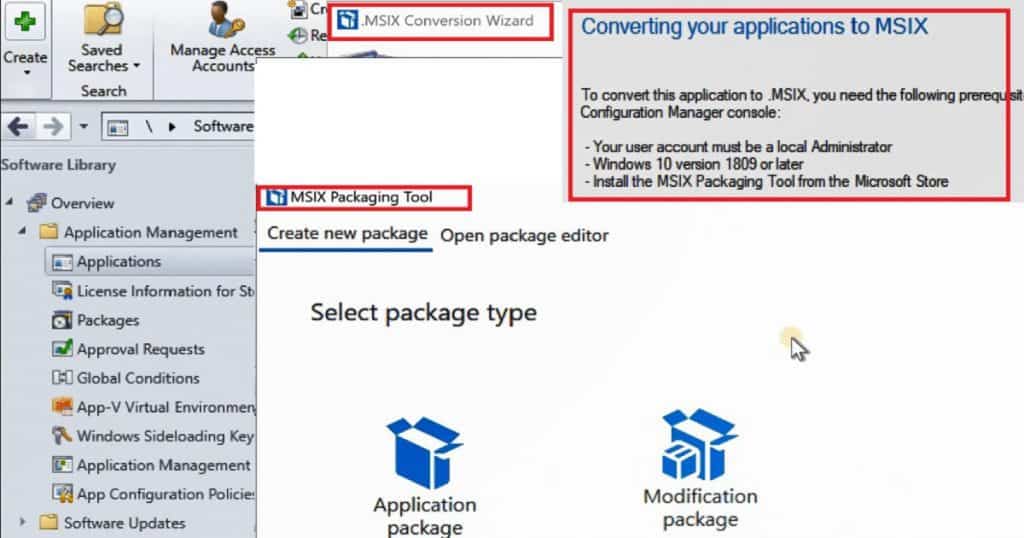
SCCM Console, MSIX Package Conversion Tool, Local Admin, SignTool.exe
Make sure you have all the prerequisites to run the MSIX conversion wizard from the SCCM console. You need to ensure all these before proceeding to the next stage of the SCCM MSI to MSIX conversion process.
Fifth step – SCCM MSIX Conversion Process.
The following are the prerequisite to running the MSIX conversion wizard. While running the conversion wizard, SCCM will install the MSI package on the Windows 10 machine and capture it to convert to the MSIX package.
This activity is done using the MSIX packaging tool in the background.
- Windows 10 1809 or later
- Local Admin access on Windows 10 device
- SCCM 1810 or later console
- MSIX Packaging Tool from the Windows store
- Package Source and Package destination access
- Clean Windows 10 machine without any other app installed
- Install Windows 10 1809 or later SDK or copy SignTool.exe from Windows 10 SDK installed the machine
- Make sure you have a copy of the PFX file with the password (as explained in the above step)
SCCM MSIX Conversion Wizard
Ensure you have all the prerequisites mentioned in the above section before proceeding further. This wizard will use the MSIX packaging tool in the background to convert MSI packages to MSIX.
Sixth step – SCCM MSIX Conversion Process.
SCCM MSIX conversion wizard (1810)cannot handle certificate signing of MSIX applications. So, MSIX code signing should be done as a separate process as a process as I mentioned in the below section.
- Login to Windows 10 1809 or later device with local admin access.
- Launch SCCM 1810 or later console. Launch SCCM console with Administrator privileges.
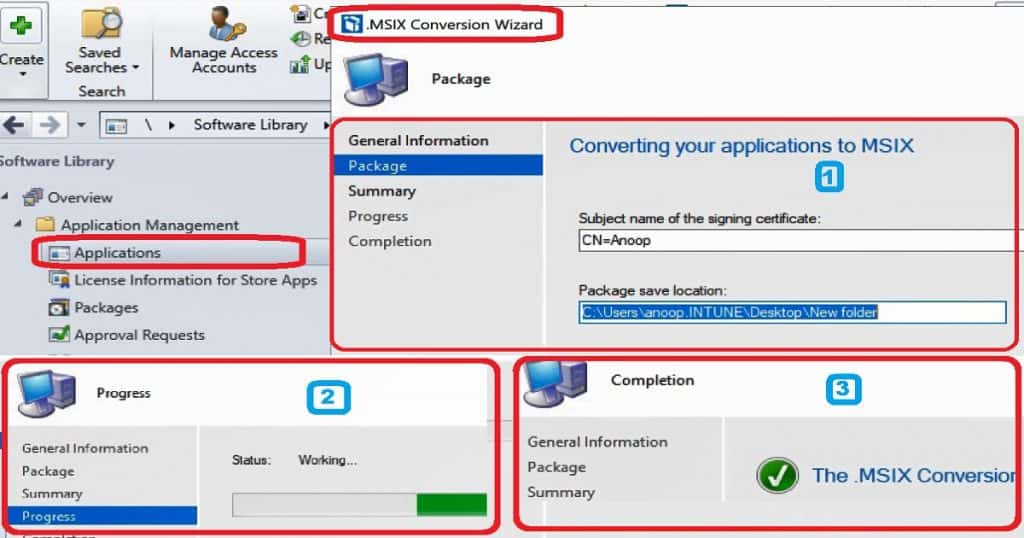
- Navigate to Software Library -> Applications -> Select the MSI application you want to convert to MSIX.
- Click on.MSIX Conversion wizard from the ribbon menu of the SCCM console.
- Click next on the welcome page.MSIX conversion wizard.
- (1) Enter the “Subject Name of the Signing Certificate.” Ensure that you use the same name in the above section, “Request MSIX Application Code Signing Certificate.” In this example, I used Anoop as the subject name.
- (1.1) Use the package Save location to store the.MSIX package after the conversion and click on the Next button to start the conversion process.
- (2) The.MSIX package conversion process may take a longer time depending on the complexity. MSI package and the performance of your infra.
- (3) Finish the.MSIX conversion wizard. Your MSI package got converted.MSIX package and ready for code signing.
Sign MSIX Application with Code Signing Certificate – SignTool.EXE
I have installed Windows 10 SDK on Windows 10 1809 device, and that is the device that I’m going to use to sign the MSIX application with a code signing certificate.
I will be using SignTool.EXE to sign the MSIX package I created in the above section. The following are the parameters for SignTool.exe.
Seventh step – SCCM MSIX Conversion Process.
C:\Program Files (x86)\>signtool.exe /?
sign — Sign files using an embedded signature.
Timestamp — Timestamp previously-signed files.
Verify — Verify embedded or catalog signatures.
catdb — Modify a catalog database.
remove — Remove embedded signature(s) or reduce the size of an
embedded signed file
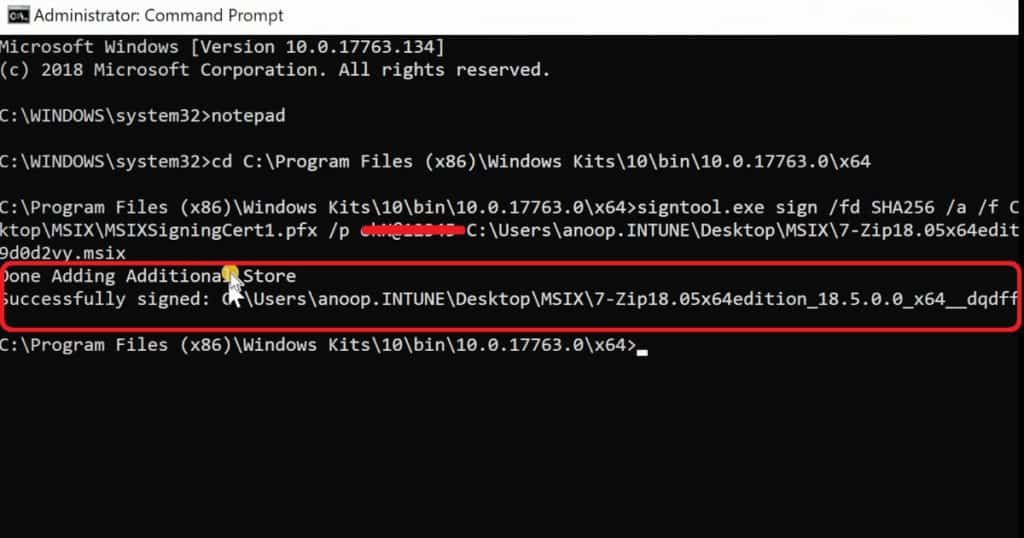
The following is the command I used for signing the MSIX application.
Syntax SignTool sign /fd <Hash Algorithm> /a /f <Path to Certificate>.pfx /p <Your Password> <File path>.MSIX
C:\Program Files (x86)\Windows Kits\10\bin\10.0.17763.0\x64>”signtool.exe sign /fd SHA256 /a /f C:\Users\anoop.INTUNE\Desktop\MSIXSelfSignedCert.pfx /p <Password> <MSIX File Path> \7-Zip18__dqdffe9d0d2vy1.msix”
Done Adding Additional Store
Successfully signed:
Enable SideLoading on Windows 10 Device
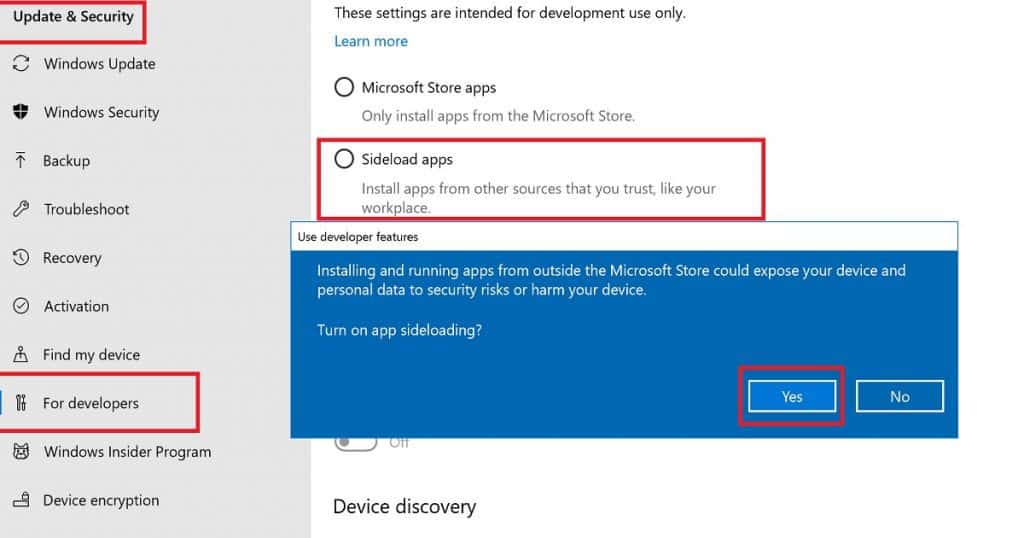
You won’t be able to install the MSIX app unless and until you enable the sideloading options in Windows 10. There are many ways to sideload apps within Windows.
You can use 1. Manual method, 2. Powershell method or 3. Group Policy method to enable sideloading.
The following steps will enable the sideloading on Windows 10 machines with Group Policy.
Eighth step – SCCM MSIX Conversion Process.
- Open the Group Policy Management Editor for a domain-based Group Policy Object (GPO). You will be applying the group policy setting, as specified below, to your selected PCs.
- Click to expand Computer Configuration, Administrative Templates, Windows Components, and App Package Deployment.
- Double-click the Allow all trusted apps to install setting.
- Allow all trusted apps to install the window, click Enabled, and click OK.
I used the manual method to sideload the app in the scenario. You can go to the Settings option and enable sideloading from Updates & Security -> for Developers -> Click on Sideload app option and Click YES on the warning screen.
Install MSIX Application
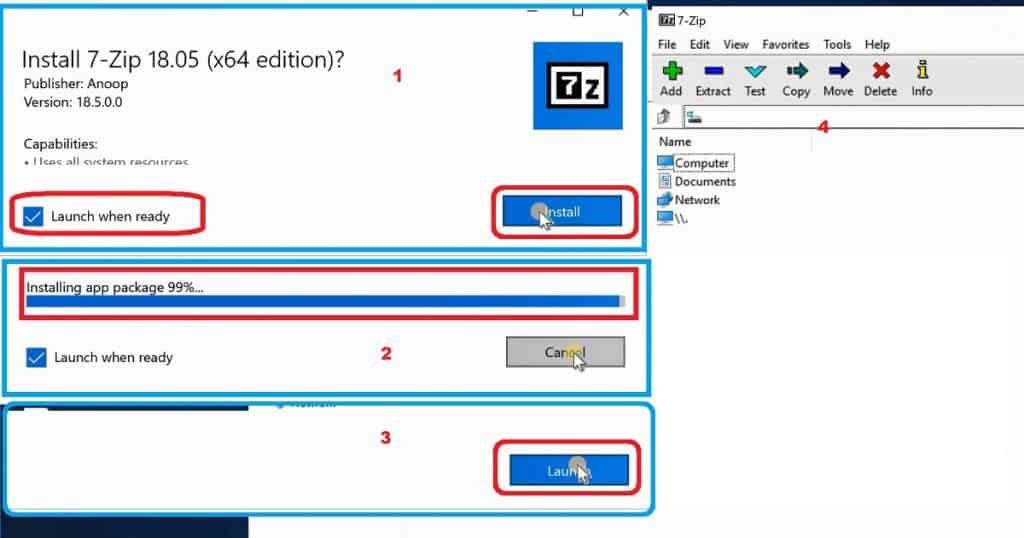
Now you are ready to install the MSIX application on Windows 10 devices. Double click and install it manually on any Windows 10 device.
I will cover how to deploy the MSIX application with SCCM in a future blog post. Last step – SCCM MSIX Conversion Process.
Resources
- MSIX Installation Troubleshooting
- Create Self Signed Cert
- Using SignTool.exe
- MSIX Packaging Tool
- SCCM .MSIX Conversion
- Create Internal PKI APPX code signing certificate
- Robert MSIX Blog Post
- Windows 10 SDK Download
Author
Anoop is Microsoft MVP! He is a Solution Architect in enterprise client management with more than 20 years of experience (calculation done in 2021) in IT. He is a blogger, Speaker, and Local User Group HTMD Community leader. His main focus is on Device Management technologies like SCCM 2012, Current Branch, and Intune. E writes about ConfigMgr, Windows 11, Windows 10, Azure AD, Microsoft Intune, Windows 365, AVD, etc…

Hi – You got me worked out on this new tool. Will be spending this weekend experimenting MSIX conversion and LAPS within the lab.
Thanks – Good write up…
Ram
Glad to know you liked it Ram !
Hi
I tried creating msix package , but I am facing issue with signing the msix package.
Error :
SignTool Error: This file format cannot be signed because it is not recognized.
Can u help me out in this issue?
Thanks in advance
Can you tell me more about the certificate you are using in this scenario please?
I am using a self signed ceertificate
I am using a self signed certificate
A self signed cert from ? Internal PKI ?how did you create self signed cert ?
Did you see any errors in the event logs ?
I guess there is no error with the certificate because when I tried to create msix package from MSIX Packaging tool I used the same certificate and it worked fine
But when I am using sign tool to sign it I am getting the following error irrespective of the application:
Done Adding Additional Store
SignTool Error: This file format cannot be signed because it is not recognized.
SignTool Error: An error occurred while attempting to sign: \7-Zip18.03x64edition_1.0.0.0_x64__v4teb3zypt9er.msix
Number of errors: 1
Do you have the root cert of that pki on that device
Also do you have sideloading enabled for msix manual installation on the device ? **This is not required for some of the insider versions of Windows 10
Ya root cert is present and also sideloading has been enabled
I have no clue .. as you know it’s very difficult to troubleshoot remotely
Hi Anoop
The video and the link that you have provided was very informative.
May i ask i query – if we want to deploy an MSIX package to bulk Windows 10 1809 devices in an enterprise using SCCM or Intune, do we need to make Windows SDK available in those end-user Windows 10 devices ?
Does installation of signed MSIX package need Windows SDK as pre-requisites ? Or, is there any other pre-requisite to install a signed MSIX package (apart from enrolling the certificate and enabling sideloading in the devices via GPO) ?
Hi Anoop
The video and the link that you have provided was very informative
May i ask i query – if we want to deploy an MSIX package to bulk Windows 10 1809 devices in an enterprise using SCCM or Intune, do we need to make Windows SDK available in those end-user Windows 10 devices ?
Does installation of a signed MSIX package need Windows SDK as pre-requisites ? Or, is there any other pre-requisite to install a signed MSIX package (apart from enabling sideloading in the device and enrolling the certificate to the device via GPO) ?