Let’s learn How to Enable Windows Subsystem for Linux Android Sandbox, and Hyper-V on Windows 11 Cloud PC. Linux, Android Windows Subsystems, and Hyper-V specifically provide hardware virtualization. That means each virtual machine runs on virtual hardware.
Hyper-V lets you create virtual hard drives, switches, and many other virtual devices, all of which can be added to virtual machines. Hyper-V is built into Windows as an optional feature, and It is not preinstalled.
Windows Subsystem for Linux and Windows Subsystem for Android also helps IT Admins and Developers to test and run the program/applications compatible with those operating systems. The Windows Sandbox feature also helps IT Admins perform the application packaging process with Cloud PC.
Many of you need to run multiple operating systems as an IT professional or a technology enthusiast. Hyper-V, Sandbox, and other Windows subsystems such as WSL and Windows Subsystem for Android (WSA) let you run multiple operating systems as virtual machines and subsystems on Windows 11 Cloud PC.
It’s not always easy to run virtualization on physical devices, as explained below. There are specific hardware requirements to enable virtualization on Windows 11 physical devices. The Windows 365 Cloud PC comes to the rescue here so that you don’t have to purchase additional hardware to meet the business requirements.
What are Virtualization Options on Windows 11 | Cloud PC?
Windows 11 is the latest released operating system of Microsoft. Windows 11 helps you work how you want and offers you the flexibility of multiple windows. What are Virtualization Options on Windows 11 with Windows 365 Cloud PC?
The following are the general virtualization technologies and subsystems available within Windows 11 core OS. In this post, you will see specific towards Cloud PC.
- Windows Subsystem for Linux (WSL)
- Windows Subsystem for Android (this is required for running Android Apps via the Amazon app store)
- Sandbox
- Hyper-V
The following are the generic hardware requirements to enable the virtualization of physical devices. It can be complex, and you might need to purchase the correct hardware to meet these specific hardware requirements.
The Windows 365 Cloud PC comes with a great helping hand to Develops and IT admins to enable these settings without struggling with physical hardware. You need to purchase Cloud PC, as explained in the linked post.
Enable virtualization support for Each hardware vendor (Dell, Lenovo, Acer, etc.) is different for physical PCs – Enable virtualization on Windows 11 PCs. There are different processes for different vendors.
Enable Virtualization for Windows 365 Cloud PCs
Let’s understand the prerequisites for enabling the Virtualization for Windows 11 and specifically for Windows 365 Cloud PCs. The following is the prerequisite to Enable Nested Virtualization for Cloud PCs.
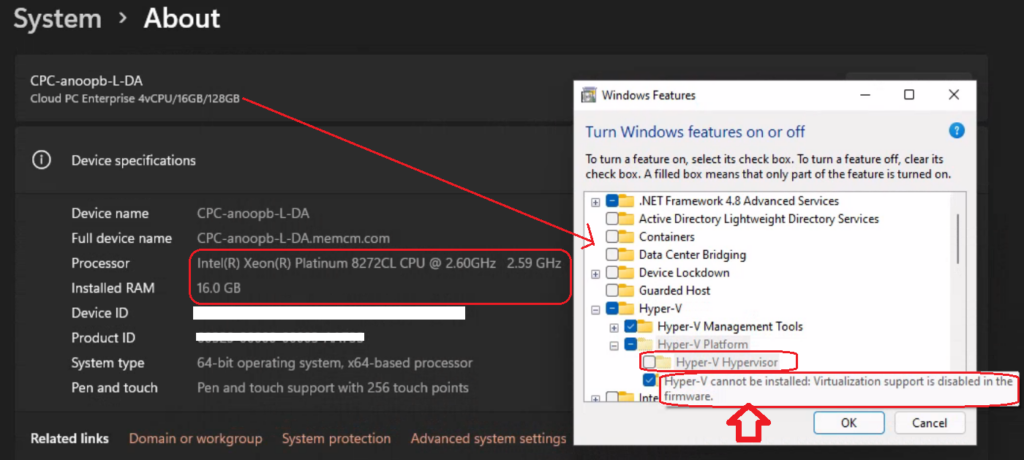
You have to use Windows 365 Enterprise with 8 vCPU, 32 GB SKU to enable the nested virtualization feature for Cloud PC. The first screenshot (example) below is the Cloud PC SKU where virtualization support is disabled in the firmware.
You won’t be able to enable the nested virtualization or virtualization if the hardware (processor and firmware?) support is not there. This is applicable for Windows 11 physical devices as well.
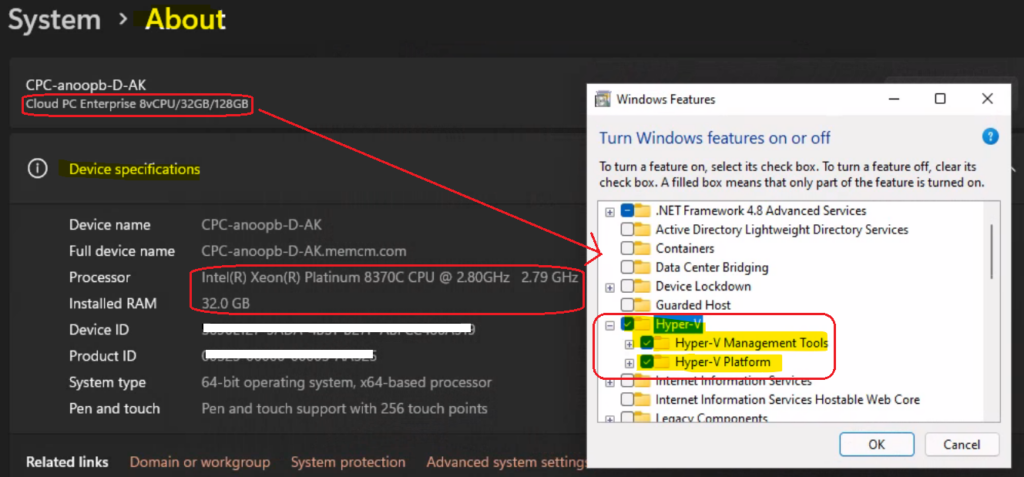
In the following Cloud PC enterprise SKU, you can enable the hyper-v because the firmware and processor support virtualization. This is applicable for Linux and Android subsystems installations as well.
NOTE! – As mentioned in the above section, I couldn’t enable Windows Subsystem for Android to work with the Windows 365 Enterprise with 8 vCPU, 32 GB, GB SKU because of the storage device?
Enable Windows Subsystem for Android | Amazon App Store
Windows Subsystem for Android is required for running Android Apps on Windows 11 PCs using Amazon App Store. The Windows 11 PC or Cloud PC must meet the following requirements to enable the Windows subsystem for Android apart from the generic hardware configs mentioned in the above link.
- RAM – 8 GB (minimum) and 16 GB (recommended)
- Storage Type – Solid State Drive (SSD)
- Processor – Intel Core i3 8th Gen (minimum) or above | AMD Ryzen 3000 (minimum) or above | Qualcomm Snapdragon 8c (minimum) or above
- Processor Architecture – x64 or ARM64
You need to install the following application from Microsoft Store to enable Windows Subsystem for Android.
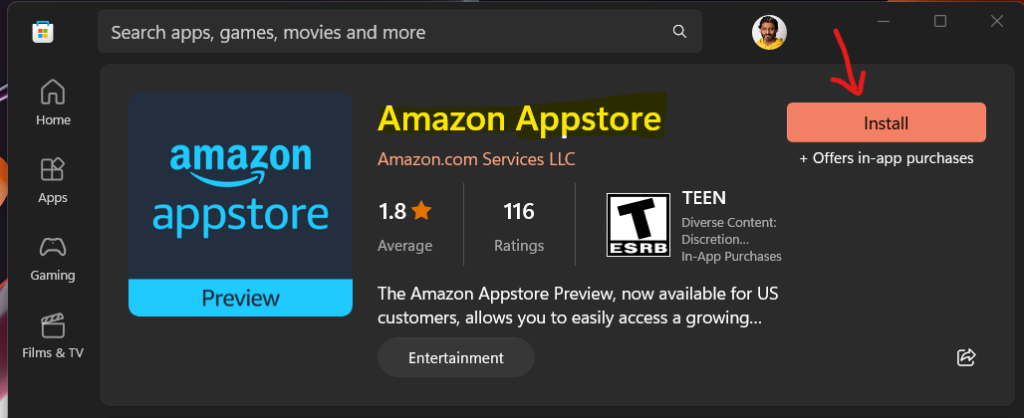
Install Amazon AppStore app from -> ms-windows-store://pdp/?productid=9NJHK44TTKSX
You can use the above link to install and enable Windows Subsystem for Android and Amazon App Store on Windows 11 PCs. While writing this post, the Amazon App store is available only to US customers.
You need to go through 3 step process to enable the Windows Subsystem for Android.

When I launched Amazon Appstore for the second time, it gave me the download option. The step changed to the download option, and it ended up with the error 0x80072EE2 (The operation timed out).

I couldn’t get this enabled for Windows 365 Cloud PC that I have purchased with Windows 365 Enterprise 8 vCPU, 32 GB, 128 GB. When I tried to install the Amazon app store on Windows 11 Cloud PC, ended up with the following error.
Amazon Appstore App Installation Error on Windows 365 Cloud PC – Your Storage device isn’t supported for this product.
I don’t know whether this problem is because Cloud PC doesn’t use an SSD hard disk?. I think that is the prerequisite specific to Windows Subsystem for Android.

Enable Linux Subsystem for Linux on Windows 11 Windows 365 Cloud PC
Let’s enable Linux Subsystem for Linux on Windows 11 Windows 365 Cloud PCs. You need to ensure that virtualization support is enabled on firmware and CPU processor support. The Windows 11 Cloud PC I purchased a few days back has got all this virtualization support.
Let’s check how to enable Linux Subsystem WSL for Windows 11 Windows 365 Cloud PC. Follow the steps below to enable WSL.
- Right-click on the start button.
- Select Windows Terminal or Terminal or PowerShell option.

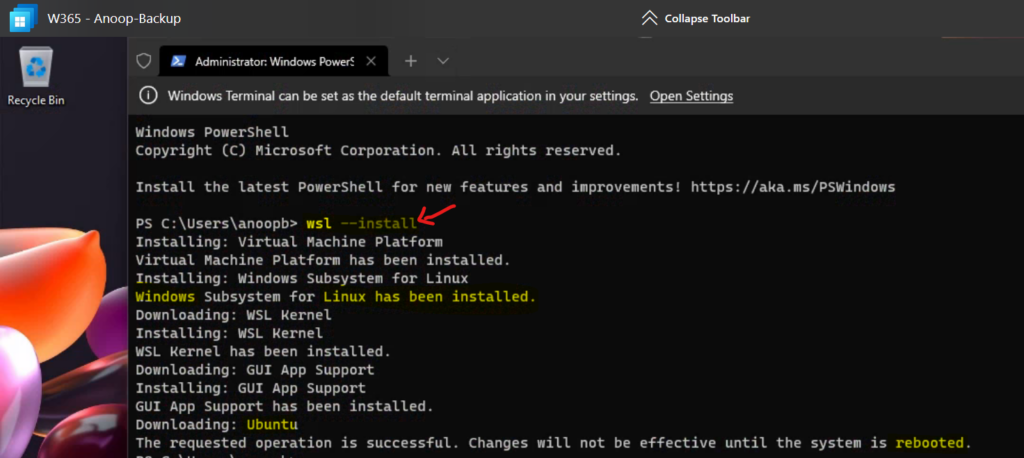
Run the following command to enable WSL Linux Subsystem on Windows 365 Cloud PC.
wsl --installThe following are the steps performed as part of the Windows 11 Linux Subsystem (WSL) process on Windows 365 Cloud PC.
Installing: Virtual Machine Platform
Virtual Machine Platform has been installed.
Installing: Windows Subsystem for Linux
Windows Subsystem for Linux has been installed.
Downloading: WSL Kernel
Installing: WSL Kernel
WSL Kernel has been installed.
Downloading: GUI App Support
Installing: GUI App Support
GUI App Support has been installed.
Downloading: Ubuntu
The WSL is enabled for Windows 365 Cloud PC. These changes will not be effective until the system is rebooted. You need to restart the Windows 11 Cloud PC before using Windows Linux Subsystem (WLS).
Linux distribution
The default Linux distribution installed will be Ubuntu. You can change it using the following command-line option. You can also use the Microsoft Store application to install Linux distribution.
wsl --install -d <Distribution Name>After the restart, the Ubuntu screen popped up with the option to create a new user name and password. I have created one using the standard Linux format to adduser command. The Linux command List worked fine from Windows 365 Cloud PC.
ls -al
What is Hyper-v or Hypervisor
Hyper-v or Hypervisor is Microsoft’s virtualization platform. A computer with Hyper-v is a Host computer and allows guest operating system access to virtual operating platforms.
Hyper-v provides features like Resource allocation, Live migration, replication, etc. If you want to use Hypervisor on your computer, you should enable Hyper-v.
Let’s see how to Enable Hyper-v in windows feature in the below section of this post. It’s recommended to check Hyper-V’s system requirements before proceeding. Hyper-V can be enabled in many ways, including the control panel, PowerShell, command prompt, or Deployment Imaging Servicing and Management tool (DISM).
Enable Hyper-V in Windows Features on Windows 11 Cloud PC
Let’s follow the steps to turn on the Hyper-V feature from Control Panel. If you like to use virtual devices, it is good to learn how to use Hyper-v on Windows11 (Cloud PC).
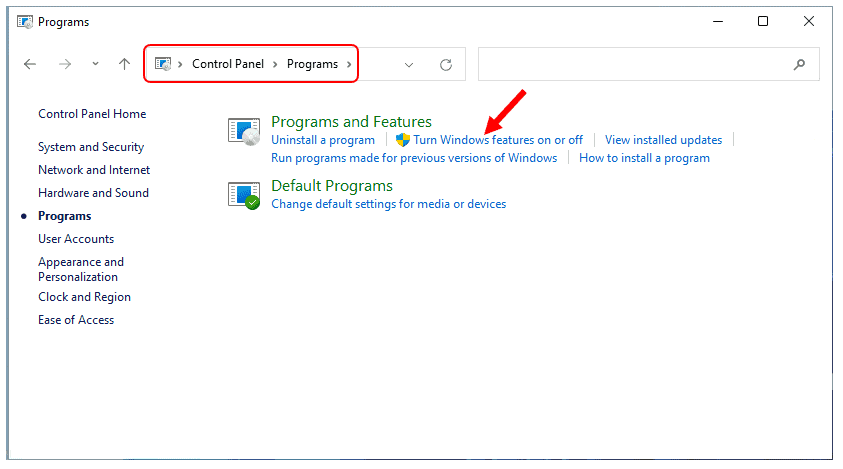
On Windows 11 device, Open Control Panel and click on the Programs and Features. Click on the Turn Windows features on or off.
You must be logged in as an Administrator on the computer.
Select Hyper-V, Hyper-V Management Tools, and the Hyper-V Platform check box and click OK on Windows features.
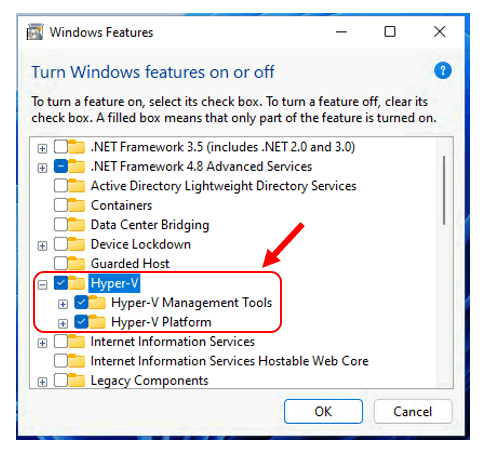
Once completed, Please wait. Windows Features started searching and installing the required components.

When the installation has been completed, you are prompted to restart your computer.

Enable Hyper-V using PowerShell in Windows 11
Let’s check how to enable Hyper-V using PowerShell
- Open Powershell as Administrator.
- Type the following command to Enable Hyper-V and press Enter.
Enable-WindowsOptionalFeature -Online -FeatureName Microsoft-Hyper-V -AllNote – When the installation has been completed, you need to restart your Windows 11 Device (Cloud PC) to apply the changes.

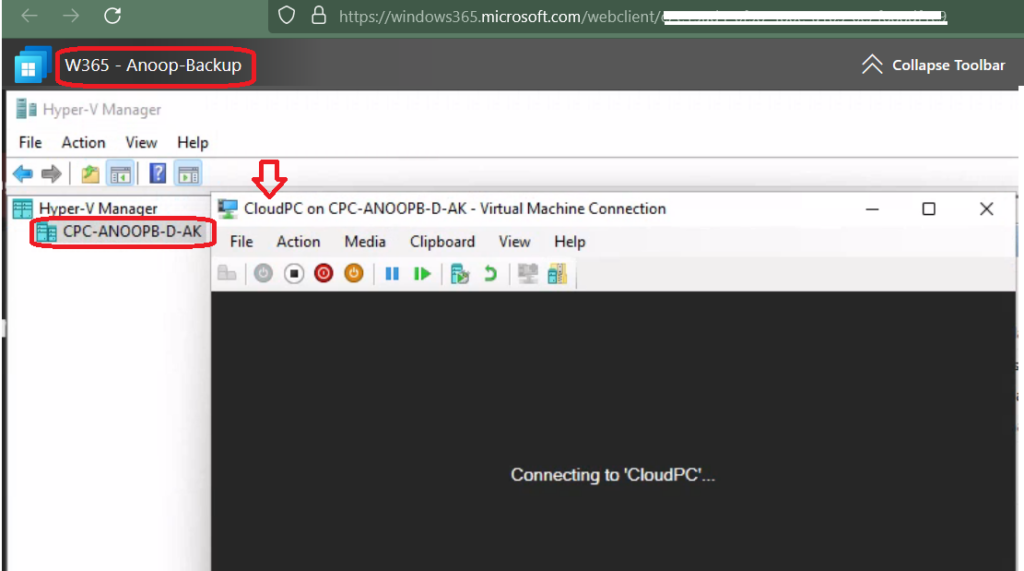
The Hyper-V installation worked OK for Windows 11 Cloud PC. I was able to create and run the Hyper-V VM inside the Cloud PC.
Enable Hyper-V using DISM in Windows 11
The Deployment Image Servicing and Management tool (DISM) helps configure Windows and Windows images. DISM can enable Windows features while the operating system is running.
- To enable the Hyper-V role using DISM, Open PowerShell, or Command prompt as Administrator.
- Type the following command and press Enter.
DISM /Online /Enable-Feature /All /FeatureName:Microsoft-Hyper-VNote – When the installation has been completed, you need to restart your Windows 11 computer (Windows 365 Cloud PC) to apply the changes.

Enable Windows Sandbox on Windows 11 PC | Cloud PC
Let’s enable Windows Sandbox on Windows 11 Cloud PC using Control Panel and PowerShell. To enable the Sandbox feature for Windows 11, you can use the steps explained in the above section to enable Hyper-V using Control Panel.
Read More – How To Use Windows Sandbox To Create MSI Packages.
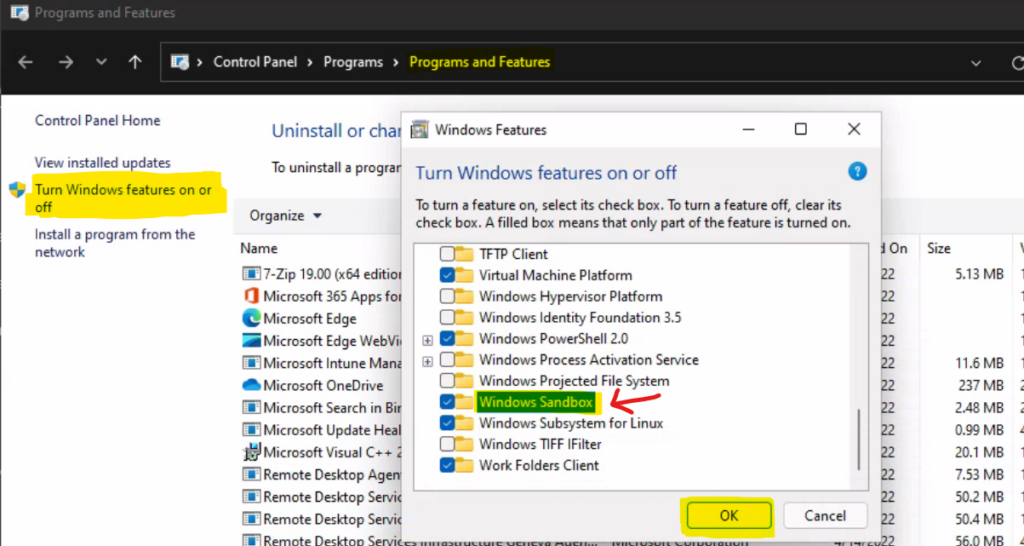
You could run the following PowerShell command from Windows Terminal or Terminal application to enable the Sandbox on Windows 365 Cloud PC or physical devices if you meant the generic requirement for the hypervisor.
To enable Sandbox using PowerShell, open PowerShell as Administrator and run the following command from Windows 11 or Windows 10 virtualization enabled Cloud PC.
Enable-WindowsOptionalFeature -FeatureName "Containers-DisposableClientVM" -All -OnlineNOTE! – If you’re using a physical machine to enable Sandbox, make sure virtualization capabilities are enabled in the UEFI, as explained in the above section.

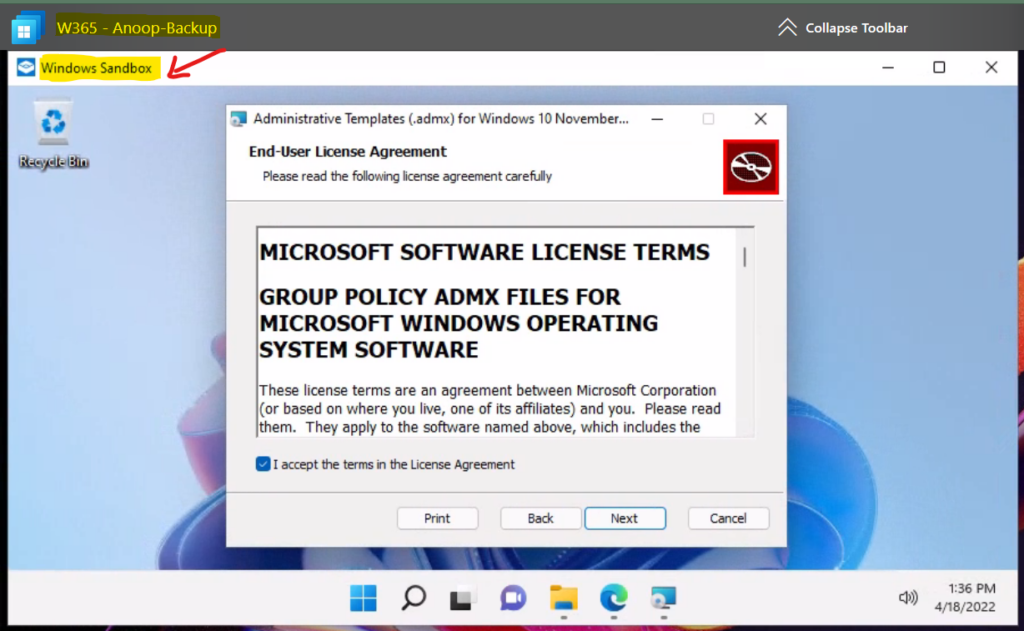
The Windows Sandbox worked fine with Windows 365 Cloud PC. This is another helpful use case for Cloud PC in the enterprise world where you want to capture the state and install MSI or any other apps as part of the packaging process.
Results | Conclusion
After successful installation, the Hyper-V allows users to run virtual machines on Windows 11. Open Hyper-V Manager from the Start menu and start creating Virtual Machines.
The Linux command LIST worked fine, as explained in the above section. So, the Windows Subsystem for Linux (WSL) worked fine.
The Windows Sandbox worked fine with Windows 365 Cloud PC. I installed the MSI package on the isolated Windows Sandbox running inside the Cloud PC.
The only issue I found with Cloud PC is Windows Subsystem for Android and this is because of the storage device attached to Cloud PC. It seems Cloud PC doesn’t have SSD storage attached to it.

Authors
Anoop C Nair is Microsoft MVP! He is a Device Management Admin with more than 20 years of experience (calculation done in 2021) in IT. He is Blogger, Speaker, and Local User Group HTMD Community leader. His main focus is on Device Management technologies like SCCM 2012, Current Branch, and Intune. He writes about ConfigMgr, Windows 11, Windows 10, Azure AD, Microsoft Intune, Windows 365, AVD, etc.

