Let’s learn how to reset network adapters in Windows 11. A network adapter is an internal component of a computer that allows one to communicate over a network with another computer. It is the only component in the computer connected to the Internet.
The Internet is an essential media that is used to communicate with each other. The Internet helps people to connect people to the world. But there are many problems affecting Internet connections.
PCs face many network problems, including high CPU Usage, High Bandwidth usage, Intermittent Network Problems, connection issues, etc. Fortunately, Network Adaptors can be easily reset, and PC network problems can be resolved.
The Network reset will reinstall all your network adaptors on your PC. The reset option will resolve all the connectivity issues quickly. This blog post will help you to understand Reset Network Adaptors in Windows 11 PC.
What are the Advantages of Reset Network Adapters in Windows 11?
Resetting Network Adapters is an important factor. A Network Adaptor is an important component, and its Smooth functioning is essential. The following are the Advantages of resetting network Adapters in Windows 11.
1. It helps to resolve network issues
2. It controls malware infections
3. It reset the outdated drivers
4. Used to reset misconfigured settings
Reset Network Adapters in Windows 11
Different Methods can easily reset Network Adapters. Users can choose any method according to their preferences. There are 2 methods available for resetting the Network Adapter in Windows 11.
| Different Methods for Resetting Network Adaptors |
|---|
| Reset Network Adapters in Windows 11 Using Settings |
| Reset Network Adapters using Command Prompt |
1. Reset Network Adapters in Windows 11 using Settings
Network Adapters can be easily Reset Via the Settings Application, which can be easily accessed from the Start Menu. You can also access the Settings Application through Shortcut (Win +I). Here, I show accessing Setting via the Start Menu.
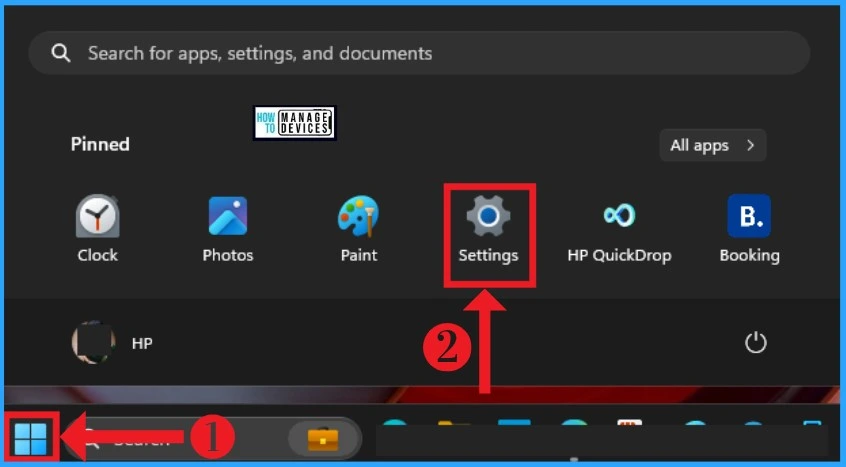
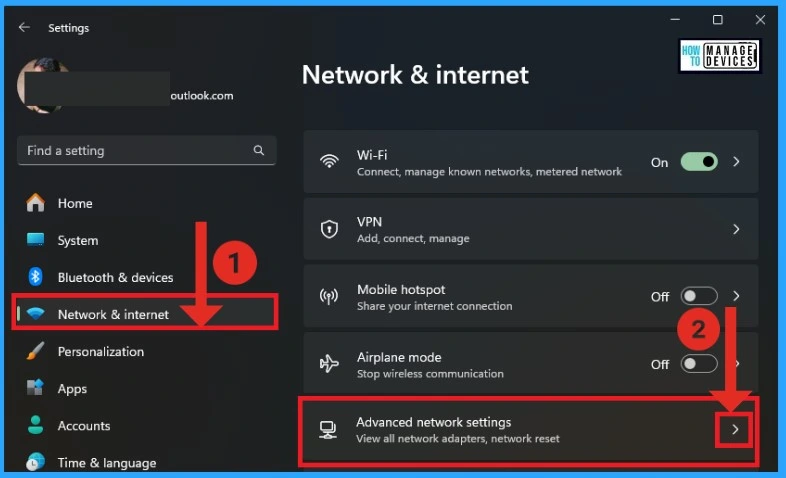
After selecting Settings Application from the Start Menu, Select Network & Internet settings from the Left side of the Settings Application. Then, Select Advanced Network Settings from Network & Internet.
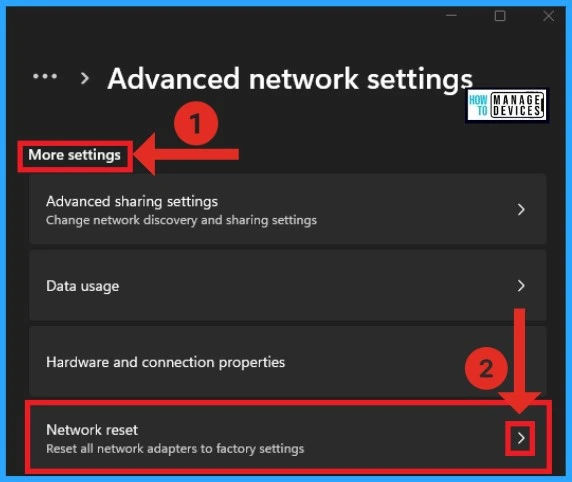
The Advanced Network Settings help users view all network adapters on their Windows PCs. In More Settings of Advanced Network, Choose Network Reset. This option allows the reset of all network adapters to factory settings.
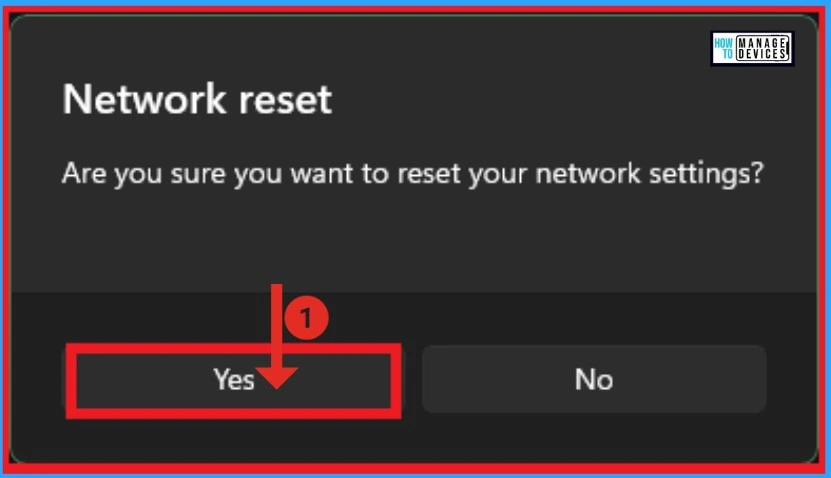
A new window will appear after selecting the Network reset option from the above window. It will show a message like “Are you sure you want to reset your network settings? “. Click on the Yes button from this window for Resetting Network Adaptors.
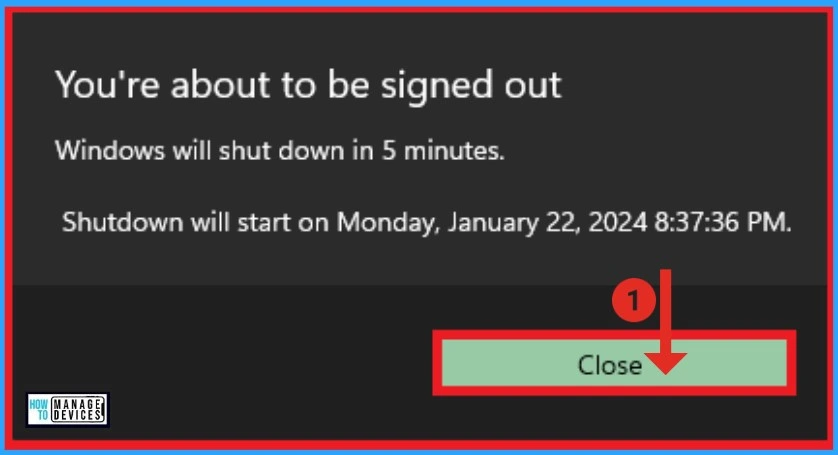
After Clicking on the Yes button, another Window will appear. It says, ” You are about to be signed out. ” Your Windows will shut down in 5 minutes. This is an automatic process; the reset process only completes after shutdown. This window also shows your system’s Shutdown date and time.
2. Reset Network Adapters using Command Prompt
Command Prompt can easily reset Network Adapters. It is the second method of resetting network adaptors. You can open Windows Terminal or Windows PowerShell for Command Prompt.
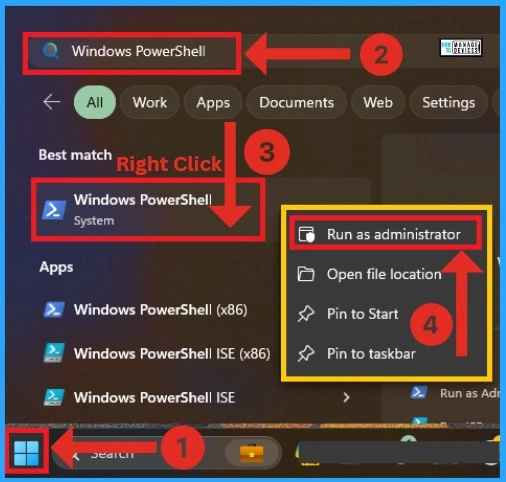
- Click on the Start Button
- Search Windows Powershell
- Right Click on the Windows Powershell
- Click on Run as Administrator from the context menu
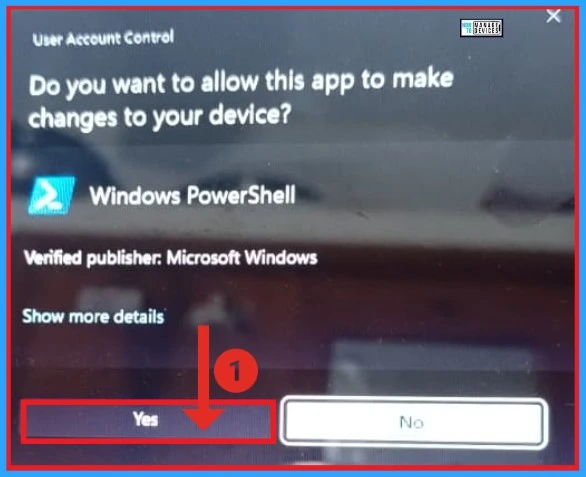
A window on your PC will appear after clicking the Run as Administrator option. A User Account Control window asks, ” Do you want to allow this app to change your device?”. You can click on the Yes option to open Windows PowerShell. The PowerShell will make changes to your device.
After that, Windows PowerShell will open, and you can give commands as Administrator. In the Windows PowerShell, type netsh winsock reset and Enter. You can see the message as Successfully reset the Winsock Catalog. After that, you must restart your computer to complete the reset.
Note: – netsh winsock reset ( This command is used to reset Winsock Catalog).

We are on WhatsApp. To get the latest step-by-step guides and news updates, Join our Channel. Click here –HTMD WhatsApp.
Author
Gopika S Nair is a computer enthusiast. She loves writing on Windows 11 and related technologies. She is here to share quick tips and tricks with Windows 11 or Windows 10 users. She is Post Graduate Diploma Holder in Computer Science.

