
The introduction of Apple’s new iPhone 14 and iPhone 14 Pro are sure to result in many iPhone owners upgrading to the new models. When upgrading to a new iPhone using iCloud — an easy and efficient method — there are a few steps you can take upfront to ensure the process completes properly, and you don’t end up with applications and data you don’t want on the new handset.
How to prepare to migrate to a new iPhone
Delete unnecessary applications
Now is a perfect time to perform some basic cleanup. Review the installed applications and programs on your current iPhone and ask yourself if you really need each of those programs. If you’re like me, you’ll find several previously installed programs that you thought you were going to use often and didn’t.
SEE: iPhone 14 cheat sheet: Everything to know about Apple’s 2022 flagship phones (TechRepublic)
Each installed program takes up storage and consumes processor cycles in the form of background app refresh activity, saps energy by tracking your location and even eats into your data plan if cellular connectivity is enabled to assist the app in tracking you. Don’t transfer these unnecessary programs that can consume needed storage, data and battery life. Remove them before migrating to the new device.
Confirm settings
Because settings and user preferences typically transfer during a migration from an old to a new iPhone, now is also a great time to review settings and preferences. Specifically, review Background App Refresh, Location Services and Cellular settings before beginning a migration to a new iPhone.
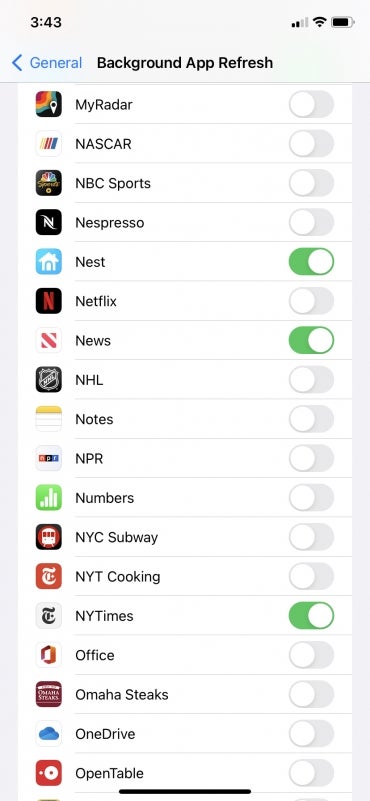
To review and adjust Background App Refresh settings — which dictate which programs can check for and download updated content in the background when connected to Wi-Fi or cellular networks — tap Settings then General and select Background App Refresh.
Should you choose, you can disable the option for all installed programs by sliding the master Background App Refresh radio button to disabled. But odds are there are specific programs, such as news and weather apps, you wish to keep receiving such updates. Scroll through the list (Figure A), and enable and disable applications as you prefer.
Figure A
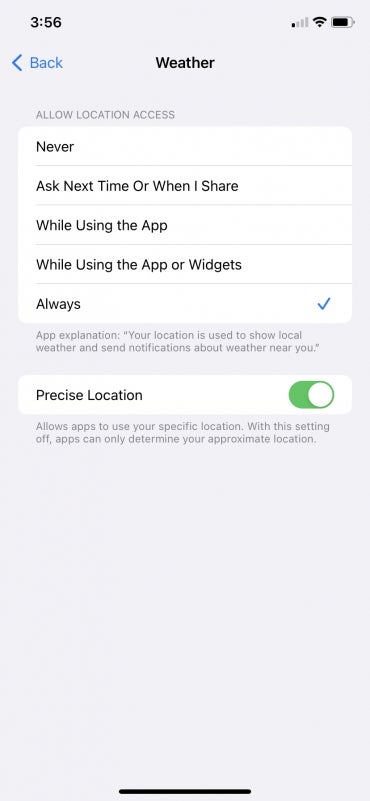
To review and adjust Location Services settings — which use Bluetooth, cellular, GPS and Wi-Fi hotspot infrastructure to determine, track and report your approximate location — tap Settings then Privacy & Security and select Location Services. Should you choose, you can opt to disable Location Services outright by disabling its radio button.
Because Location Services can assist tracking your device, should it become lost, and provide applications with location information needed to assist programs in working more effectively, it’s likely best to review each application’s settings.
Options include configuring an application to Never Use Location Services, using location settings While Using The App and Ask Next Time Or When I Share (Figure B). Another choice, to be used with discretion since it enables an app to always use location services, is Always.
Figure B
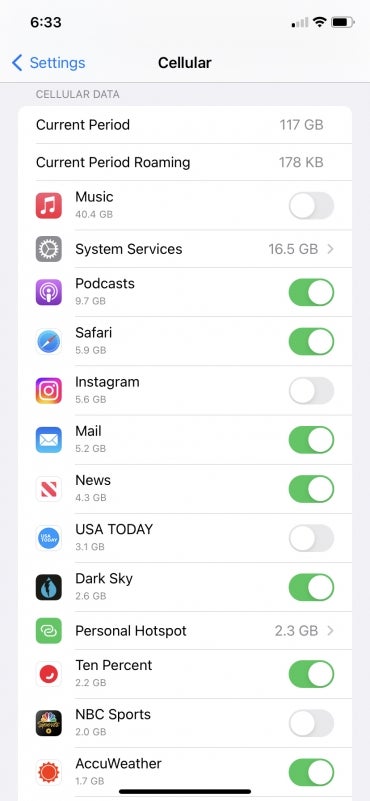
To review and adjust Cellular settings — which determine whether an installed program can use cellular data network connections (which consumes data on your service plan) to check for updates and download information when connected only to cellular networks — tap Settings then tap Cellular.
Under the Cellular Data heading, as shown in Figure C, enable and disable individual application settings as you need.
Figure C
Review account storage
When backing up an iPhone using iCloud, Apple doesn’t automatically delete corresponding data previously backed up to iCloud when you delete a corresponding application. That’s a good thing, as you might wish to reload the application and restore the backed-up data later. In other cases, you may never plan on using an application again.
Preparing a new iPhone migration is an appropriate occasion to also review the iPhone information backed up to the cloud and available for reinstallation and help eliminate potential data that could needlessly be migrated to a new device. If nothing else, deleting no longer needed application data from a previous iPhone iCloud backup frees more space for backing up, migrating and restoring the information you do need.
To review iPhone application data previously backed up to iCloud, open Settings, tap your Apple ID and then iCloud and select Manage Account Storage. Once the device loads the application backup information, as shown in Figure D, you can scroll through the list and confirm which apps are storing how much data.
Figure D
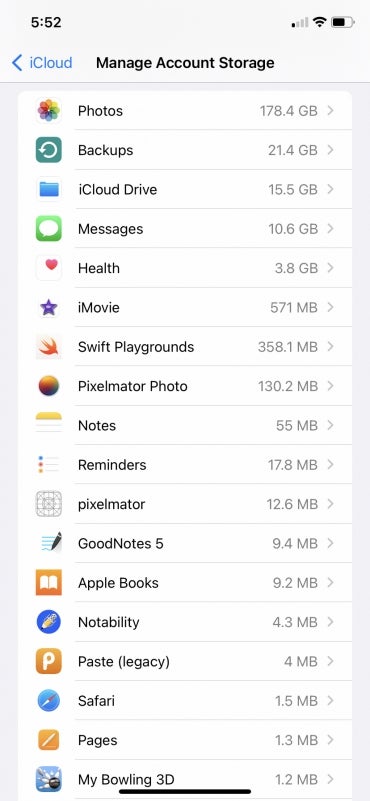
When spotting application data you no longer require, tap that application’s entry. Once the app’s data page loads, you can tap Delete Data, as shown in Figure E, then confirm the action to remove that information from your iCloud backup and free corresponding storage.
Figure E

You might be surprised by this review. I certainly was when preparing to migrate to a new iPhone this week. Application data from years ago, including for apps I haven’t used since before the pandemic and no longer required, remained within my iCloud backup.
Perform an iCloud backup
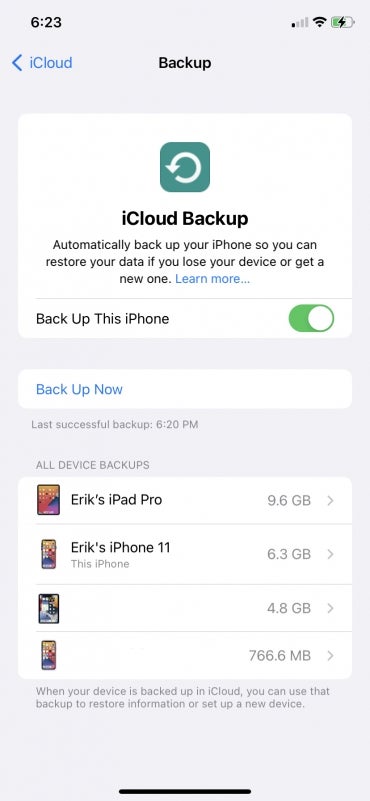
Last, before breaking the tape on the replacement iPhone and beginning the migration to the new device, first perform a final iCloud backup on the old handset. To complete a fresh backup, open Settings, tap your Apple ID, select iCloud and then iCloud Backup. The iCloud Backup screen will display, as shown in Figure F.
Figure F
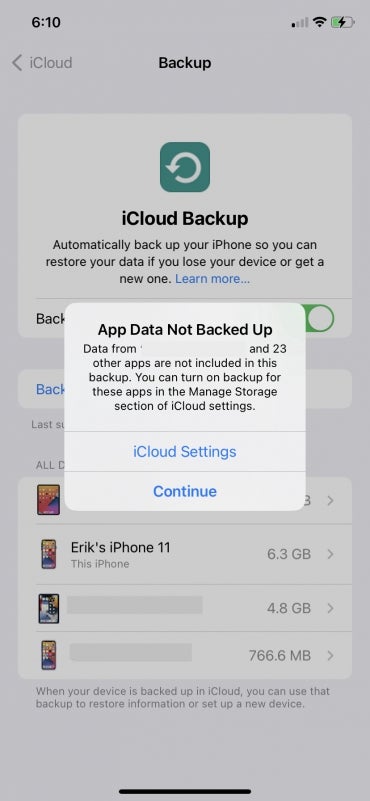
Tap Back Up Now. iOS will warn you if it detects application data and information not included within previous iCloud backups and prompt you to select iCloud Settings, as shown in Figure G, to review and correct any errors.
Figure G
Once you’ve confirmed data you wish to include within the iCloud Backup is set, tap the Back Up Now button.
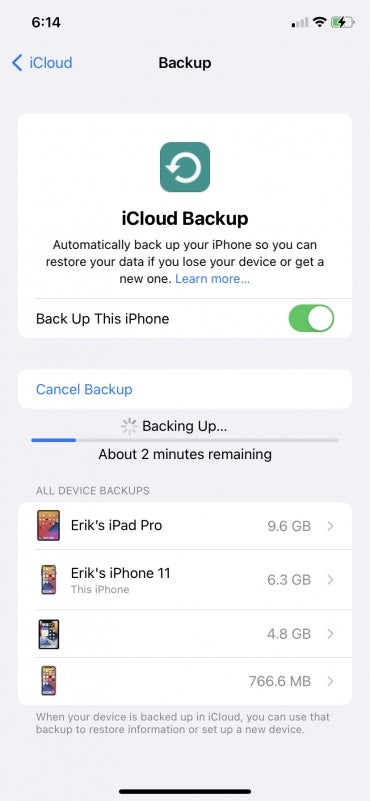
Alternatively, from the previous menu you can simply tap the Continue option. The iPhone will then perform the backup, which iOS will track using a traditional progress bar, as shown in Figure H.
Figure H
With applications, settings and a fresh backup confirmed, you can begin migrating to the new iPhone. Completing the earlier steps will help ensure only the information you want and need is restored to the new device.