Let’s learn how to set up Windows Autopatch using the step-by-step Implementation Setup Guide. Windows Autopatch is generally available for customers with Windows Enterprise E3 and E5 licenses. It applies updates to your Windows operating system and configures automatic updates for Office applications.
Windows Autopatch is a cloud service that automates Windows, Microsoft 365 Apps for enterprise, Microsoft Edge, and Microsoft Teams updates to improve security and productivity across your organization.
Microsoft will continue to release updates on the second Tuesday of every month, and now Autopatch helps streamline updating operations and create new opportunities for IT pros. More customizations are added to Windows Autopatch – Customize Windows Update Autopatch Settings for Automatic Patch.
Once you’ve enrolled devices into Autopatch, the service does most of the work. But through the Autopatch blade in Intune MEM Portal, you can fine-tune ring membership, access the service health dashboard, generate reports, and file support requests. The reporting capabilities will grow more robust as the service matures.
Read More on Windows Autopatch Quality Updates Report In Intune MEM Portal -> Windows Autopatch Quality Updates Report In Intune MEM Portal. Checkout the new Intune training course – Intune Training Course 2023.
Video Tutorial on Windows Autopatch Decoded
Let’s have a deep dive video Tutorial on Windows Autopatch Decoded to get more details. In this video, let’s discuss about Windows Autopatch Decoded | Azure AD Groups – Configuration Policies created and managed by Service.
Prerequisites – Windows Autopatch
Windows Autopatch requires Windows 10/11 Enterprise E3 (or higher) to be assigned to your users. Additionally, Azure Active Directory Premium and Microsoft Intune are required.
Windows Autopatch is only available for the following products.
- Microsoft 365 E3
- Microsoft 365 E5
- Windows 10/11 Enterprise E3
- Windows 10/11 Enterprise E5
- Windows 10/11 Enterprise VDA
Note – Windows Autopatch is offered as a feature to Windows 10/11 Enterprise E3 at no additional cost.

Windows 10/11 Enterprise E3 builds on Windows 10/11 Pro by delivering enterprise-grade security, management, and control features for large or mid-sized companies, or any size business that processes sensitive data operates in regulated industries, or develops intellectual property that must remain secure.
The increased security helps protect your sensitive data, identities, and devices from cybersecurity threats, and provides enhanced deployment and software and device management options.
- Connectivity – All Windows Autopatch devices require connectivity to multiple Microsoft service endpoints from the corporate network. For the full list of required IPs and URLs, see Configure your network.
- Supported Operating System – The Windows 64-bit editions are required for Windows Autopatch, Windows 10/11 Pro, Windows 10/11 Enterprise, and Windows 10/11 Pro for Workstations.
- Hardware requirements: If your corporate-owned devices are running a current. The supported version of Windows 10 or Windows 11, can be enrolled in Windows Autopatch. Bring-your-own-device (BYOD) scenarios are not currently supported.
- Management requirements: Your devices must be managed with either Microsoft Intune or Configuration Manager co-management.
- Identity requirements: User accounts must be managed by Azure Active Directory or Hybrid Azure Active Directory Join.
Bonus Step – Activate Trial License
However, you can obtain a trial license for Microsoft 365 E5 if you want to proceed with Windows Autopatch Implementation. This trial will provide you with 25 licenses for 1 month. Follow the steps below for instructions on how to obtain this trial:
- Navigate to the Microsoft 365 admin center and sign in with your tenant
- Select Billing and then Purchase services
- In the search bar, look for Microsoft 365 E5 and select Details under that product
- Select Start free trial and complete the validation prompts
- Select Try now and then Continue.
- To validate that you have successfully redeemed the Microsoft 365 E5 trial, navigate to the Microsoft 365 admin center > Billing > Licenses.
Is Windows Autopatch Missing In Intue MEM Portal?
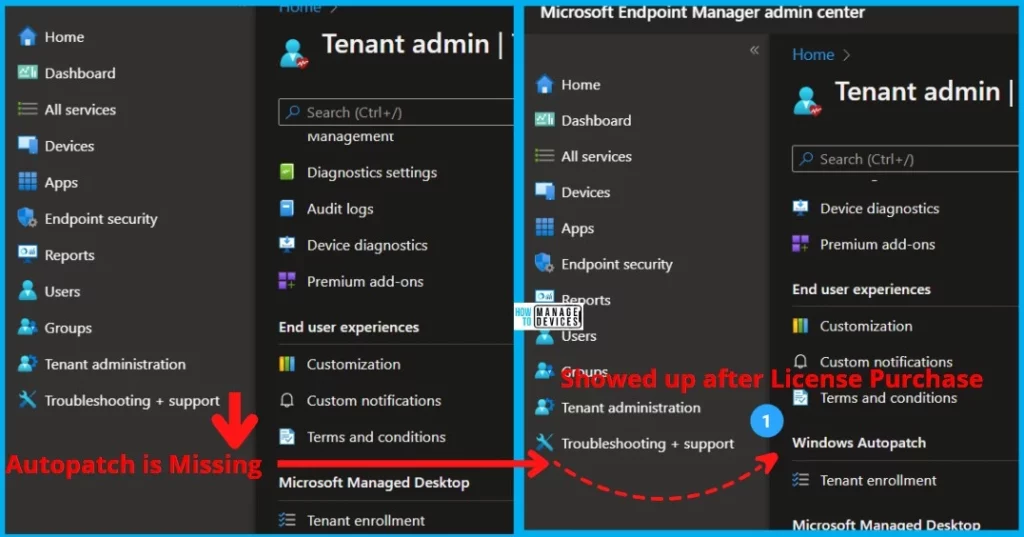
If you don’t see the Windows Autopatch Tenant enrollment blade, you don’t meet the prerequisites or the proper licenses. Ensure you have assigned licenses to users. Here you can see after assigning the license, The Windows Autopatch appears in Tenant Administration.
Video on Windows Autopatch Scenario with Cloud PC
In this video, let’s understand the options for Automatic Patch Management for Windows 365 Cloud PC without any additional cost?
Enroll to Windows Autopatch Service
To start using the Windows Autopatch implementation, ensure you meet the Windows Autopatch prerequisites.
Important – You must be a Global Administrator to enroll tenants and run the Readiness assessment tool.
- Sign in to the Microsoft Intune admin center https://intune.microsoft.com/.
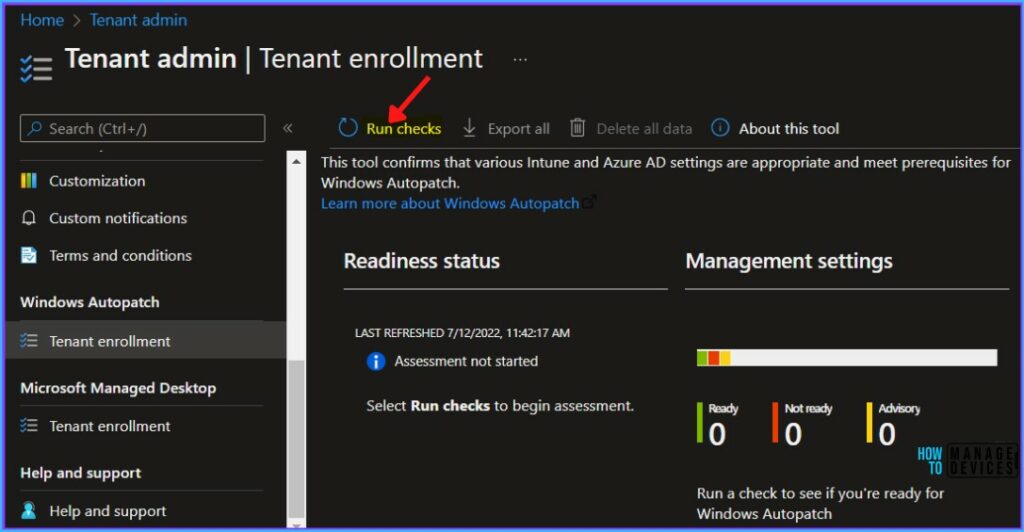
- Select Tenant administration and then navigate to Windows Autopatch > Tenant enrollment.
- Click on Run Checks.
The Readiness assessment tool allows you to check the relevant settings and details steps to fix any settings that aren’t configured properly for Windows Autopatch.
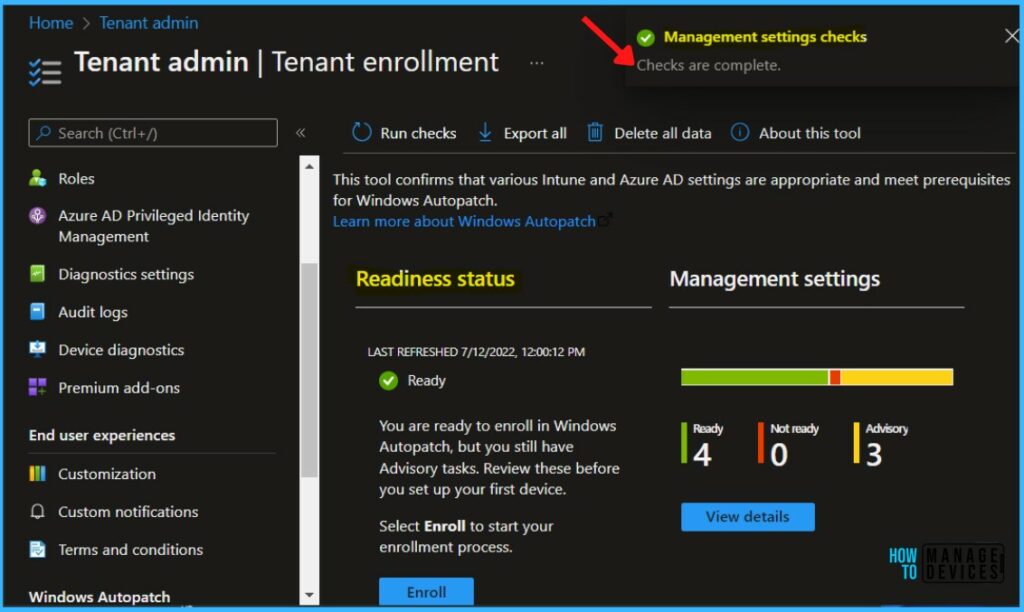
Once all the management settings checks are completed, A notification will appear automatically in the top right-hand corner with a message. You can see “Management Settings Checks are complete”.
The Readiness Assessment tool shows the status Ready, and you’re ready to enroll in Windows AutoPatch. It is important to review all management settings before starting the enrollment process.
Readiness Status of Windows Autopatch Enrollment
For each check, the Readiness assessment tool will report one of four possible results:
- Ready -> No action is required before completing enrollment.
- Advisory -> Follow the steps in the tool or this article for the best experience with enrollment and for users. You can complete enrollment, but you must fix these issues before you deploy your first device.
- Not ready -> You must fix these issues before enrollment. You won’t be able to enroll in Windows Autopatch if you don’t fix these issues. Follow the steps in the tool or this article to resolve them.
- Error -> The Azure Active Directory (AD) role you’re using doesn’t have sufficient permissions to run this check.
Important – The online Readiness assessment tool helps you check your readiness to enroll in Windows Autopatch for the first time. Once you enroll, you’ll no longer be able to access the tool again.
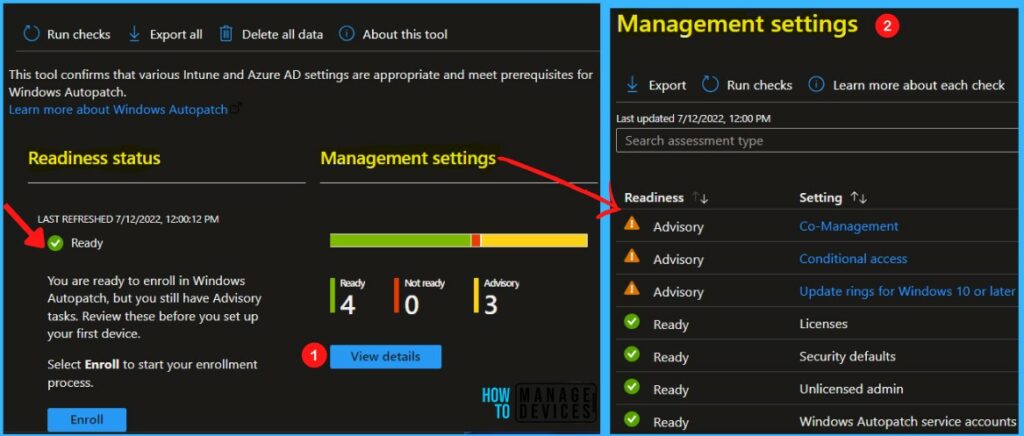
Click on View details to see all management settings, and The Readiness assessment tool checks the following settings –
- Conditional access -> Verifies that conditional access policies and multi-factor authentication aren’t assigned to all users. Your conditional access policies must not prevent our service accounts from accessing the service and must not require multi-factor authentication.
Windows Autopatch cloud service accounts -> Check that no usernames conflict with ones that Windows Autopatch reserves for its own use. The cloud service accounts are MsAdmin, MsAdminInt, and MsTest.
- Security defaults -> Check whether your Azure Active Directory organization has security defaults enabled.
- Licenses -> Check that you’ve obtained the necessary licenses.
Update rings for Windows 10 or later -> Verifies that Intune’s Update rings for Windows 10 or later policy doesn’t target all users or all devices. Policies of this type shouldn’t target any Windows Autopatch devices.
- Unlicensed admin -> Verifies that this setting is enabled to avoid a “lack of permissions” error when we interact with your Azure Active Directory. Let’s check the option to Allow Unlicensed Admin To Access Intune.
Enroll your Tenant for Windows Autopatch
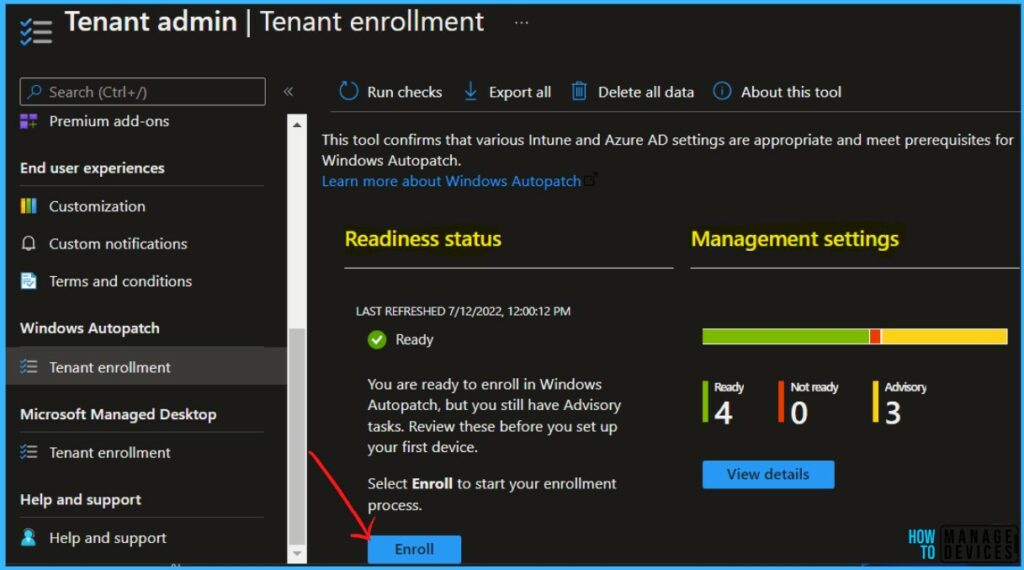
To enroll your tenant, Within the Readiness assessment tool, you’ll now see the Enroll button. By selecting Enroll, you will proceed with the enrollment of your tenant to the Windows Autopatch service.
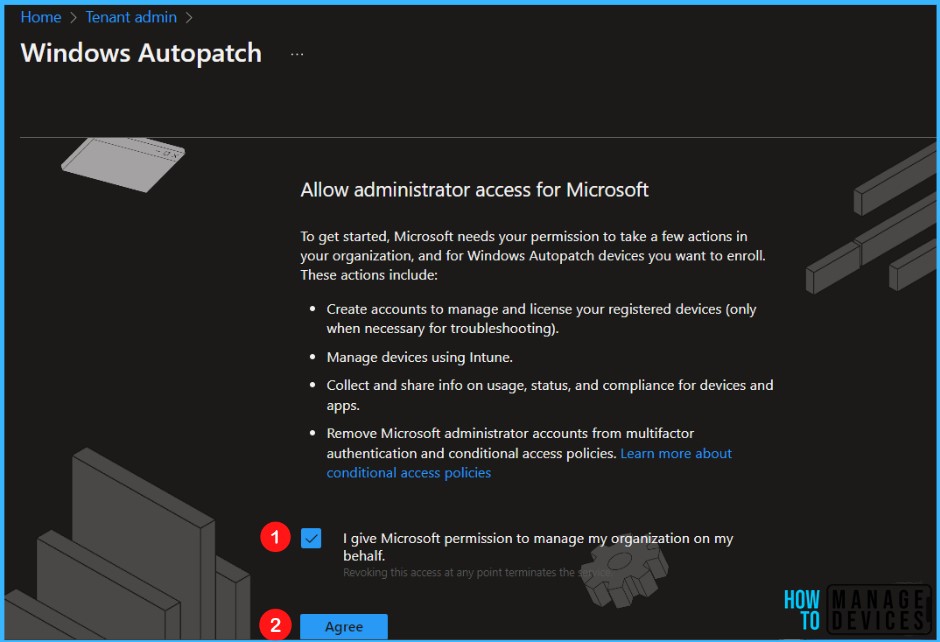
Select the check box to agree to the terms and conditions to allow administrator access for Microsoft and Click on Agree.
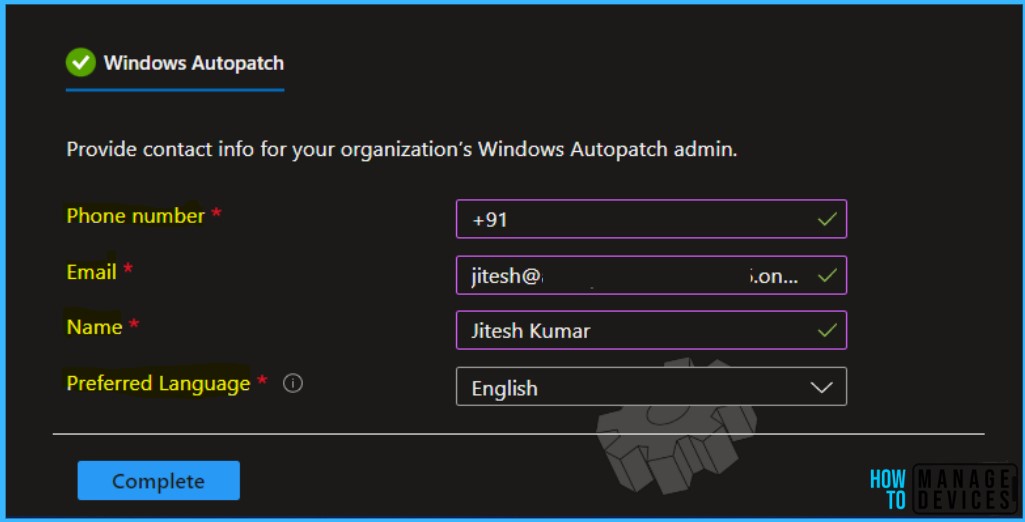
Here you need to provide the Phone number, Email, Name, and Preferred Language of the IT admin. Once you have added the information, Click on Complete.
Note – You can validate the added information in Admin contacts, available under Tenant administration in the Windows Autopatch section.
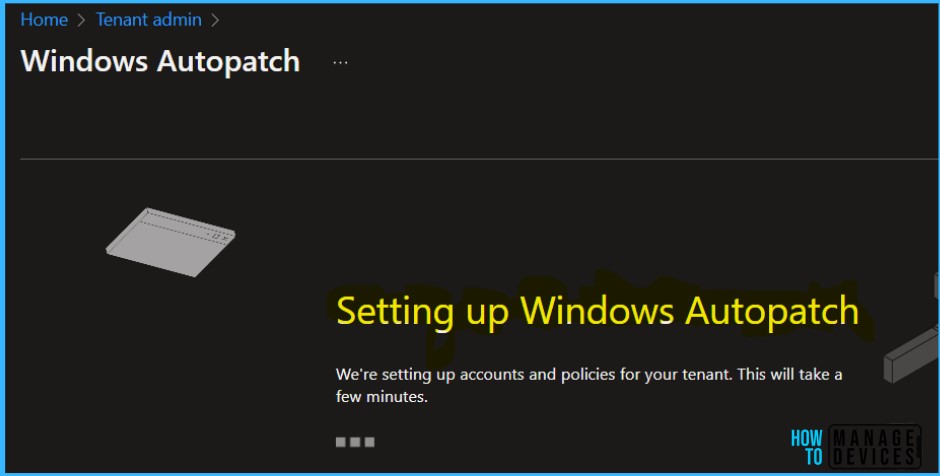
The setup of the Windows Autopatch service on your tenant will take a few minutes to complete, Please wait. This step creates the policies, groups, and accounts necessary to run the service.
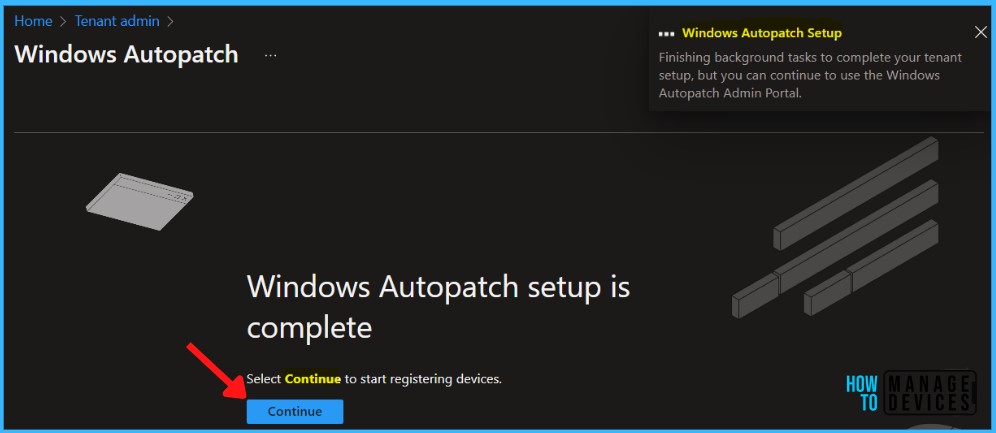
Once these actions are complete, you are successfully enrolled in your tenant. Windows Autopatch setup is complete, and Select Continue to start registering devices.
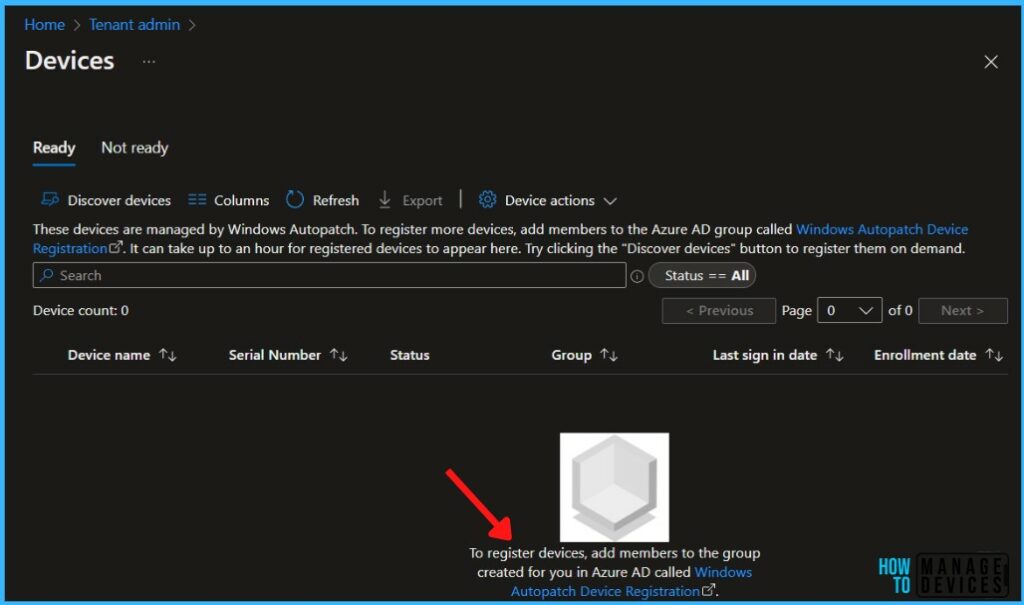
Select the Ready tab, then select the Windows Autopatch Device Registration hyperlink. You will be directly navigated to the Azure Active Directory group.
Windows Autopatch Device Registration
Before Microsoft can manage your devices in Windows Autopatch, you must have devices registered with the service.
You should have either Azure AD Global Administrator, Intune Service Administrator, or Modern Workplace Intune Administrator roles in Windows Autopatch to register devices.
Note – The Modern Workplace Intune Admin role is a custom created role during the Windows Autopatch tenant enrollment process.
The Windows Autopatch device registration process is transparent for end-users because it doesn’t require devices to be reset. The overall device registration process is as follows.
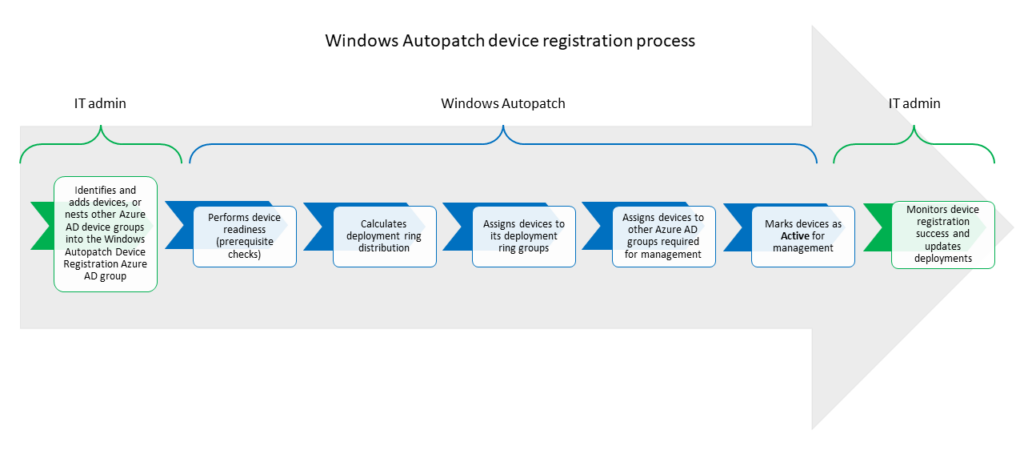
Add either device through direct membership or other Azure Active Directory dynamic or assigned groups as nested groups in the Windows Autopatch Device Registration group.
To register devices, navigate to Devices > Windows Autopatch, and click on Devices. Click on add members to the Azure AD group called Windows Autopatch Device Registration. To register more devices, Navigate to the Azure AD group Windows Autopatch Device Registration.
Note – All existing Windows 365 Cloud PC Enterprise workloads can be registered into Windows Autopatch by leveraging the same method as your physical devices.
Once you add the device, A notification will appear automatically in the top right-hand corner with a message. You can see “Group members successfully added“.
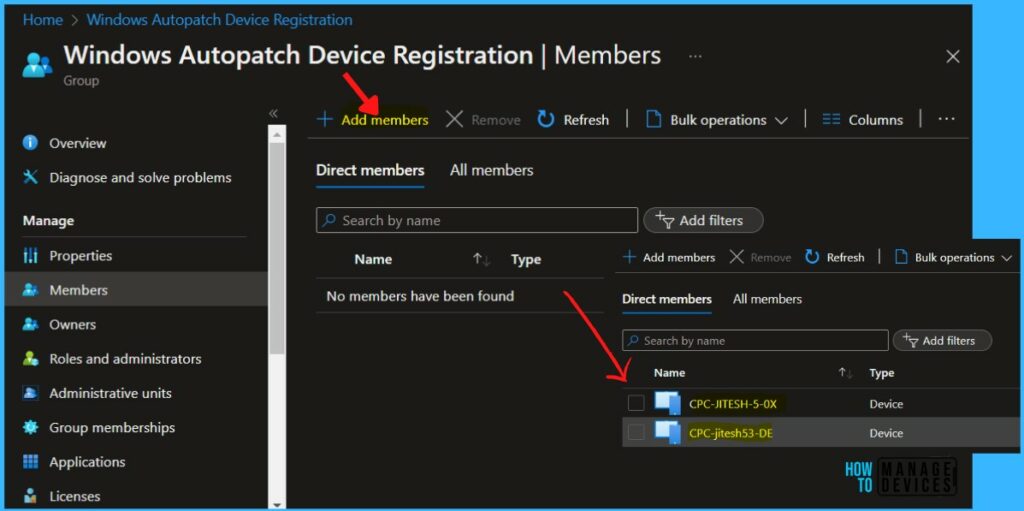
Once devices or Azure AD groups containing devices are added to the Windows Autopatch Device Registration group, Windows Autopatch discovers these devices. It runs software-based prerequisite checks to try to register them with its service.
It can take up to an hour for registered devices to appear in the Intune console. You can manually discover registered devices in Autopatch, Try clicking the “Discover devices” button to register them on demand.
Note – To register more devices, Navigate to the Azure AD group Windows Autopatch Device Registration and add members. You can also click on the hyperlink Windows Autopatch Device Registration reflected in the below screenshots.
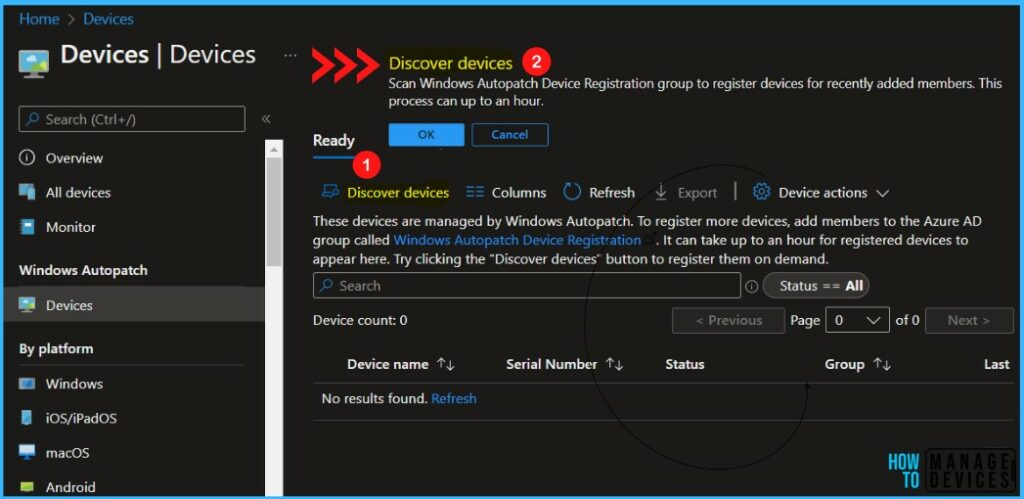
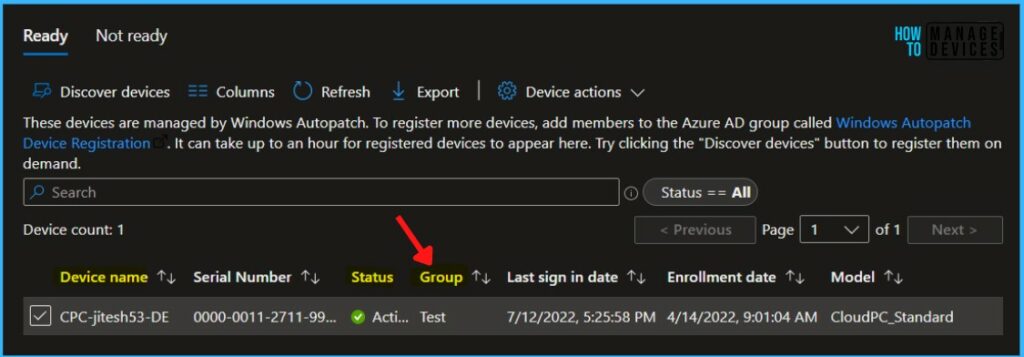
In MEM Admin Center, Navigate to Devices > Windows Autopatch, and click on Devices. The Ready tab is to show devices that were successfully registered to the Windows Autopatch service.
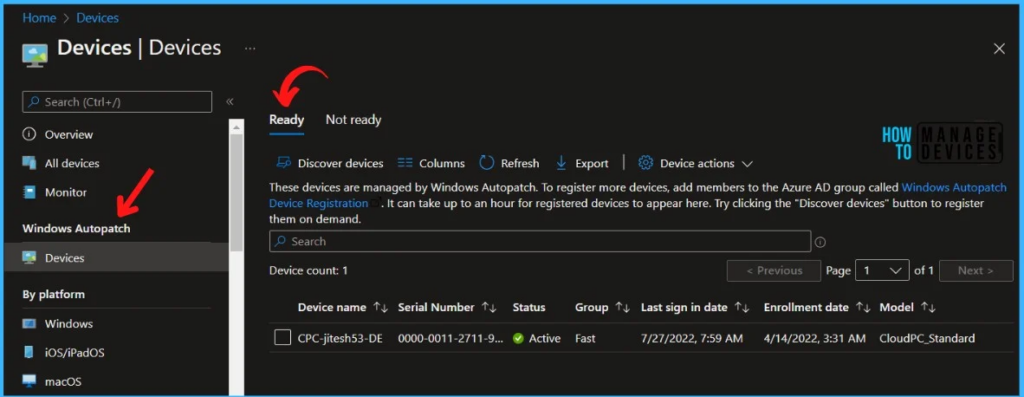
Important – Windows Autopatch enrollment of SCCM Co-Managed devices requires the following 3 workload sliders to Pilot/Intune.
- Device Configuration
- Windows Update policies
- Office 365 Client Apps
Adding Devices to Update Rings In Windows Autopatch
If you want to move separate devices to different rings, repeat the following steps for each device:
- In the Windows Autopatch section, select Devices.
- Select the devices you want to assign. All selected devices will be assigned to the ring you specify.
- Select Device actions from the menu and Select Assign device group.
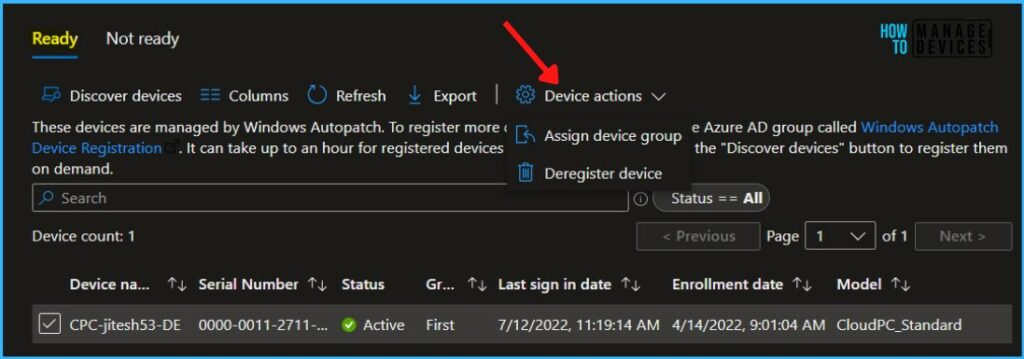
A fly-in opens, Use the dropdown menu to select the ring to move devices to, and then choose Save. Each of the update rings has a different purpose and is assigned a set of policies to control the rollout of updates in each management area.
- Automatic: Let Microsoft Managed Desktop automatically assigned to one of the groups.
- Test: Select this group for devices used for testing purposes only.
- First: Best for early adopters to receive and validate changes.
- Fast: Best for assessing quality issues prior to broad deployment.
- Broad: Use for business-critical devices.
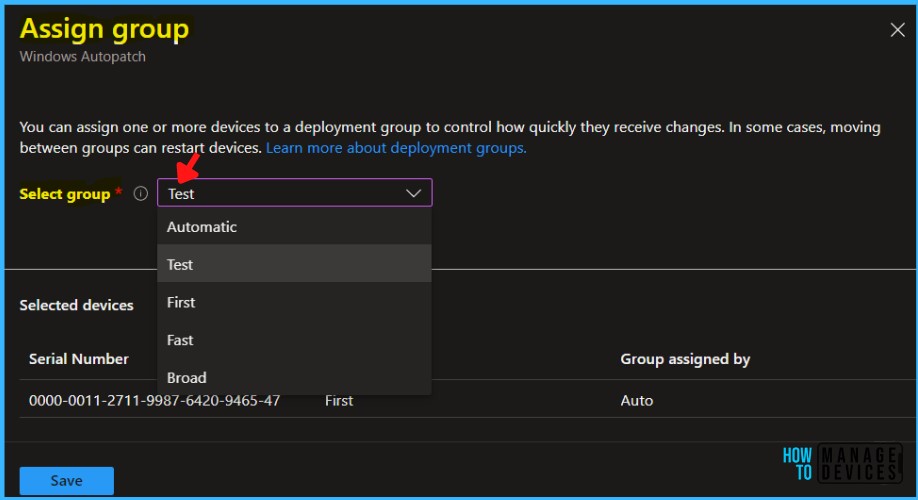
A notification will appear automatically in the top right-hand corner with a message. You can see “1 device scheduled for assignment to Test group.”
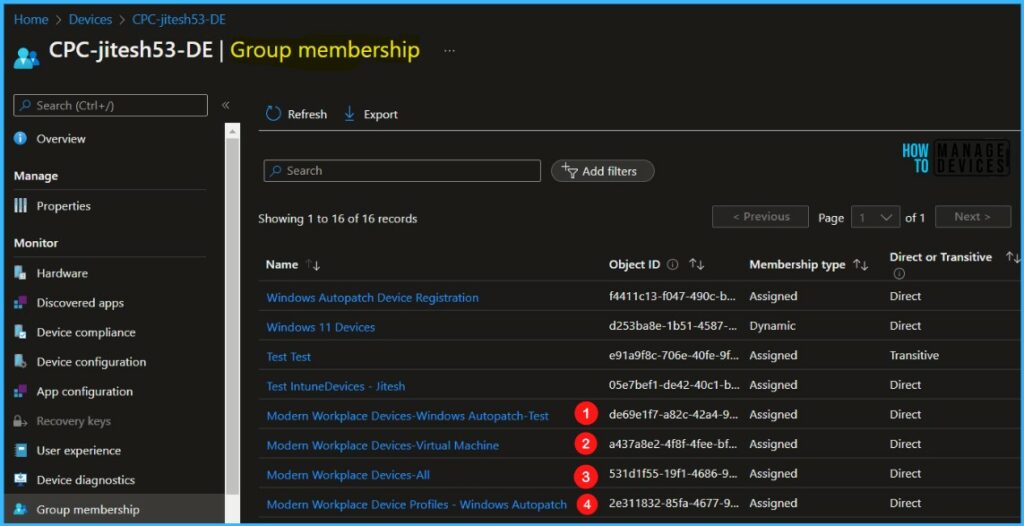
Based on the deployment group assignment, you can see the added device part of Modern Workplace Devices – Test and multiple groups. You can view Group Membership for Intune Managed Devices.
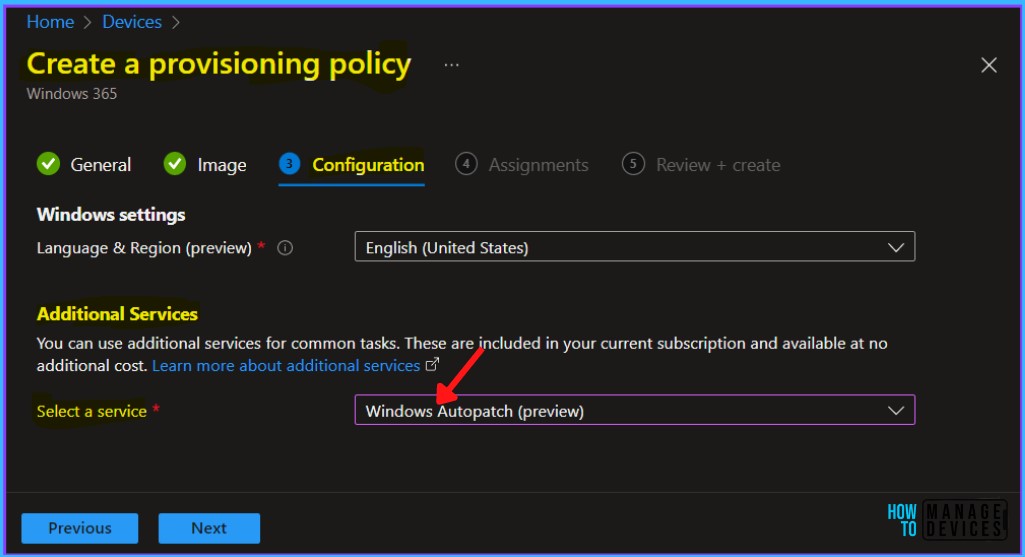
Windows Autopatch on Windows 365 Cloud PC Enterprise Edition
With Windows 365 Enterprise, you can include Windows Autopatch onboarding as part of your provision process, providing a seamless experience for admins and users to ensure your Cloud PCs are always up to date.
For Windows Autopatch Implementation on a Windows 365 Provisioning Policy, You can check more about creating provisioning policies for Azure AD Join and Hybrid Azure AD Join for Windows 365 Cloud PC.
When creating a Provisioning Policy in Windows 365, Under the Microsoft managed services section, select Windows Autopatch.
When the assignment is complete, the Group assigned by column will change to Test (based on your group selection), and the Group column will show the new group assignment.
During enrollment, Windows Autopatch creates four Azure Active Directory groups that are used to segment devices into update rings:
Note – You can’t create additional rings for managed devices and must use the four rings provided by Windows Autopatch.
- Modern Workplace Devices – Test
- Modern Workplace Devices – First
- Modern Workplace Devices – Fast
- Modern Workplace Devices – Broad
Each update ring has a different purpose and is assigned a set of policies to control the rollout of updates in each management area.
When a device is enrolled into the Windows Autopatch service, the device is assigned to an updated ring so that we have the right distributions across your estate. The distribution of each ring is designed to release to as few devices as possible to get the signals needed to make a quality evaluation of a given release.
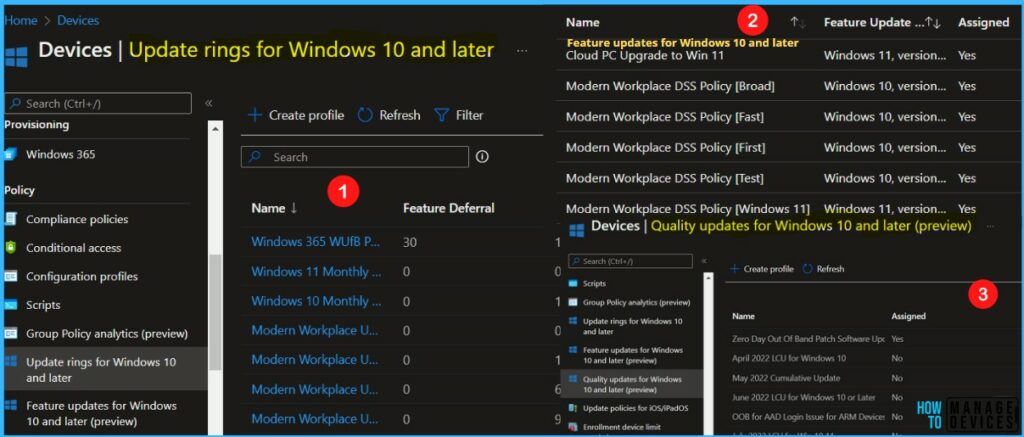
End Users Experience – Quality Update
Login to the device that is part of the deployment group and waits for the sync to complete, and you can see added Windows Update rings policies are applied.
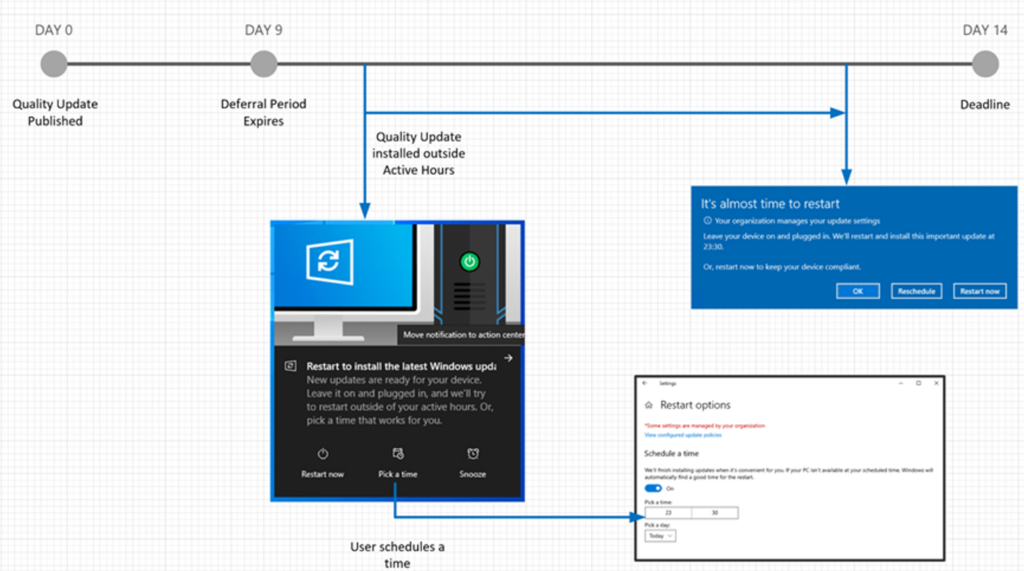
The Windows 10 quality update is published, and devices in the Broad ring have a deferral period of nine days. Devices will wait nine days before downloading the latest quality update.
In the following example, the user schedules the restart and is notified 15 minutes prior to the scheduled restart time. The user can reschedule, if necessary, but cannot reschedule past the deadline.
Feature Update Grace Period
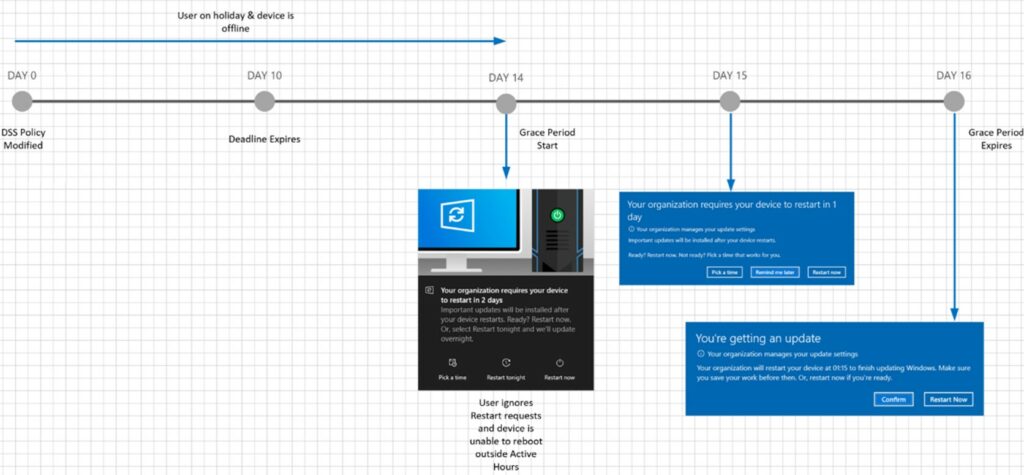
In the following example, the user is on holiday, and the device is offline beyond the feature update deadline. The user returns to work, turning the device back on.
Since the deadline has passed, the device is granted a two-day grace period to install the update and restart. The user will be notified of a pending installation and given options to choose from. Once the two-day grace period has expired, the user is forced to restart with a 15-minute warning notification.
Windows Autopatch Release Management
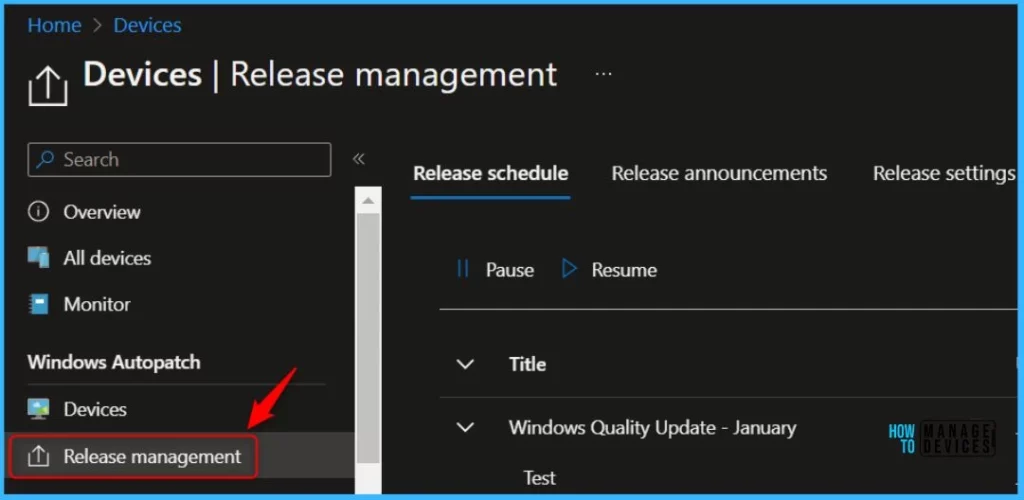
The Windows Autopatch Release Management provides you with more clarity on the Quality, Feature updates and install schedules in Intune portal.
Navigate to Devices, Under Windows Autopatch. Select Release management, which displays the updates and releases scheduled.
Pausing Release
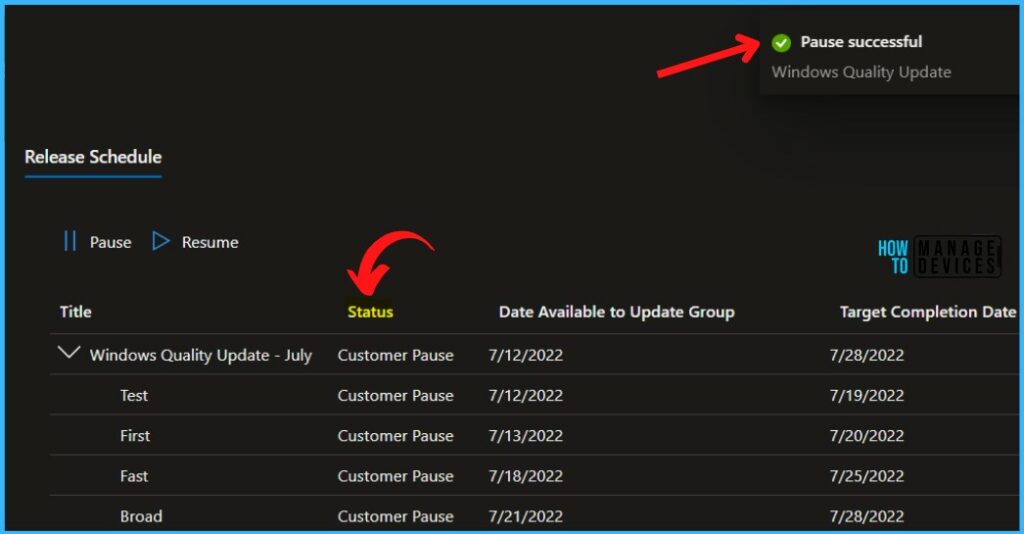
To pause a release, Click on the Pause options and choose the reason you want to Pause. Select the type of update you would like to pause and reason, Additional details, and click Okay.
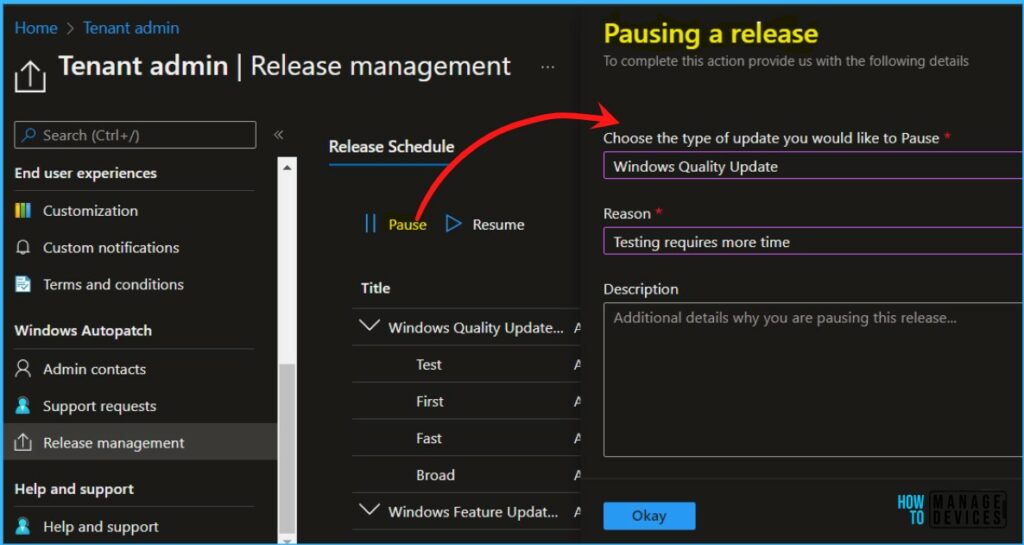
A notification will appear automatically in the top right-hand corner with the message “Windows Quality Update Pause Successful” Here, you can see the status Customer Pause.
Resume Release
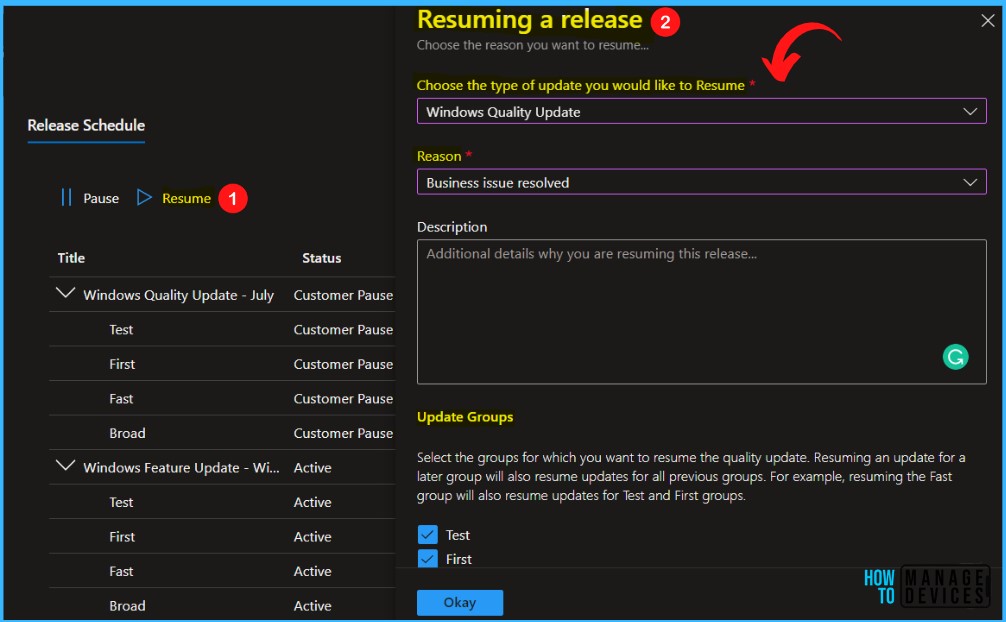
To resume a release, Click on the Resume options and choose the reason you want to resume. Select the type of update you would like to resume and reason, Additional details.
Select the Update groups for which you want to resume the update. Resuming an update for a later group will also resume updates for all previous groups and click Okay.
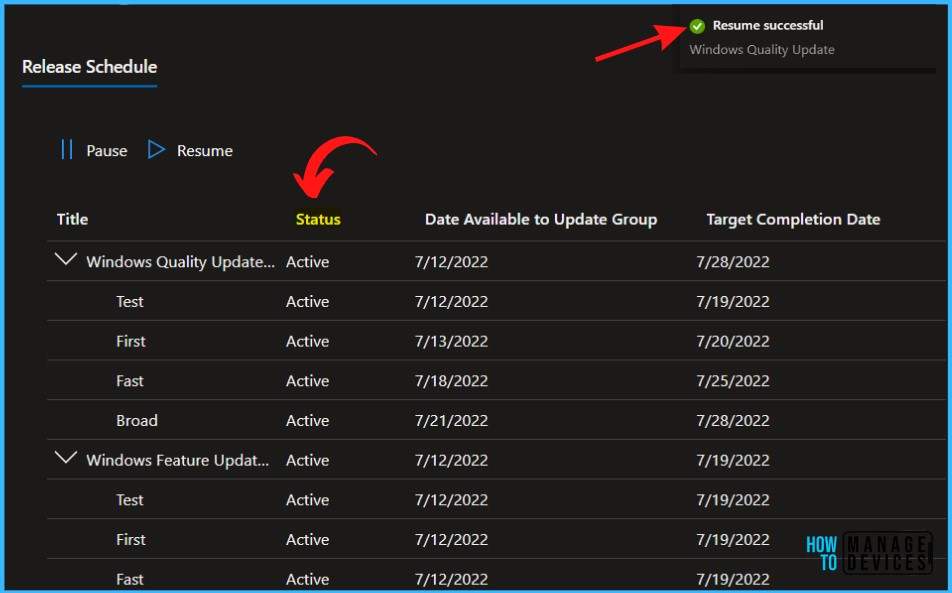
A notification will appear automatically in the top right-hand corner with the message “Windows Quality Update Resume Successful” Here, you can see the status Active.
Windows Autopatch relies on the following capabilities to help resolve update issues if there is an issue with an update –
- Pausing and resuming: If Windows Autopatch detects an issue with a Windows quality release, Microsoft may decide that it’s necessary to pause that release. Once the issue is resolved, the release will be resumed.
- Rollback: If Windows Autopatch detects issues between versions of Microsoft 365 Apps for enterprise, Microsoft might force all devices to roll back to the previous version.
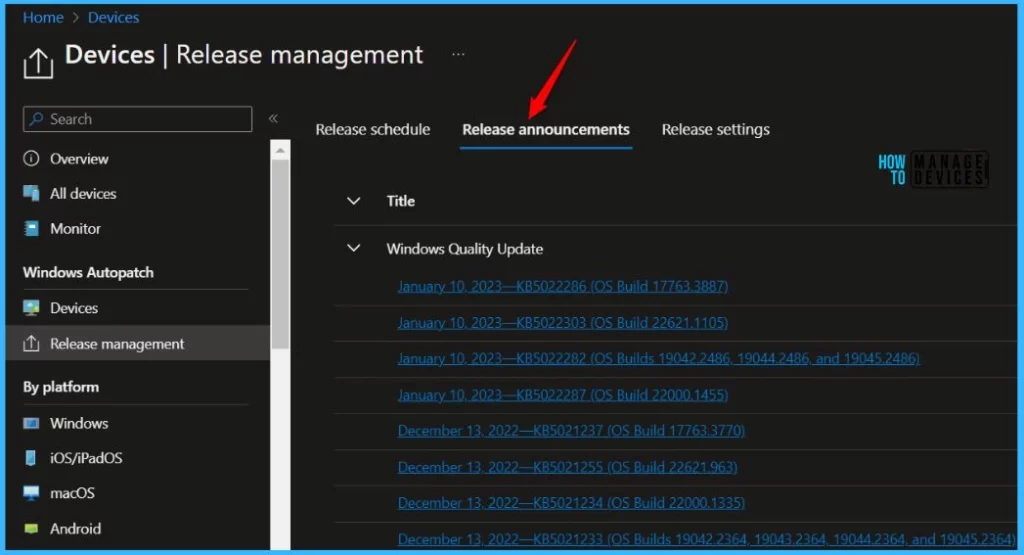
The Release announcements help admins to locate relevant release notes and knowledge base articles for updates.
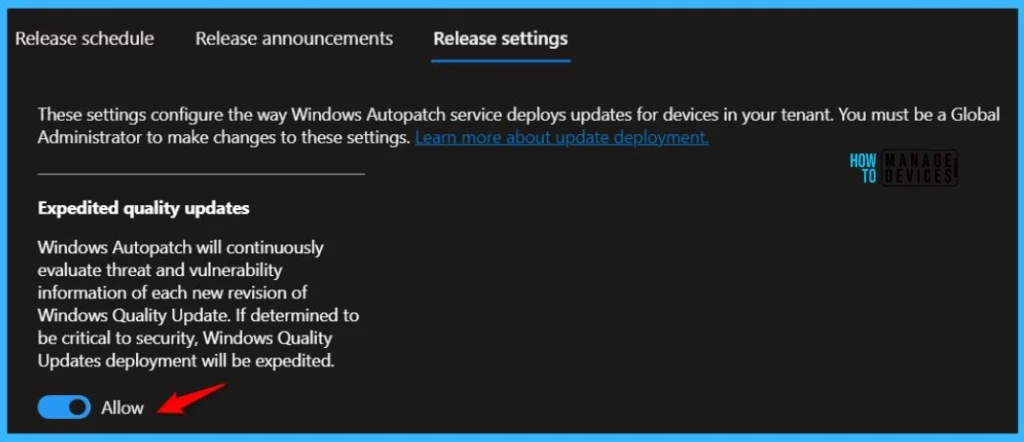
Quality updates are expedited when the Autopatch service determines that threat or vulnerability information makes a particular update critical to security. In this scenario, the update is applied to all device deployment rings simultaneously.
To opt out of expedited quality updates, you can go to the Release settings and under the Release management blade. Change the slider from ‘Allow’ to ‘Block’. You must be a Global Administrator to make changes.
Here’s how Windows Autopatch manages Microsoft 365 Apps for enterprise updates. When the Microsoft 365 App update setting is set to Block, Windows Autopatch won’t provide Microsoft 365 App updates on your behalf, and your organizations will have full control over these updates.
When set to Allow, Windows Autopatch will manage Microsoft 365 apps automatically. To manage them yourself, select the switch to turn them off. You must be an Intune Administrator to make changes to the setting.Allow.

Windows Autopatch Implementation – Summary of Changes Made During Tenant Enrollment
During the Windows Autopatch enrollment process, the Autopatch service created the following changes –
- Sixteen (16) Azure AD groups
- Three (3) Windows Autopatch Cloud Service Accounts
- Four (4) Update rings for Windows 10 and later policies
- Five (5) Feature updates for Windows 10 and later policies
- One (1) Conditional Access policy
- Nineteen (19) Device Configuration profiles
- One (1) Custom Endpoint Manager role.
- One (1) Enterprise application
- One (1) PowerShell Script
Note: The details count we represent here is based on our observations.
Azure Active Directory Groups – Windows Autopatch Implementation
Windows Autopatch will create Azure Active Directory groups required to operate the service. The following groups are used for targeting Windows Autopatch configurations to devices –
| Group name | Description |
|---|---|
| Modern Workplace-All | All Modern Workplace users |
| Modern Workplace – Windows 11 Pre-Release Test Devices | Device group for Windows 11 Pre-Release testing. |
| Modern Workplace Devices-All | All Modern Workplace devices |
| Modern Workplace Devices-Windows Autopatch-Test | Immediate ring for device rollout |
| Modern Workplace Devices-Windows Autopatch-First | First production ring for early adopters |
| Modern Workplace Devices-Windows Autopatch-Fast | Fast ring for quick rollout and adoption |
| Modern Workplace Devices-Windows Autopatch-Broad | Final ring for broad rollout into an organization |
| Modern Workplace Devices Dynamic – Windows 10 | Microsoft Managed Desktop Devices with Windows 10 Group |
| Modern Workplace Devices Dynamic – Windows 11 | Microsoft Managed Desktop Devices with Windows 11 Group |
| Modern Workplace Roles – Service Administrator | All users are granted access to the Modern Workplace Service Administrator Role |
| Modern Workplace Roles – Service Reader | All users granted access to Modern Workplace Service Reader Role |
| Modern Workplace Service – Intune Admin All | Group for Intune AdminsAssigned to:Modern Workplace Service Accounts |
| Modern Workplace Service – Intune Reader All | Group for Intune readersAssigned to:Modern Workplace Service Accounts |
| Modern Workplace Service – Intune Reader MMD | Group for Intune readers of MMD devices and usersAssigned to:Modern Workplace Service Accounts |
| Modern Workplace Service Accounts | Group for Windows Autopatch service accounts |
| Windows Autopatch Device Registration | Group for automatic device registration for Windows Autopatch |
Service Accounts – Windows Autopatch Implementation
Windows Autopatch will create three cloud service accounts in your tenant. These accounts are used to run the service, and all need to be excluded from any multi-factor authentication controls –
| Cloud service account name | Usage |
|---|---|
| [email protected] | This account is a limited-service account with administrator privileges, used as an Intune and User administrator to define and configure the tenant for Microsoft Modern desktop devices. This account doesn’t have interactive sign-in permissions. The account performs operations only through the service. |
| [email protected] | This account is an Intune and User administrator account used to define and configure the tenant for Modern Workplace devices, used for interactive sign-in to the customers’ tenant. The use of this account is extremely limited as most operations are exclusively through msadmin (non-interactive). |
| [email protected] | This standard account is used as a validation account for the initial configuration and roll out of policy, application, and device compliance settings. |
Email Alerts on Windows Autopath Service
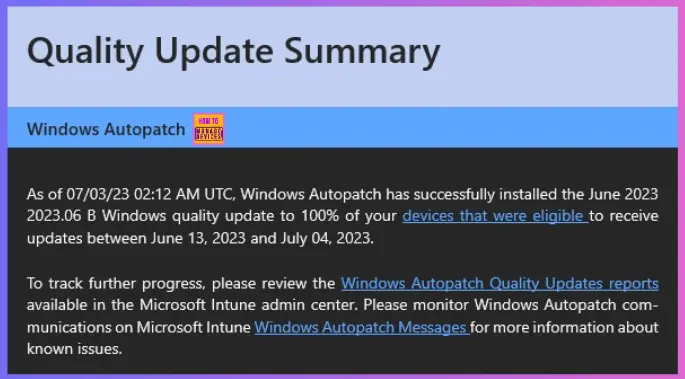
The following is the sample email alert that you get from the Windows Autopatch service after the completion of monthly quality update patching. The below example is for June updates.
As of 07/03/23 02:12 AM UTC, Windows Autopatch has successfully installed the June 2023 2023.06 B Windows quality update to 100% of your devices that were eligible to receive updates between June 13, 2023, and July 04, 2023.
To track further progress, please review the Windows Autopatch Quality Updates reports available in the Microsoft Intune admin center. Please monitor Windows Autopatch communications on Microsoft Intune Windows Autopatch Messages for more information about known issues.
Device Configuration Policies – Windows Autopatch Implementation
The following configuration policies are used for targeting Windows Autopatch configurations –
- Modern Workplace – Set MDM to Win Over GPO
- Modern Workplace – Telemetry Settings for Windows 10
- Modern Workplace – Telemetry Settings for Windows 11
- Modern Workplace-Window Update Detection Frequency
- Modern Workplace – Data Collection
Conditional Access Policies – Windows Autopatch Implementation
Modern Workplace – Secure Workstation -> This policy targets only the Windows Autopatch cloud service accounts. The policy blocks access to the tenant unless the user is accessing the tenant from a Microsoft authorized location.
Update rings for Windows 10 and later – Windows Autopatch Implementation
- Modern Workplace Update Policy [Test]-[Windows Autopatch]
- Modern Workplace Update Policy [First]-[Windows Autopatch]
- Modern Workplace Update Policy [Fast]-[Windows Autopatch]
- Modern Workplace Update Policy [Broad]-[Windows Autopatch]
Feature Update Policies – Windows Autopatch Implementation
- Modern Workplace DSS Policy [Test]
- Modern Workplace DSS Policy [First]
- Modern Workplace DSS Policy [Fast]
- Modern Workplace DSS Policy [Broad]
- Modern Workplace DSS Policy [Windows 11]
Microsoft Office Update Policies – Windows Autopatch
- Modern Workplace – Office ADMX Deployment
- Modern Workplace – Office Configuration v5
- Modern Workplace – Office Update Configuration [Test]
- Modern Workplace – Office Update Configuration [First]
- Modern Workplace – Office Update Configuration [Fast]
- Modern Workplace – Office Update Configuration [Broad]
Microsoft Edge Update Policies – Windows Autopatch
- Modern Workplace – Edge Update ADMX Deployment
- Modern Workplace – Edge Update Channel Stable
- Modern Workplace – Edge Update Channel Beta
Modern Workplace – Autopatch Client Setup -> PowerShell Installs necessary client components for the Windows Autopatch service.


When you enable Windows Autopatch service for a device, does it disable / stops the patch management capability from ConfigMgr ? Just want to see if there any ways to continue managing 3Rd party application patches through ConfigMgr.
Thank you for great guide and explanation.
Bom dia, sabem me dizer qual a diferença do configuration Manager para o Windows Autopatch?
Good morning, can you tell me what is the difference between Configuration Manager and Windows Autopatch?
On very high-level as name suggests its an automatic patch deployment using cloud intelligence without or very less manual intervention from the admin side.
In the SCCM world, you need to use ADR or some other mechanism to create monthly patches and then deploy it pilot ring or test devices/users and get feedback from them before moving forward with production deployment or border deployment.
With Windows Autopatch, the vision is to reduce/automate all these tedious steps with better user and admin experience.
Can we change the policies and configurations created by Windows Autopatch?
Fantastic guide!!! I enjoy and learn a lot with this… even better than MS guide.
Thanks a lot
Hello,
How can I add AVD session hosts into Windows Autopatch Group? Thanks!