Let’s see how the Create SCCM Package Deployment using PowerShell. The PowerShell Cmdlets are native PowerShell commands and NOT standalone executables. Cmdlets are executed along with parameters and values to operate once or multiple times.
After you import the SCCM PowerShell Module into the site server, the PowerShell Cmdlets can be used to create a Package and deploy it to a collection and monitor the deployment. Let’s learn how to use PowerShell cmdlets to manage SCCM Package deployment.
I posted about the 3 Best Methods to Import SCCM PowerShell Module Cmdlets in my last post. Today I will show you how to create and deploy the SCCM Package using SCCM PowerShell Cmdlets.
You can use PowerShell cmdlets to automate the package creation and deployment process with Configuration Manager (aka MEMCM), similar to how you use SCCM Console. This post helps the PowerShell enthusiast to start working on PowerShell scripting solution for SCCM Application and Package creation process.
Read More -> Create SCCM Application Deployment using PowerShell
In this post, I will create a 7Zip package and deploy it to a device collection without using the SCCM Console. I have downloaded the 64-bit version of 7Zip from Download (7-zip.org) and copied it to the shared folder of my SCCM site server.
- ConfigMgr SCCM Package Refresh vs Package Update
- Best Way to Deploy Powershell Script using Intune | Endpoint Manager
- Set SCCM Software Center Icon for Task Sequences Packages | Easy Steps
Create SCCM Package Using PowerShell Cmdlets
To create SCCM Package Deployment using PowerShell, you need to connect to the SCCM PowerShell drive. First, we have to connect to the SCCM site server via PowerShell.
I have separated each function of the SCCM package creation process into different sections and separate PowerShell commands for easy understanding. Later, it won’t be difficult to create one PowerShell command to cover end to end processes from package creation to monitoring.
In the SCCM Console, Click on the Drop-Down option on the top left side corner of the console and click on Connect via Windows PowerShell option.
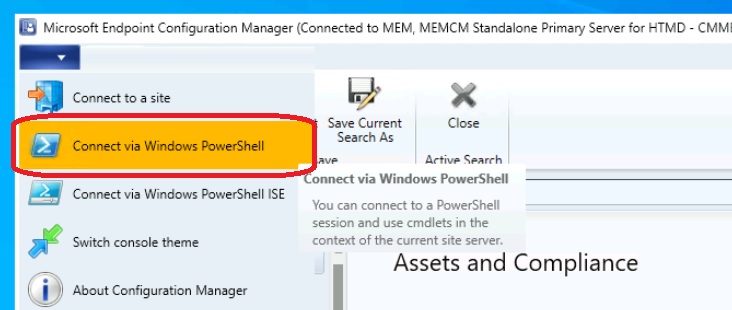
Click on A on the following warning about the untrusted publisher.
Do you want to run software from this untrusted publisher?
File F:\Program Files\Microsoft Configuration Manager\AdminConsole\bin\Microsoft.ConfigurationManagement.PowerShell.Types.ps1xml is published by CN=Microsoft Corporation, O=Microsoft Corporation, L=Redmond, S=Washington, C=US and is not trusted on your system. Only run scripts from trusted publishers.
[V] Never run [D] Do not run [R] Run once [A] Always run [?] Help (default is “D”): A
The New-CMPackage cmdlet creates an SCCM package using PowerShell. A package contains the content files and instructions for distributing programs, software updates, boot images, operating system images, and drivers to Configuration Manager clients.
Important – Make sure you have collected or downloaded the Application files, supported the manufacturer icon file types (JPG, JEPG, ICO, and PNG), and copied them to SCCM shared folder. Once you have your icons ready, you can now add them to your applications in SCCM.
To create a Package, type the following PowerShell command and Press Enter.
New-CMPackage -Name 7ZIP -Description "Archiving Software" -Language English -version 21.07 -Manufacturer "Igor Pavlov" -Path \\<Name-of-the-SCCM-Server>\Sources\Test\7ZIP -IconLocationFile \\<Name-of-the-SCCM-Server>\Sources\Test\7ZIP\7z.ico
This command creates an SCCM package named 7ZIP, along with the following PowerShell parameters:
- Name: Provide the Name of the Package (For Example, 7 Zip)
- Description: Adds a description to the Package (Archiving Software)
- Language: Specifies the Language (English)
- Version: Specifies the version (21.07)
- Manufacturer: Specifies the Manufacturer (Igor Pavlov)
- Path: Specifies the location of the source files. (For Example, \\<Name-of-the-SCCM-Server>\Sources\Test\7ZIP)
- IconLocationFile: Specifies the .ico file for the Package icon. (For Example, <Name-of-the-SCCM-Server>\Sources\Test\7ZIP\7z.ico)
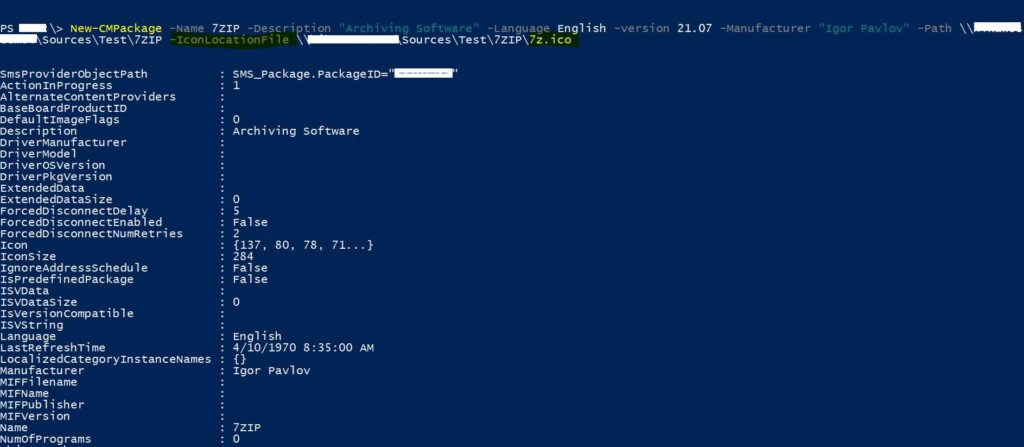
The 7Zip Package now appears in the Packages node of the Configuration Manager console.

Select the package from the list to validate the information. Right-click on the package and select Properties. Here you can see the details in the general tab specified during the package creation process.

The New-CMPackage PowerShell cmdlet only supports JPG, JEPG, ICO, and PNG extensions. I tried with EXE, and it prompted me with the following error. Therefore, I used the 7z.ico file.
WARNING: The extension of the icon file is not valid. This cmdlet supports only JPG, JPEG, ICO, and PNG extensions.

Create Program for SCCM Package using PowerShell
Let’s follow the steps to create a new program for an existing package using the PowerShell command below.
The New-CMProgram cmdlet creates a program for a package. Programs are commands that are associated with the SCCM package. One Package can be associated with multiple programs depending on the deployment scenario.
Now to create the program for the 7ZIP package, type the following command and press Enter
New-CMProgram -PackageName 7ZIP -StandardProgramName 7ZIP -DiskSpaceRequirement 4 -DiskSpaceUnit MB -DriveMode RunWithUnc -Duration 20 -ProgramRunType WhetherOrNotUserIsLoggedOn -RunMode RunWithAdministrativeRights -RunType Hidden -CommandLine "7z2107-x64.exe /S"
The above PowerShell command creates a program named 7ZIP associated with package 7ZIP along with the following parameters:
- PackageName: Provide the Name of the package
- StandardProgramName: Provide the Name of the program
- Diskspacerequirement: Specifies the disk space requirement (4)
- DiskspaceUnit: Specifies the disk space requirement Unit (MB)
- DriveMode: Specifies the program will run with a Universal Naming Convention(RunWithUnc)
- Duration: Specifies the Maximum allowed Runtime is Minutes (20)
- ProgramRunTypes: Specifies the Program Run type (WhetherOrNotUserIsLoggedOn)
- RunMode: Specifies the Run Mode (RunWithAdministrativeRights)
- CommandLine: Specifies the silent command to install (For example, 7z2107-x64.exe /S)
Select an existing package (7Zip) in the Packages node and select the Programs tab. The below screenshots shows the details of the 7ZIP program created by the New-CMProgram cmdlet.
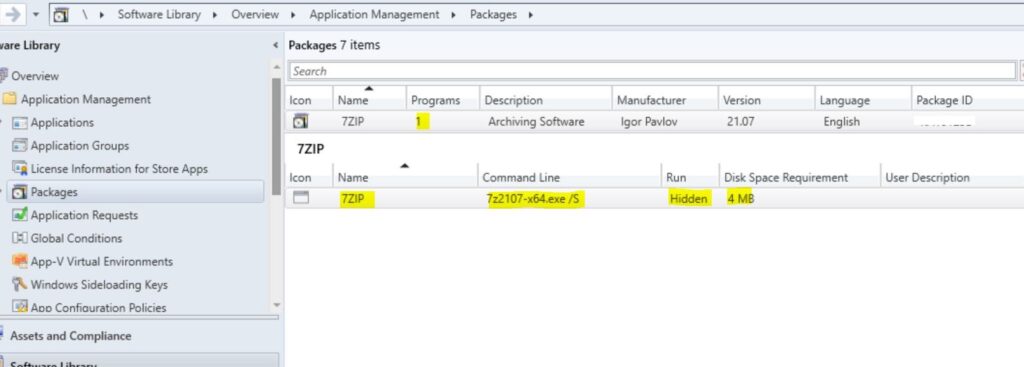
Right-click on the program and select Properties.
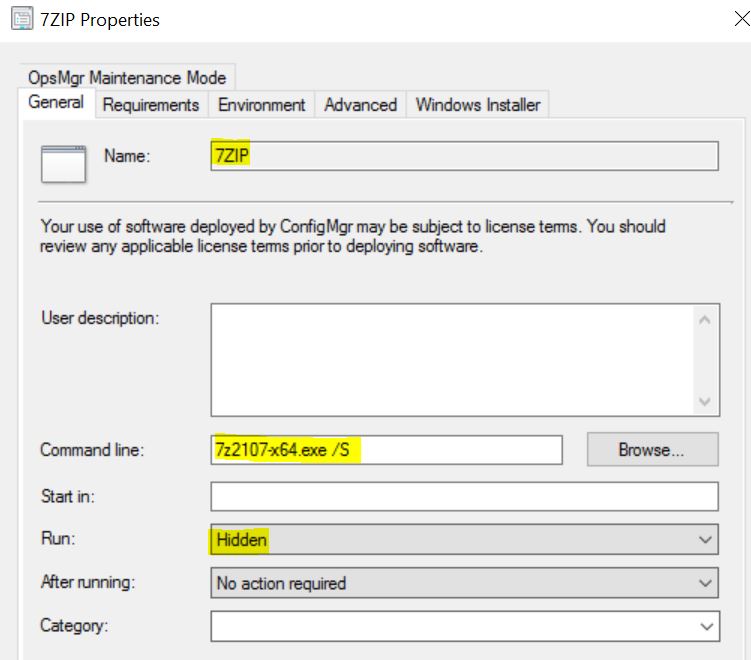
Switch to the Requirements tab. Review the specified value for Estimated disk space and Maximum allowed time (minutes).

On the Requirements tab of the Package Program Properties, you can validate the following information.

Once you validate the information added to package properties, you can close the package wizard and proceed next to prepare for distribution and deployment.
Distribute Package Content to Distribution Point using PowerShell
The following steps help you distribute content to distribution points using the PowerShell command.
The Start-CMContentDistribution cmdlet distributes content from the content library on the site server to distribution points. You can also use the cmdlet to distribute content for the SCCM Objects –
- Applications
- Legacy packages
- Software update deployment packages
- Driver packages
- OS images
- OS upgrade packages
- Boot images
- Content referenced by task sequences
The next step is to distribute the content of the 7ZIP package to the Distribution Point, Type and Enter the following command:
Note – The content can be distributed to distribution points, distribution point groups, or collections associated with distribution point groups.
Start-CMContentDistribution -PackageName 7ZIP -DistributionPointName <Distribution Point Name> 
The command distributes the 7ZIP Package to a specified Distribution Point along with the following parameters:
- PackageName: Provide the Name of the package
- DistributionPointName: Specifies the Distribution Point where the Package content will be distributed
Once the content is processed to distribute, You can monitor the content status. If it’s showing the yellow color, distribution is in progress.
If the content distribution were successful, it would appear with Green color, as shown in the 7ZIP Program executed by the Start-CMContentDistribution cmdlet.

SCCM Package Deployment using PowerShell
The New-CMPackageDeployment cmdlet deploys a package to resources in a collection. The collection parameter of the PowerShell command can be specified by the collection by ID or name.
To deploy the 7ZIP Package to a collection, type the following command and press Enter.
New-CMPackageDeployment -CollectionName "Test_collection" -StandardProgram -ProgramName "7ZIP" -PackageName "7ZIP" -DeployPurpose Required -ScheduleEvent AsSoonAsPossible -FastNetworkOption DownloadContentFromDistributionPointAndRunLocally -SlowNetworkOption
DoNotRunProgram
The PowerShell command deploys the 7ZIP Package to the target collection along with the following parameters:
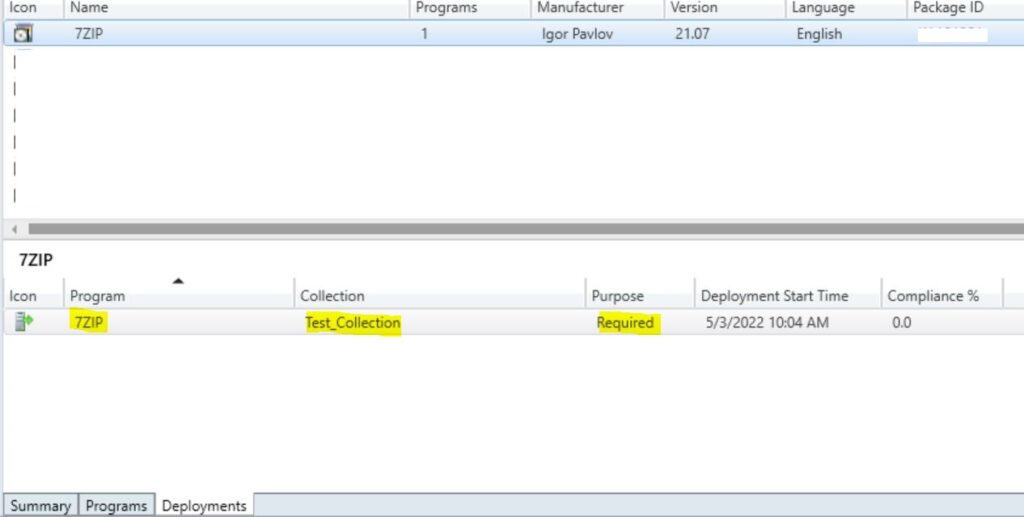
- CollectionName: Specifies the Name of the Collection (Test_collection)
- StandardProgram: Specifies the Package/Program deployment is for computers with the Configuration Manager client
- ProgramName: Provide the Name of the associated Program with the SCCM Package (7ZIP)
- PackageName: Specify the Name of the SCCM Package (7ZIP)
- DeployPurpose: Specifies the deployment is required to install at the deadline (Required)
- ScheduleEvent: Specifies the deployment is executed as soon as the policy is received (AsSoonAsPossible)
- FastNetworkOption: Specifies the behavior when the client uses a distribution point from the current boundary group (DownloadContentFromDistributionPointAndRunLocally)
- SlowNetworkOption: Specifies the behavior when the client uses a distribution point from a neighbor boundary group or the default site boundary group (DoNotRunProgram)
The below screenshots shows the deployment status of the 7ZIP Program executed by the New-CMPackageDeployment cmdlet.
Initiate Machine Policy Request & Evaluation Cycle using PowerShell
Here’s how on the client computer, Initiate the Machine Policy Request & Evaluation Cycle to speed up the inventory using PowerShell, SCCM client action Machine Policy Request & Evaluation Cycle “immediately” trigger the re-evaluation of the machine policy process from Windows 10 client.
The Invoke-CMClientAction cmdlet sends a notification to client computers to trigger an immediate client action. The notification can be sent to one or multiple client computers or all the computers in a specified device collection.
To trigger the machine Policy Retrieval and Evaluation cycle on the client machine, type command and press Enter:
Invoke-CMClientNotification -DeviceName TEST_Machine -ActionType ClientNotificationRequestMachinePolicyNowThis command triggers Machine Policy Cycle on the target machine along with the following parameters:
- DeviceName: Provide the Name of the Client machine
- ActionType: Triggers the Machine Policy Retrieval and Evaluation cycle on the client machine (ClientNotificationRequestMachinePolicyNow)
Monitor SCCM Package Deployment Status using PowerShell
The Get-CMPackageDeploymentStatus cmdlet gets the status of one or more classic software distribution deployments. Classic software distribution is a legacy software distribution program on a client.
Let’s Monitor SCCM Package Deployment Status using PowerShell. Now, to check the status of the 7Zip Package deployment, type the PS command:
Get-CMPackageDeploymentStatus -Name "7ZIP"This command gets the status of a deployment that is distributed to SCCM clients by using the deployment package named 7ZIP
Importance of Get-CMPackageDeploymentStatus Cmdlet: It provides all the details ( CollectionID, DeploymentID, PackageID, ProgramName, etc.) which you will need later to manage, modify, remove the Deployment, Package, and Program.

We can see that MessageDescription: Program completed with success. This means our 7ZIP Package has been successfully deployed to the target collection: Test_collection
Similarly, we can verify that from the SCCM console from the deployment status from the \Monitoring\Overview\Deployments node.

List of Useful PowerShell Commands to Manage SCCM Package Deployment
Let’s check the List of Useful PowerShell Commands to Manage SCCM Package Deployment. The following is the PS command to remove an SCCM Package deployment.
Remove-CMPackageDeployment -DeploymentId <Mention-the-DeploymentID-Here> -CollectionName "Test_Collection" -ForcePS Command to rename the SCCM Package.
Set-CMPackage -PackageId <Mention-the-PackageID-Here> -NewName "7ZIP-Package02" -Description "This package has been Modified"PS Command to set the distribution Priority of an SCCM Package to High.
Set-CMPackage -PackageId <Mention-the-PackageID-Here> -DistributionPriority HighPS Command to remove Program from the SCCM Package.
Remove-CMProgram -PackageId <Mention-the-PackageID-Here> -ProgramName "7ZIP" -ForcePS Command to remove the SCCM Package.
Remove-CMPackage -PackageId <Mention-the-PackageID-Here> -Force
Author
Dhanraj Barman is an experienced professional in the IT services field with almost seven years of experience working with SCCM Infrastructure solutions, Windows Imaging (OSD), and Microsoft Intune. He is currently working as a Consultant helping organizations to a Modern Workplace.

