

Symbols and icons are everywhere, from menus to legal documents — they’re even in ordinary documents now. Fortunately, they’re easy to insert, format and otherwise manipulate in Microsoft Office documents.
In this tutorial, I’ll illustrate how easy it is to add these visual tools to a document by adding checkmarks to a simple to-do list, but don’t stop with checkmarks. Once you’re familiar with these techniques, you can add other relevant symbols and icons to your documents too.
For this tutorial, I’m using Microsoft 365 Desktop on a Windows 11 64-bit system. Although I’m using the checkmark character in my example, Office has a comprehensive library of symbols you can add with these same methods. I’m working with Microsoft Word and Microsoft Excel, but these symbols are available in most Office apps.
You can download Microsoft Excel and Microsoft Word demo files for this tutorial.
Method one: The most basic way to insert a checkmark
You may already be familiar with entering symbols. It’s a fairly simple process, and most users learn how to add them early on with this basic approach:
1. Move your cursor on the document to where you want to insert the symbol (Figure A).
Figure A
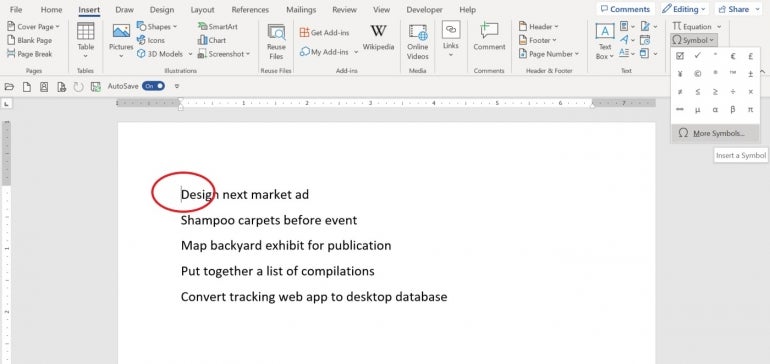
2. Click the Insert tab, and then, click Symbol in the Symbols group.
3. Click More Symbols to see all of the available checkmarks. If you’ve recently inserted this symbol, it will show up in the dropdown just a click away.
4. In the resulting symbol dialog, choose the Wingdings option from the Font dropdown, if necessary.
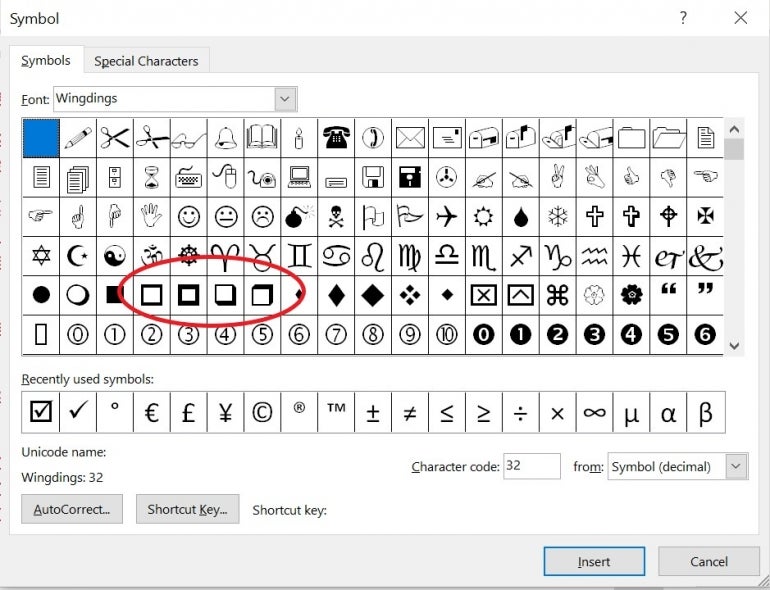
5. Use your cursor and/or the navigation arrows to browse through the symbol library. When you find the one you want, select it (Figure B).
Figure B
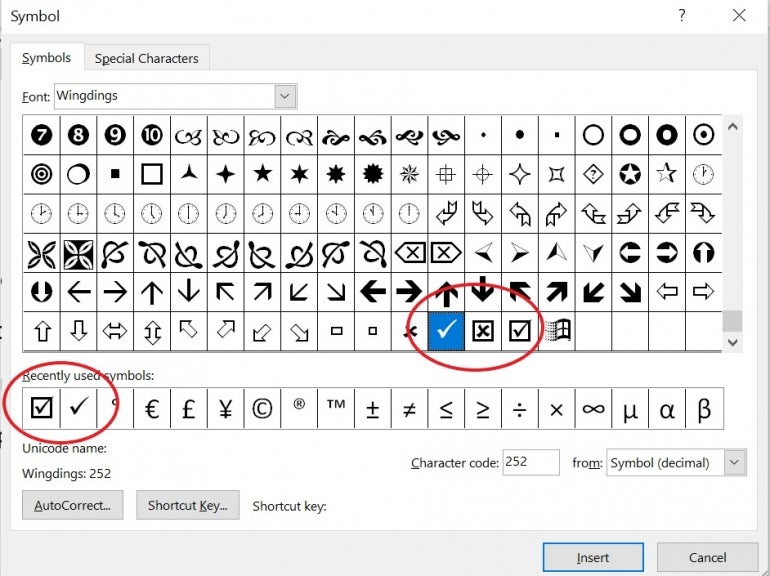
6. Click Insert and then Close.
7. If desired, add a Tab to separate the symbol and the text.
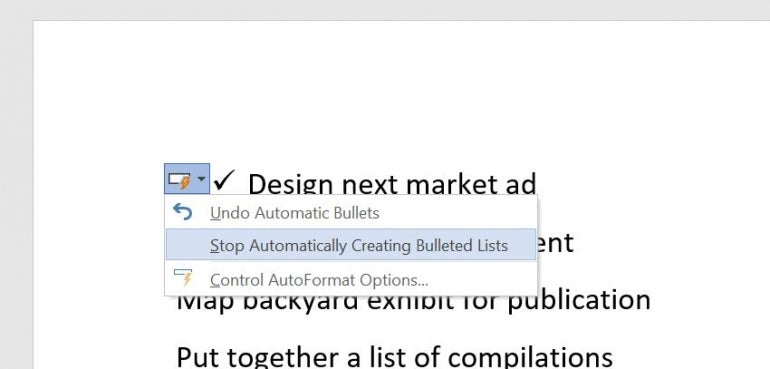
8. If Word indents the symbol and the text, that means the tool is interpreting the added checkmark as a specially formatted bullet point. You can use the smart tag to turn off automatic bullets (Figure C).
Figure C
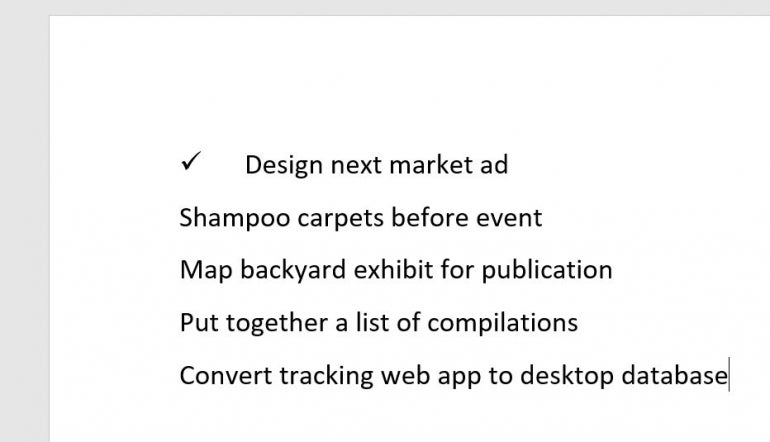
The checkmark is text, as far as Microsoft Word is concerned. Word treats the checkmark shown in Figure D as any other text character. You can increase or reduce the checkmark’s size by changing the font size as well as change its color.
Figure D
This method is available in Excel and most other Office apps, but Excel’s web version doesn’t offer a checkmark symbol to support this feature.
SEE: Explore these Excel tips every user should master.
Assigning keyboard shortcuts to easily add symbols
You may already know how to use the symbol library, but you might be missing an important component. Users can assign a keyboard shortcut to a symbol with the following steps:
1. Place your cursor where you want to insert the symbol.
2. Under the Insert tab, click Symbol in the Symbols group.
3. Click More Symbols to see all of the available checkmarks.
4. Select the symbol in question. In this case, we’re looking for the checkmark character.
5. Click the Shortcut Key button at the bottom of the dialog.
6. In the resulting dialog, click inside the Press New Shortcut Key control, and press Alt + C (Figure E). If the shortcut combination you want to select is already in use, the Currently Assigned To link will warn you, so you can select another option. In the case of this tutorial, the combination we’ve chosen is free to use.
Figure E
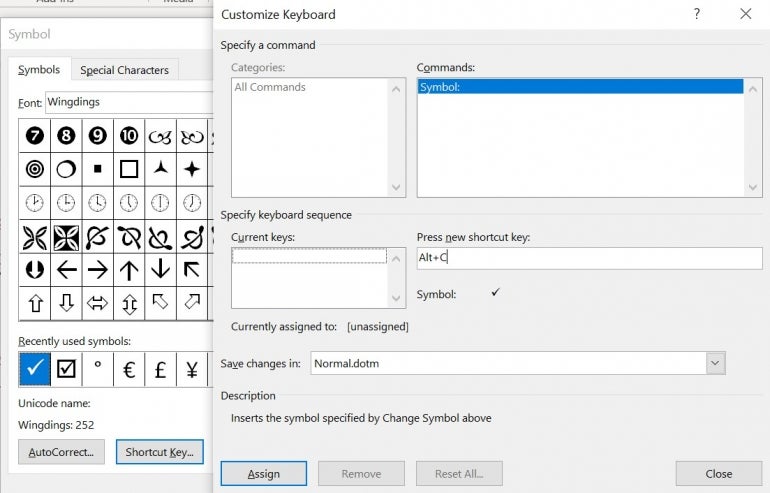
Note: You may choose to overwrite an existing keystroke combination if it’s one you want to use for your new checkmark symbol shortcut. If you change your mind, simply repeat the process using a new combination. The original combination will then be available again.
SEE: Here’s how to integrate and use Microsoft Office with Dropbox.
7. Click Assign to assign that combination to your symbol shortcut, and then, click Close twice to return to the document.
This is a quick and efficient way to use a keyboard shortcut to insert the checkmark character. When applying this shortcut strategy to your own work, you might want to specify a specific document rather than the underlying Normal template. If you choose the latter, the shortcut will be automatically available in all new documents.
Please note that you can’t use Word’s web version to create keyboard shortcuts for symbols.
Method two: Find the checkmark in the bullet library
Symbols, including checkmark symbols, are sometimes available in the bullet library, but Word will treat the formatted character and its text item as a bulleted list, which isn’t what you’ll want in all scenarios. However, bullets have behaviors users can easily exploit, which could be to your advantage when inserting checkmarks. For instance, if you copy the list item, you also copy the bullet character.
To use this route:
1. Position your cursor where you want to insert the symbol or bullet.
2. Click the Bullets dropdown in the Paragraph group on the Home tab.
3. Select the symbol from either the recently used offerings or the bullet library (Figure F).
Figure F
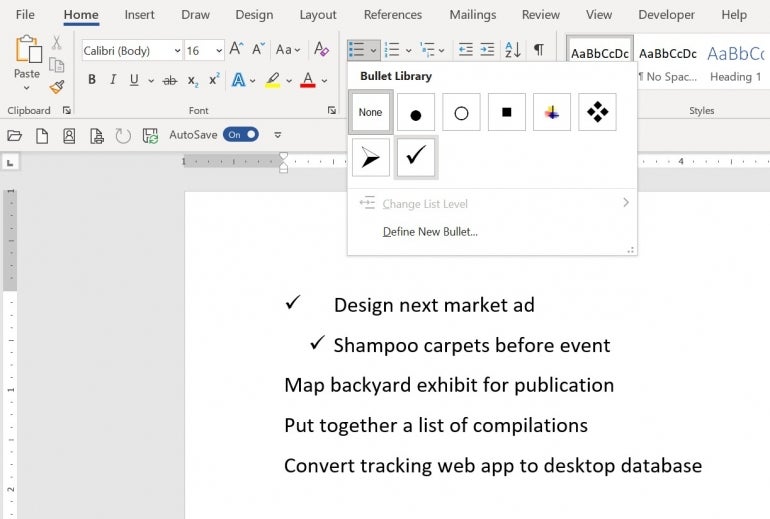
As you can see in Figure F, Word automatically indents the item because that’s the default setting for a bulleted list. For a quick indent fix, click the View tab, and check the Ruler option in the Show group. You can then drag the left indent for that item to the left margin.
However, this isn’t something you’d want to do every time you check an item off your list.
SEE: For a permanent fix, learn how to control spacing and alignment in a numbered list in Microsoft Word.
Word’s web version supports symbols as bullets, but neither Excel Desktop nor Excel’s web version offers this same support.
Add symbols to the bullet library
Not all symbols are in the bullet library, but you can easily add most symbols that you want with the following steps:
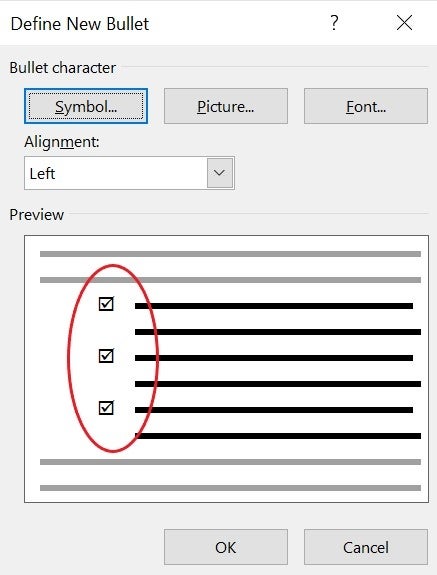
1. Click the Bullets dropdown, and choose Define New Bullet.
2. Click Symbol to launch the Symbol dialog.
3. Select the symbol you want to use from the Symbol dialog, and click OK.
4. As you can see in Figure G, I chose the boxed checkmark.
Figure G
the selected item. You can press Ctrl + Z, Command + Z or the Undo button to undo that change if you like.
With these steps, you can add symbols such as the boxed checkmark to the bullet library. Figure H shows the new boxed checkmark in the bullet library. You’ll use it as you would any other bullet.
Figure H
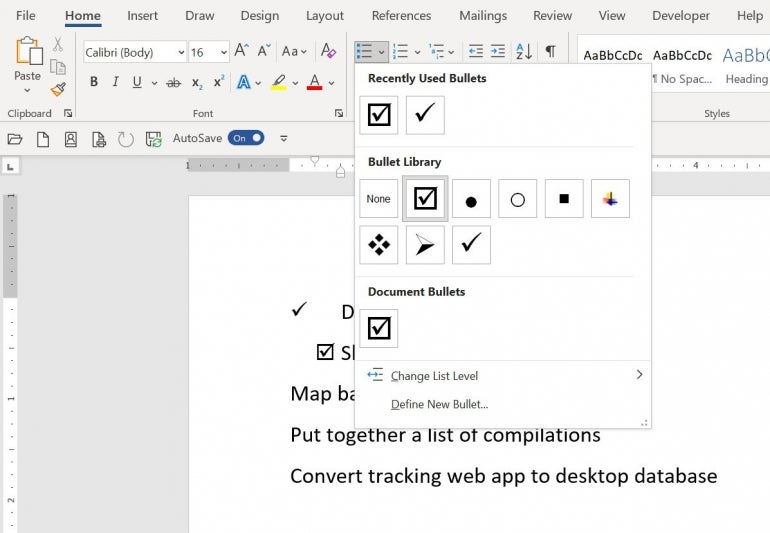
Please note that this example is a bit contrived for the sake of simplicity. In most cases, you won’t want to mix and match symbols in this way.
Method three: Copy and paste the checkmark
If you already have the desired symbol in the document once but need it repeated, you can avoid the interface route and simply copy and paste the existing symbol.
To use the paste method, select and copy the existing checkmark symbol by pressing Ctrl + C or Command + C or using the Copy button. Then, position your cursor where you want the new symbol to go and press Ctrl + V or Command + V or use the Paste button. It’s that simple. You can use this method in any Office app, including the web app versions.
Method four: Use the Alt key checkmark shortcut
My least favorite way to enter a symbol is to use the Alt shortcut, as you need to know the symbol’s character code, and then, you still must format it. In my opinion, it’s usually more work than it’s worth. However, it’s a helpful solution if you want to enter a symbol you can’t find in Word’s symbol library — again, as long as you know the character code.
Please note that this method applies only to Windows devices.
SEE: Check out these useful ALT commands and keyboard shortcuts for Office 365 apps.
To use the Alt key method to insert a checkmark or other symbol, follow these steps:
1. Position the cursor where you want to insert the new symbol.
2. Hold down the Alt key, and use the number keypad to enter the character code — that’s 0252 for the plain checkmark and 0254 for the boxed checkmark. Word will display the letter u with an umlaut over it (Figure I). Press Num Lock on your keyboard if it doesn’t work the first time.
Figure I
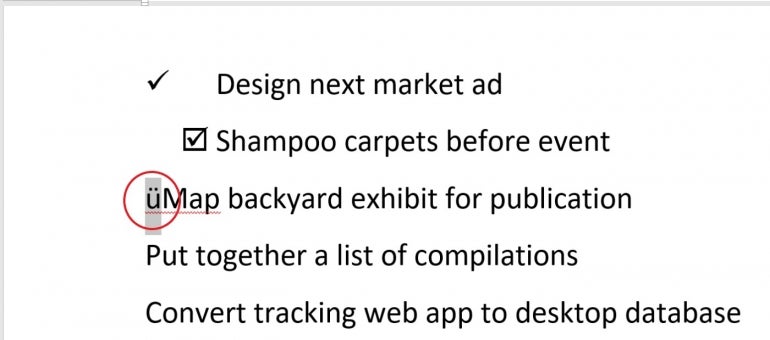
3. Highlight the new character and apply Wingdings from the Font dropdown in the Font group. For this to work, you don’t have to find the font; you can type it in, and then, press Enter when AutoComplete kicks in.
Figure J
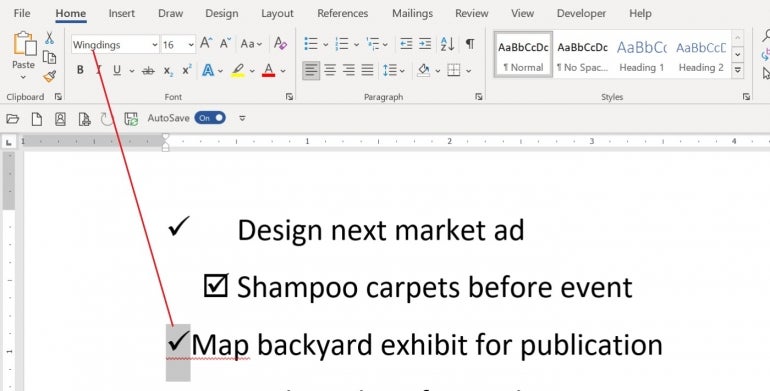
As you can see, Wingdings font changes the original character seen in Figure I. Figure J shows the new checkmark. Similar to the symbol in step 1, you can change font properties for this checkmark. You can use this method in any Office app and with the web app versions.
To find the number entered in step 2, open the Symbols dialog (Figure B). The number is in the bottom-right corner. If the number doesn’t work as is, add the number zero in front of it.
Method five: Type the Excel formula for checkmarks
The first four methods will work in most Office apps, including Excel. Let’s switch gears to see how you can use an Excel formula that will display a checkmark character. With our simple example, this technique would be overkill, but it’s a good technique to know just the same.
We’ll illustrate this method using the same simple list, except this time it’s in Excel. The first step is to apply the Wingding font to the Complete column as follows:
1. Select B3:B7.
2. Choose Wingdings from the Font dropdown.
3. Enter the following formula in B3, and then, copy it to the remaining dataset:
=IF(D3<>"",CHAR(252),"")
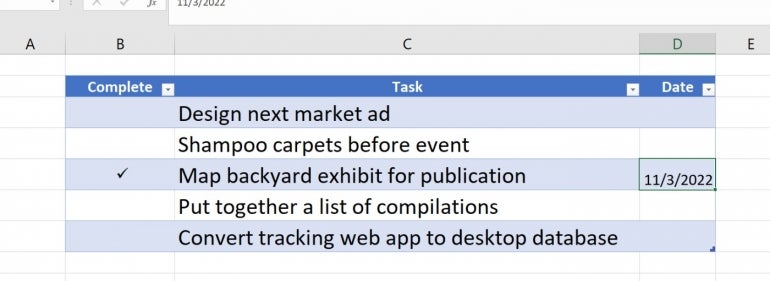
Now, you’re ready to use the list. Simply enter a completion date in column D, and watch Excel automatically display a checkmark in column B (Figure K).
Figure K
SEE: Explore these Excel tips for creating stylish spreadsheets.
Notice that the character number used in the CHAR() function is the same as the character code shown earlier in Figure B. The formulas in column B display a checkmark when you enter a date into a corresponding cell in column D.
How do I add a blank checkbox to my Office document?
So far, the techniques we’ve covered involve entering a checkmark character or symbol. But sometimes, you’ll want to display an empty box, so users can click on the line item to check it off or write a checkmark on a printed copy.
SEE: Here’s how to use the latest version of Office.com to work with your files and documents.
If you plan to print the document and manually check off boxes, you can use an open box symbol, which can be found in the same symbol library we discussed in the first method of this tutorial. As you can see in Figure L, there are a few empty box character options to choose from.
Figure L
If you want the functionality where users can click a box in an electronic copy to add a checkmark as tasks are completed, you can use the Check Box Content Control option. You’ll find it on the Developer tab in the Controls group. To use this control:
1. Position the cursor where you want to insert the first checkbox in the document and click.
2. Click the Developer tab.
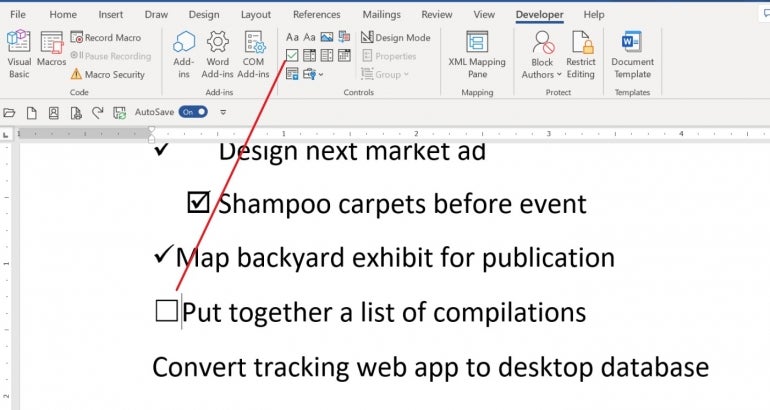
3. In the Controls group, click the Check Box Content Control icon. Doing so will insert a checkbox in edit mode (Figure M).
Figure M
4. Repeat step 3 for each item in the list. Or use the copy and paste method.
While still in edit mode, change the text appropriately. When you’re done, click Design Mode in the Controls group to leave edit mode. To use the control, simply click it. If the control displays an X instead of a checkmark, read how to use checkbox content controls in a Word document.
Microsoft Word’s web version supports this technique, but Excel’s web version doesn’t.
Do these methods work for all Microsoft Office products?
For the most part, Office apps offer supporting functionality for users who want to insert checkmarks. Throughout the article, I’ve noted when this isn’t the case. Some of these techniques will work in their web counterparts, and some won’t.
Office apps are versatile when it comes to adding symbols. You can use these methods to enter almost any symbol that’s available. Most likely, you’ll find a technique that suits you and stick with it moving forward.
To learn about other ways you can make Windows 365 tools work better for you, check out other Big Data tutorials and consider signing up for a beginner’s training course in Microsoft Office.