Let’s discuss in this post how to create a Compliance policy for iOS/iPadOS devices. Organizations need to have robust compliance policies in place as the use of iOS/iPad OS devices in the workplace continues to increase.
Compliance policies in Intune ensure users adhere to company policies and industry regulations, ultimately protecting productivity. When we use a Compliance policy along with Conditional access policy, it delivers the required security for your corporate data.
Today, let’s see how to create Compliance policies in Microsoft Endpoint Manager. Also, let’s see how we can send a custom/ Email notification to users when the device becomes non-compliant.
We can define the process into four major steps, as mentioned below
- Define your compliance requirements
- Create a Custom Email Notification
- Create a compliance policy in Intune
- Monitor the Compliance policy
Define your Compliance Requirements
While creating Compliance policies, the first step is to define the compliance rules. The compliance rules will vary from organization to organization. It depends entirely on what kind of data people access and your organization’s security policies. For example, the healthcare industry must require to adhere HIPAA regulations.
Once you have listed all the compliance rules, we can create a Compliance Policy. Common compliance rules include password complexity, device encryption, jailbreaking, and OS version requirements. Before that, we were also required to create an Email template, which will be triggered for no-compliant devices.
- iOS iPadOS ADE enrollment Profile Authentication method Company Portal Removal from Intune
- Account-Driven User Enrollment for iOS/iPadOS
Create a Custom Email Template
We need to create a custom notification template that can be triggered for users when their devices become non-compliant. Please follow the below steps to create custom notifications.
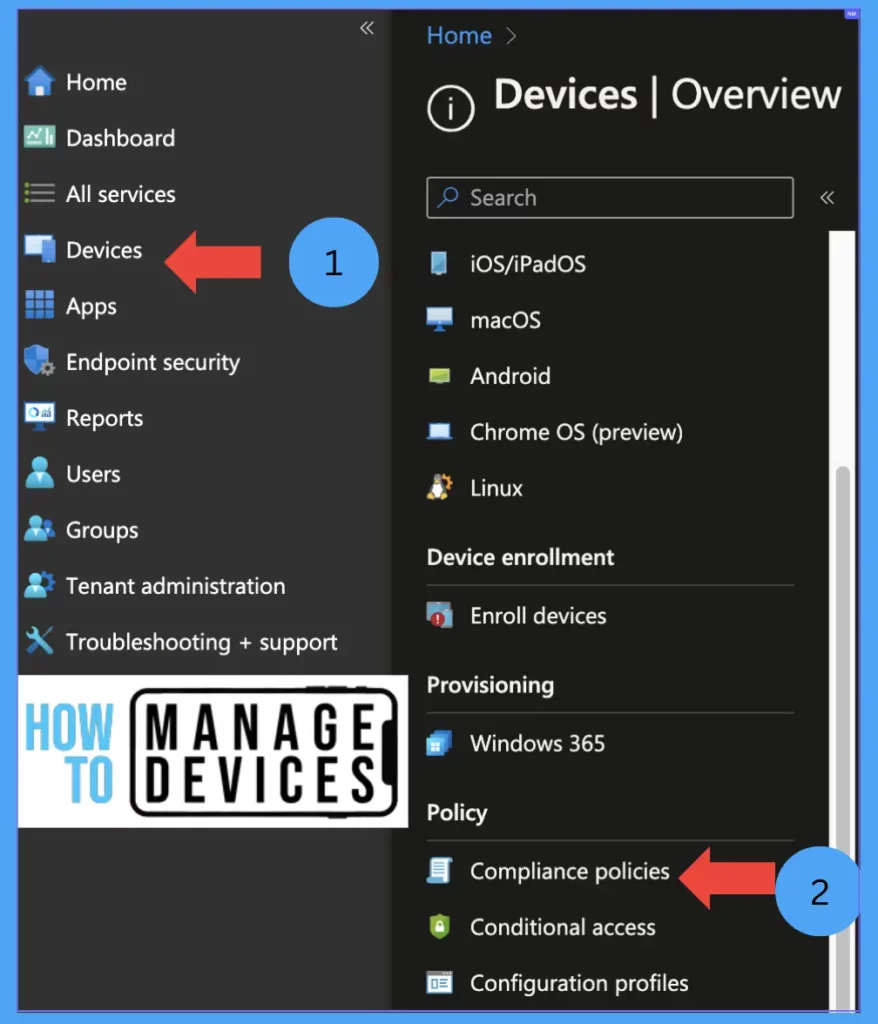
- Sign in to Microsoft EndPoint manager.
- Click on Devices > Compliance policies
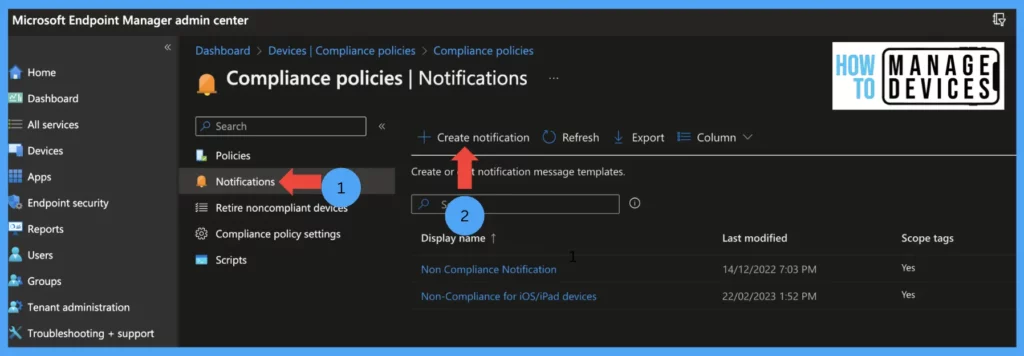
You will see in the below step how we can create a notification for the Compliance Policies.
- Click on Notifications.
- Click on Create new Notification.
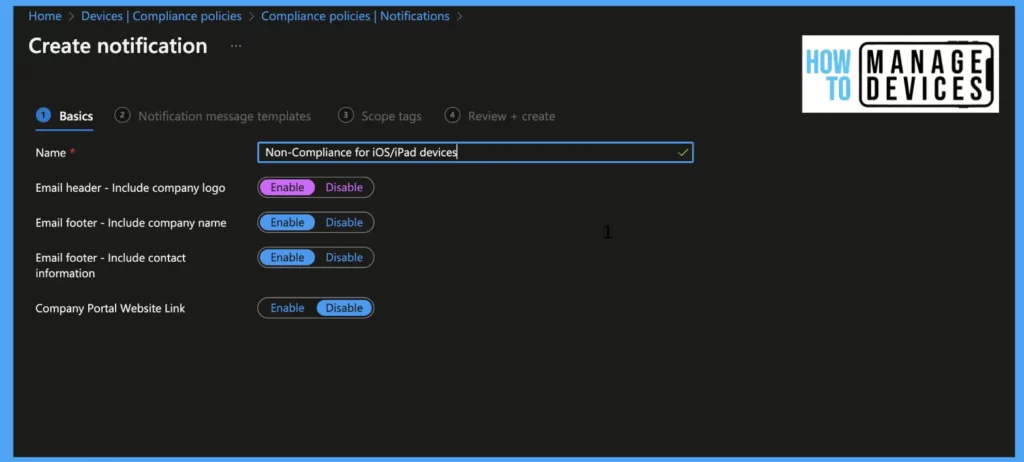
Give a name to the Notification. By default, the Notification includes your organization logo in the Email header and footer; you can disable it if it is not required(the logo will be picked up from the company branding section) and click on Next
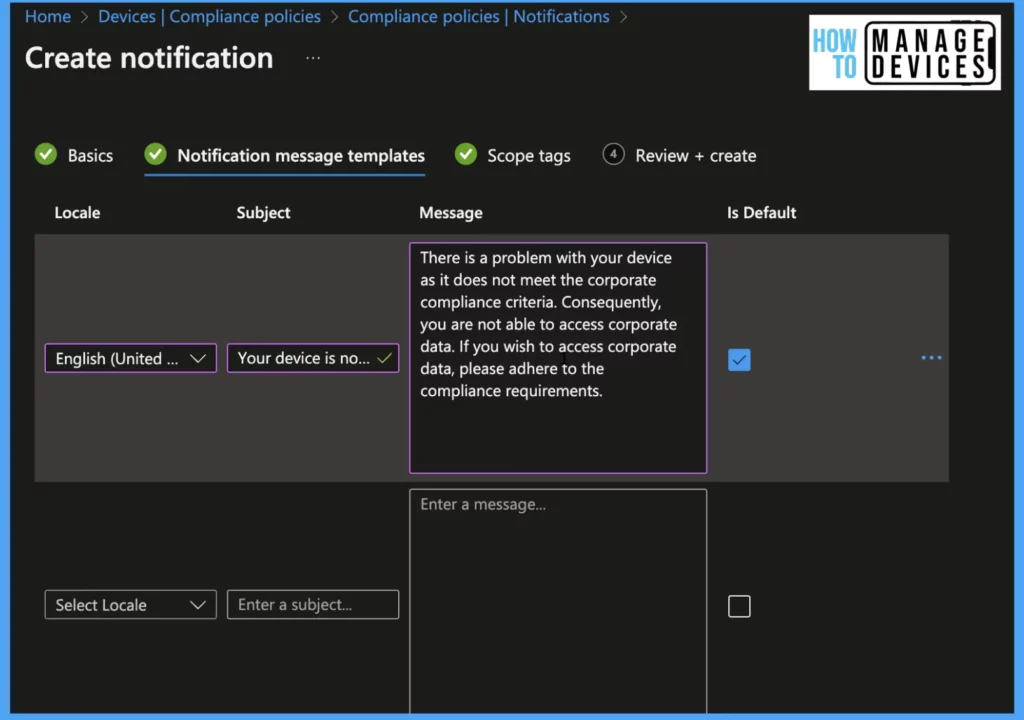
Now select the locale for language. Enter the subject and type in your Message for users. We can have notifications in multiple languages. Select the default if you want to have this as the default notification, and click on Next
Select the scope tags if you want to scope the Notification. Review the Notification and click on create
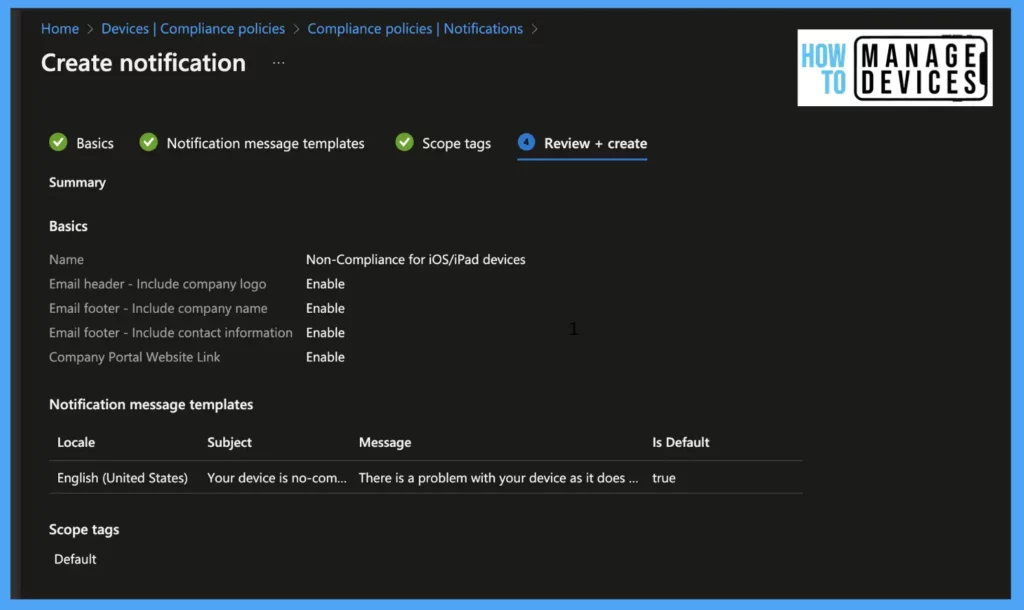
Create Compliance Policy in Intune
Now that we have defined compliance rules and created custom notifications to be sent for non-compliance devices, we are all set to create the Compliance policy for iOS/iPadOS devices. Please follow the below steps to create the compliance policy.
- Sign in to Microsoft Intune Portal.
- Click on Devices > Compliance policies and click on create policy
- Select the platform as iOS/iPadOS and click on create.
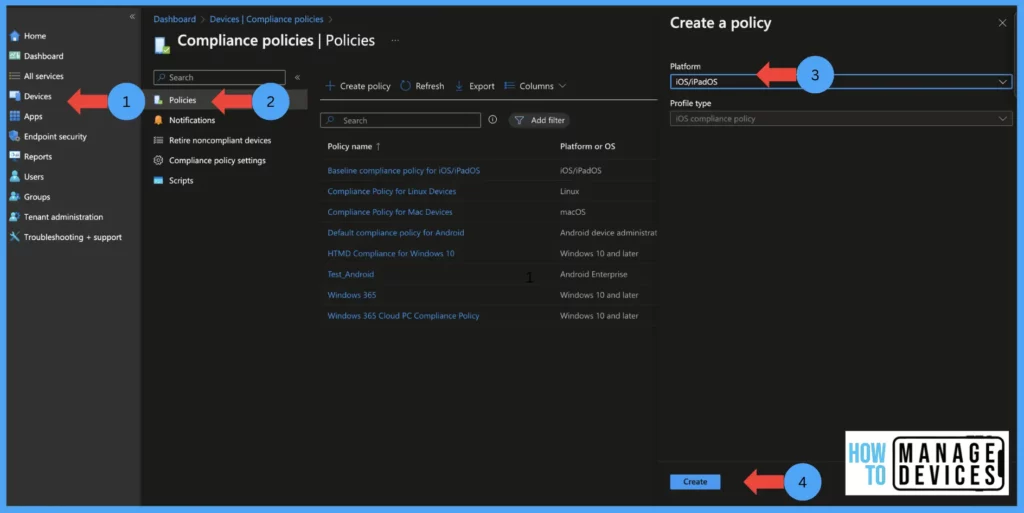
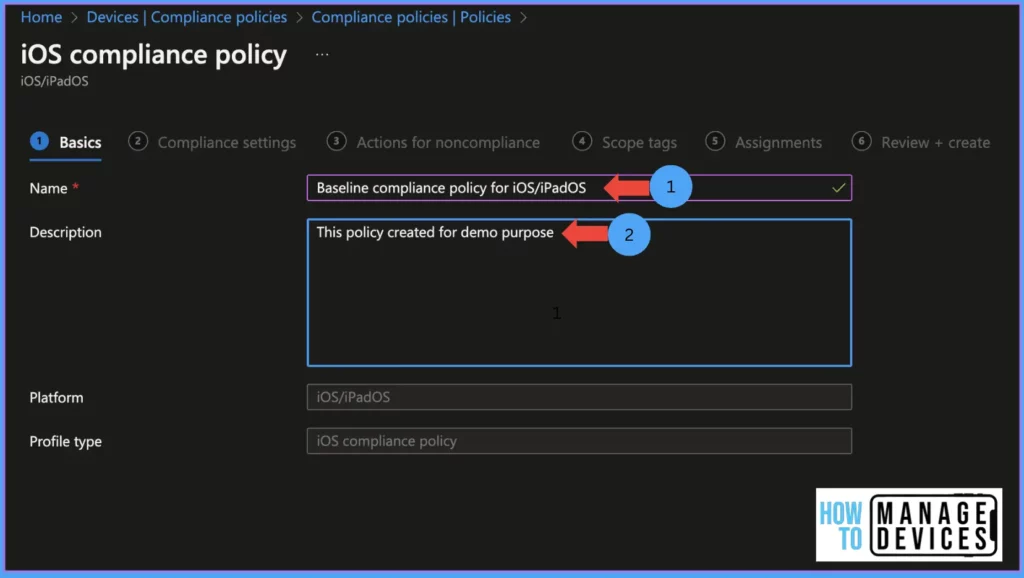
Provide a friendly name to the policy and provide the description for the policy (the description should include why the policy has been created and the purpose of the policy) and click on Next
Compliance Policy Settings
The Endpoint Manager Portal provides various compliance settings that can be configured and deployed to end users or devices. Let’s discuss below the different compliance settings available for configuring and their default values.
Email: Unable to set up email on the device This compliance setting by default, the value is set to Not configured. Set the value to Require if you want a managed email account on the device. If the user already has an Email configured, it should be removed to set up one.
Jailbroken devices: Minimum Os required is iOS 8.0. The default value is not configured. Set the value to Block to mark Jailbroken devices as Non-compliant.
Require the device to be at or under the Device Threat Level: Use this setting to evaluate the threat level on the user’s device; based on risk assessment, the device will be marked as compliant. The risk assessment is done by the Threat Defense service, which is integrated into your tenant. The minimum Os required is iOS 8.0
Not configured: by default, the value is set to Not configured. This will not evaluate the device compliance state.
Secured: This is the most secured level. If the device is evaluated with any level of threats, the device will be evaluated as Non-Compliant.
Low: Set the value to low to allow devices with low levels of threats. If the device threat level is higher, the device will be marked as Non-Compliant.
Medium: Set the value to Medium to allow devices with low or medium levels of threats. If the device threat level is higher, the device will be marked as Non-Compliant.
High: Set the value to High if you want to allow all levels of threats on the device. This is the least secure option.
Device Properties: This section will define the minimum or maximum OS required to access corporate data on devices.
Minimum OS version: This setting will define the min OS required to mark the device as Compliant As a recommendation, have n-1 OS version as the minimum OS version (ex: The current iOS version is 16, have iOS version 15 as the minimum OS version)
Maximum OS Version: This setting will block access to devices with a higher OS version than the defined value. This setting is very useful if you want to restrict access to your org data on new OS versions before your test the new OS.
Minimum OS build version: When apple release iOS and its security patches, it has a build number. Define this setting when you want to mark a device with certain minimum build numbers as Compliant.
Maximum OS build version: When you set the Maximum OS Build version, the devices with higher build versions are marked as Non-compliant
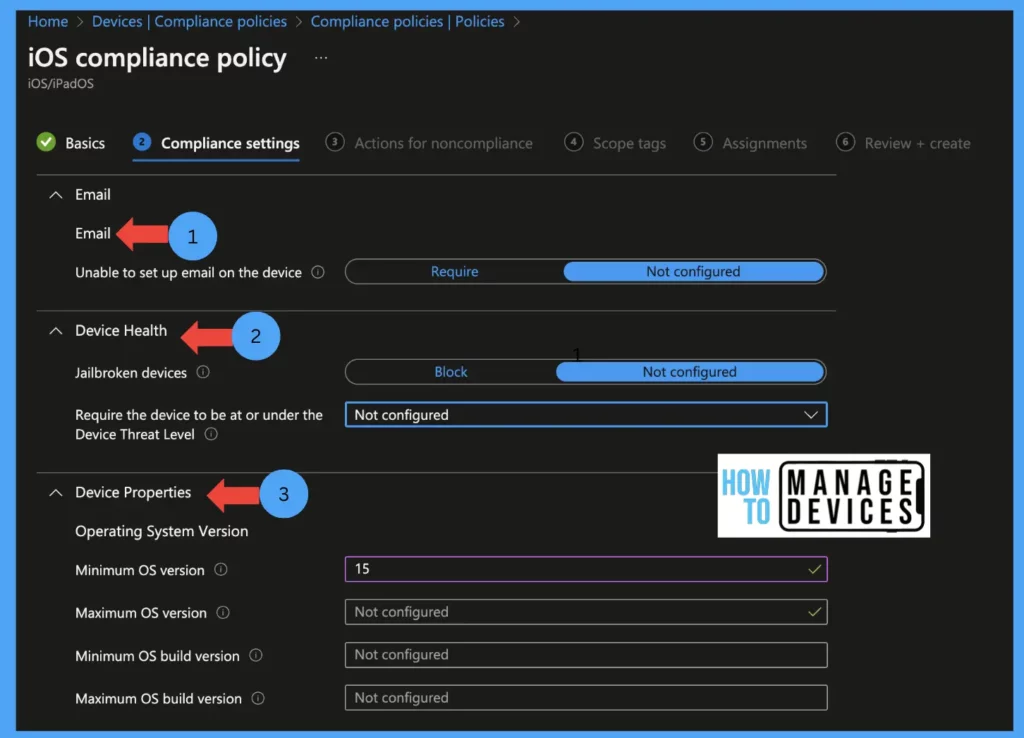
The above screenshot shows the Email, Devie Health, and Device properties settings. Define the values as per your organization’s requirements.
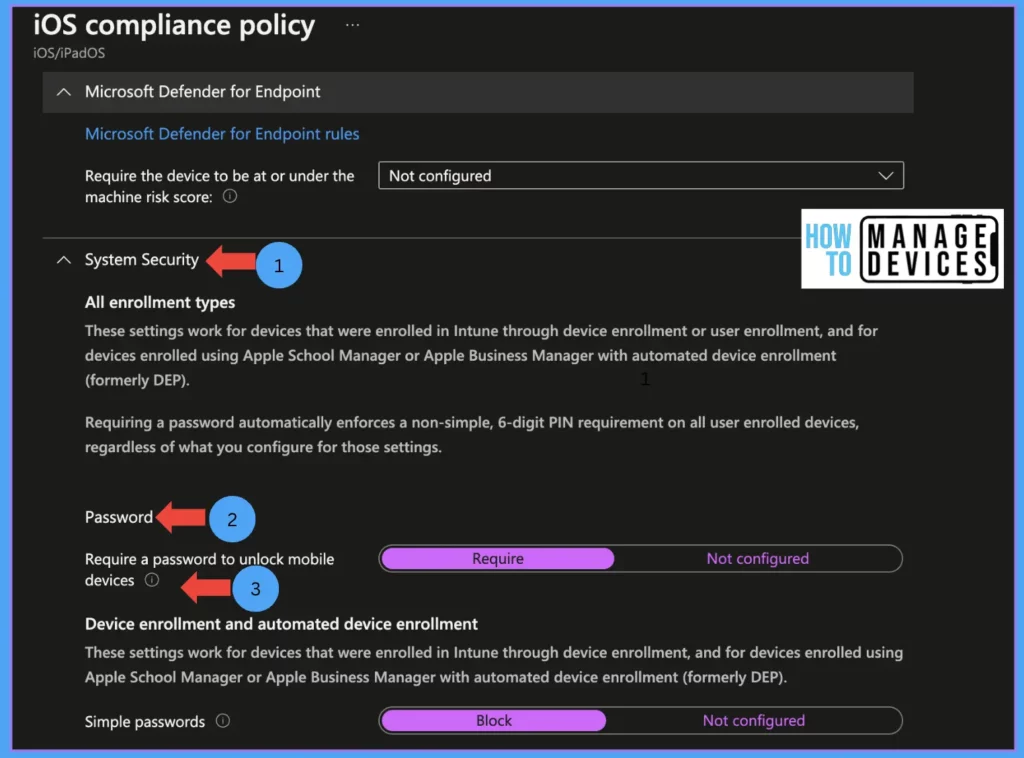
System Security: In this section, we define the compliance rule to have a device passcode. If device passcode criteria are set, users will be prompted to set the Device passcode every 15 minutes until they set a password on their device.
Password: In this section, define the password rules for the device
Require a password to unlock mobile devices: by default, the value is set to not configured. This will not enforce the device passcode. When set to Requires, users are prompted to set a device password
Simple passwords: configure this setting to avoid simple passwords like 1234 and 0000. By default, the value is set to not configured. Set the value as Block to block users from setting simple passwords and enforce having a complex password
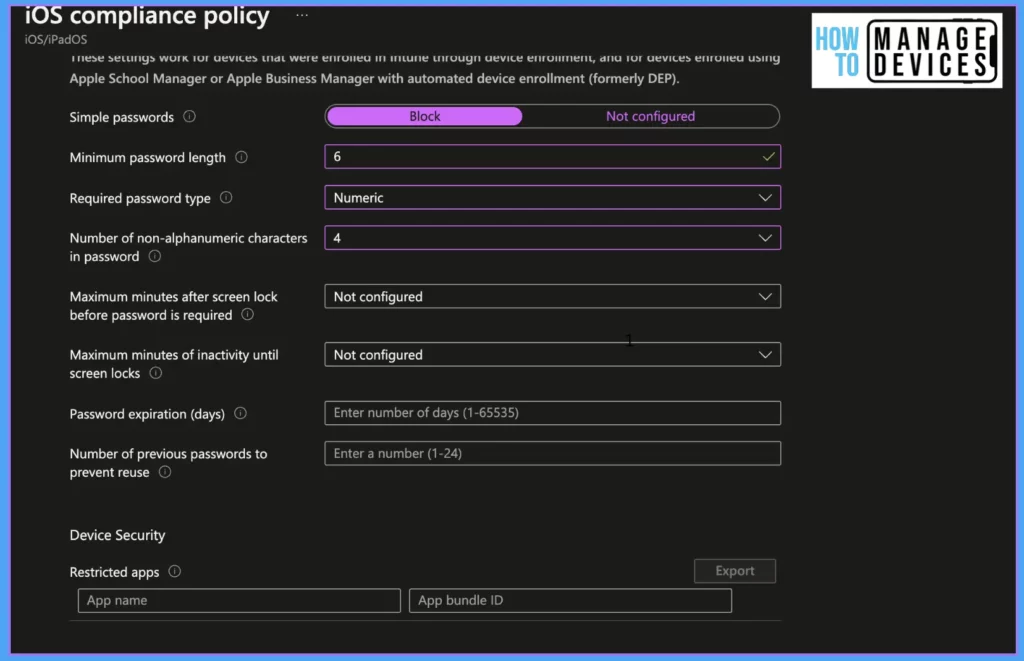
Minimum password length: Define a numeric value between 4-14 to have minimum digits or characters of the Password. This will enforce the user to have a password of a defined value( ex: if you set the value as 6, users will be forced to have a six-digit passcode)
Required password type: Define what type of Password is required, either only numeric or alphanumeric. If you set the value as numeric, the below setting is not required. Define only if you need an alphanumeric password.
Number of non-alphanumeric characters in the Password: Define the minimum number of alphanumeric(@,$,#) characters that should be available in the Password. The higher the number higher the password complexity
Maximum minutes after the screen lock before the Password is required: Define the value of how soon the user must enter the device password after the screen lock.
Maximum minutes of inactivity until the screen locks: Define the idle time before the screen gets locked. Once the value is set, the user cannot modify the value. If we do not define any value, the user can set the value as they wish.
Password expiration (days): Define a numeric value to set the expiry for the Password (use 90 days as idle value). If the value is not set, the Password doesn’t expire.
A number of previous passwords to prevent reuse: This value defines how many times the user would take to reuse the same Password. If the value is not defined, the user can reuse the same password once it expires.
Device Security: This section helps to make a device non-compliant if any particular app is installed.
App name: Enter the App name
App bundle ID: Enter the bundle id of the app(ex: com.apple.iTunes)
Click on Next. Now we have configured the compliance rules for any iOS/iPadOS device. In the next section, we will define the actions for non-compliant devices
Mark device non-compliant: You can specify the device as non-compliant after a few days. Leave not configured. It will mark the device as non-compliant immediately.
Send email to the end user: Select the template which we created. This will send an email to the user with the Message we configured, along with device details.
Note: We can use this option to send multiple reminders by selecting the option and defining the days to send emails, as shown in the screenshot below. We can define when this action must be performed immediately or after a few days. Leave not configured it will mark the device non-compliant immediately.
Send Push notification to the user: This option will trigger a push notification to the end-user device. This push notification is sent by Intune and cannot be customized. The push notification is delivered to the device when it first contacts Intune and non-compliant. Intune doesn’t guarantee the delivery of the push notification to devices. If you require to send multiple Push notifications, we can configure them with different scheduled times.
Note: Intune sends a single notification even if we set multiple notifications set for the same day. If the device is non-compliant due to multiple compliance policies for the same reason and includes push notifications, Intune sends multiple notifications to the device on the same day. We can define when this action has to be performed either immediately or after a few days.
Add device to retire list: This action will add the device to retire blade, i.e., under Devices > Compliance policies > Retire Non-compliant Devices. Admin has to retire the device manually. We can define when this action has to be performed either immediately or after a few days.
Remotely lock the non-compliant device: This action will lock the non-compliant devices. The user has to enter the device’s PIN or Password to unlock the device. We can define when this action has to be performed either immediately or after a few days.
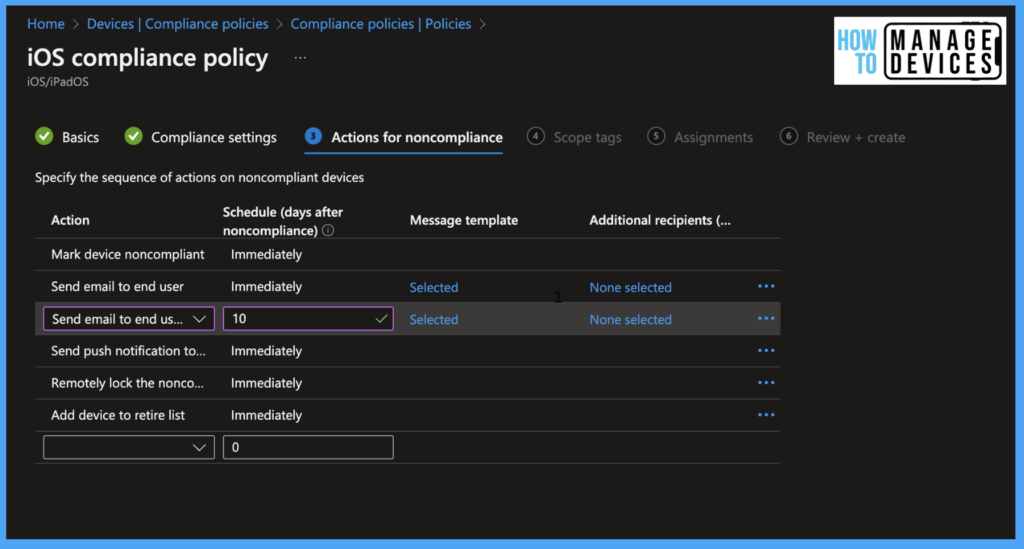
In the above screenshot, we have taken action to send emails immediately and after 10 days. We have also sent a push notification to inform users. As mentioned above, do not depend on Push notifications.
- Click on Next to select the scope tags.
- Click next to assign the policy to a group. We can also exclude a few groups if required
- Click next and review the policy and click on Create. This will create the policy and deploy it to assigned devices.
Monitor the Compliance Policy
Once the policy is assigned to users, Intune will deploy the policy to users’ devices. We can monitor the policy for individual devices or all users at once.
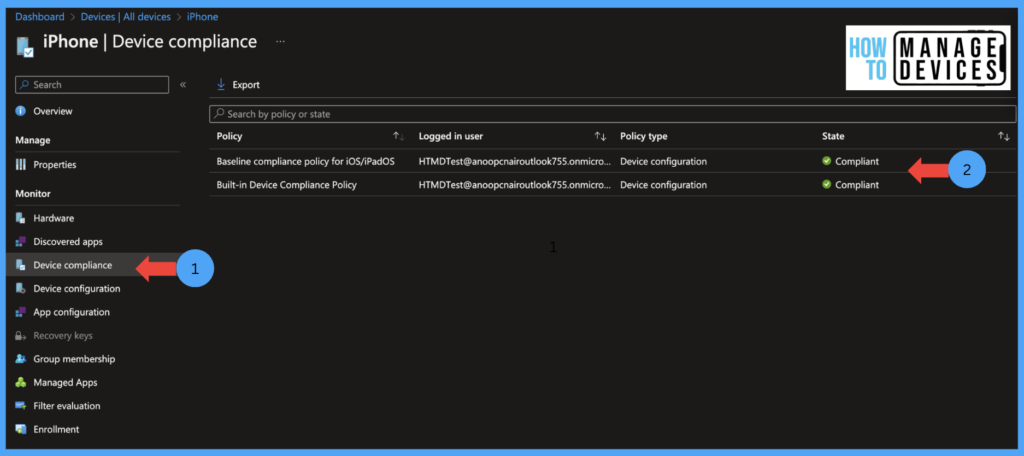
If you want to check a single device compliance status click on devices > search for device and select the device > Device compliance and view the status of the compliance policies.
If you want to check for all users or devices of a particular policy Devices > Compliance policies > select the policy > Overview. This will give you the graphical assignment of policy per users and devices. We can also monitor the status of as per Device status, User status, also Per settings status.
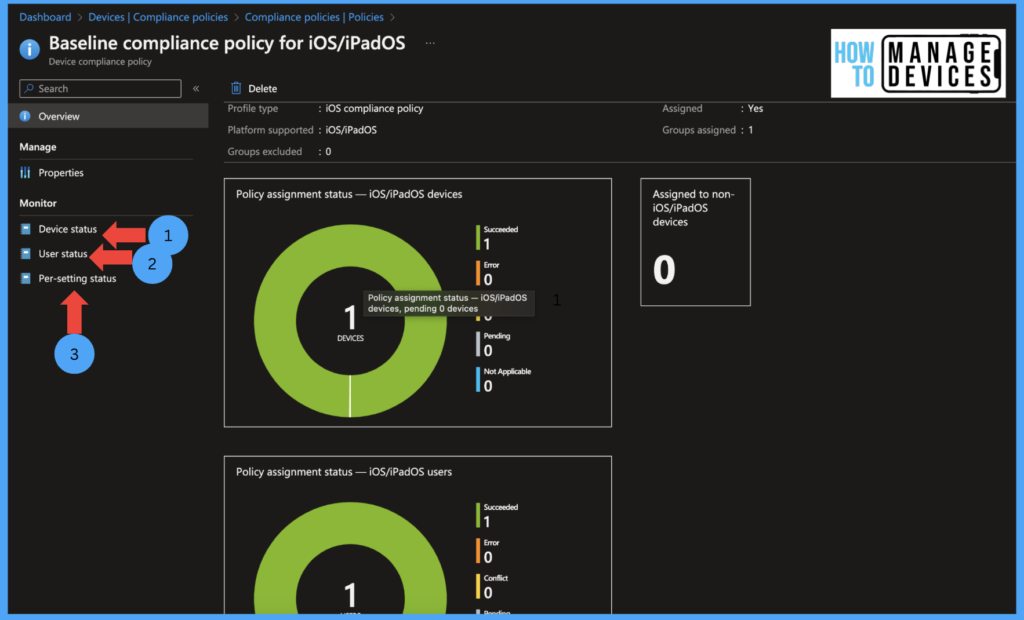
Microsoft Endpoint manager also provides Dashboard level details for all devices. This dashboard gives the status of all devices for all compliance policies we have configured in Intune. To view the Dashboard
- Sign in to Microsoft Intune Portal.
- Click on devices > Overview >Compliance status.
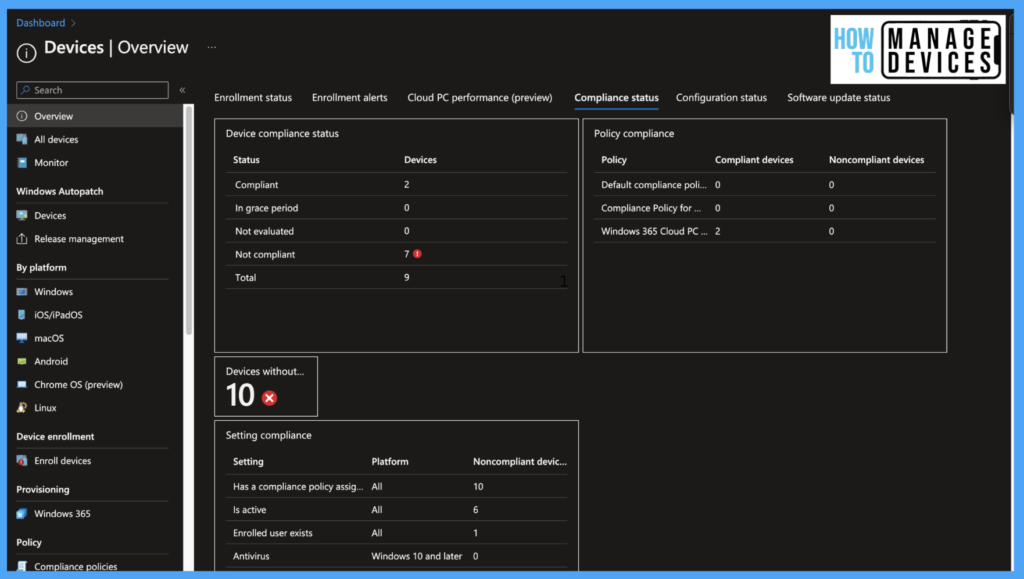
Make sure, you adhere to the compliance requirement of your organization. Compliance policy and Conditional Access policies will be a powerful tools when we use them. We can create a Conditional access policy to allow access to M365 apps only if the device is compliant, that would be another topic for another day.

