Let’s talk about how to Improve Windows 11 Performance using Debloat Tool. The Debloat tool cleans unnecessary junk files from your system and disables and uninstall applications. If you have an old PC with Windows 11, using it is recommended.
If you follow a clean installation process, Windows 11 still have many software/Bloatware from OEMs. There are many services continuously running in the background. Those background applications were wasting system resources. These things eat up the battery life (for Laptops) and collect usage data/telemetry information.
There is no option to shut them down or turn them off. Here in this post, we will try debloating on a PC to eliminate those unnecessary applications. Windows 11 will get lean after removing unwanted, Bloatware or unnecessary applications. This process is recommended to users to debloat Windows 11 to improve PC performance.
I tried to debloat on my Windows 11 PC and found a successful result without any bottlenecks. The process is also helpful in removing the bloat load of unnecessary packages that consume unnecessary system space and waste system resources.
- 4 Methods Disable Edge Browser Search Suggestions from Address Bar
- Enable Windows 11 Content Adaptive Brightness Control
- Best Guide for Bitwarden Password Manager | Detailed Review
Note! Do it carefully and follow the step properly as detailed below; otherwise, it may affect your system. Do it at your own risk!
Steps to Improve Windows 11 Performance Using Debloat
Debloating Windows 11 PC will improve your system performance. Let’s check which applications are there in my Start menu. Click on the Start button on the desktop/press the Windows button from the keyboard. Now the Start menu appears.

After looking out the Start menu, click the Search option on the Taskbar, type “PowerShell (Windows Terminal),” and from the search results, select PowerShell and click on Run as Administrator from the right panel. The detailed vision is provided in the image below for better understanding.

After clicking on the run as administrator, the next pop-up window opens as “User Account Control.” User account control asks permission for the application: “Do you want to allow this app to make changes to your Device?”. Click Yes to permit the app to make changes.

The PowerShell window opens now. Type “iwr -useb https://git.io/debloat|iex” or copy and paste it and hit enter to run the command. The Windows 10 Debloater opens, shown below in the images.
iwr -useb https://git.io/debloat|iex
You can get around this -> GitHub – Sycnex/Windows10Debloater: Script to remove Windows 10 bloatware.
Windows 11 Debloater
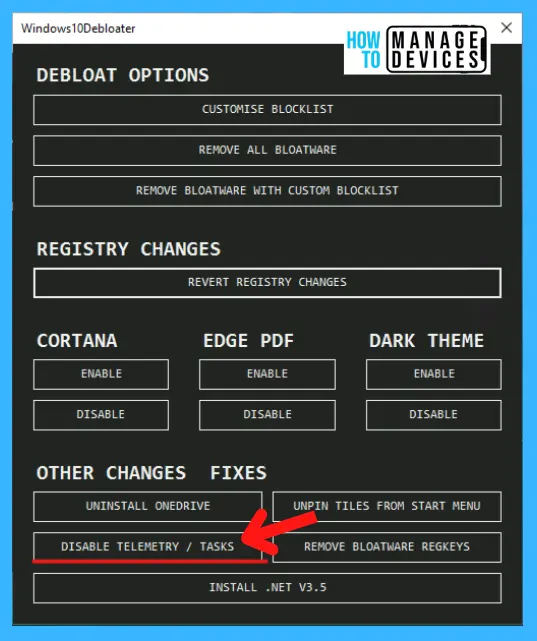
Windows10Debloater is compatible with Windows 11 operating system version. There is no core change between Windows 10 and 11 versions. The following are the options available with this free tool.
- DEBLOAT OPTIONS
- Customise Blocklist
- Remove All Bloatware
- Remove Bloatware with a custom blocklist
You can revert the registry changes with the bloater tool. The other useful options are to DISABLE or ENABLE Cortana, Edge PDF, and Dark Theme.

Disable Cortana on Windows 11 using Debloader
The Windows 10 debloater opens; disable “Cortana” if you are not using Microsoft voice assistant. Removing the app from the background will take a few seconds. Now Cortana is no more functioning in the background.
- Click on disable as marked in the image below.

Disable or Enable OneDrive
The second thing to do is Uninstall OneDrive if you are not using it on Windows PC. I am uninstalling Microsoft OneDrive will no longer pop up in the Start-up windows or will not ask for backup at random times. It will take a few minutes to complete the process.

Disallow Telemetry on Windows 11
Now it’s time to disable Telemetry/Tasks. The work of Telemetry/Tasks is running in the background and tracking all services run by Microsoft. You must do this to save from data harvesting and free up your system. You can check your PC after the completion of the process.
- Disable Telemetry Data

Now the final option is here to complete the process in Windows 11. Debloat Option is basically used to remove unnecessary applications and unwanted packages. There are three options available to debloat the windows 11 such as:
- Customize Block List
- Remove all Bloatware
- Remove Bloatware with a custom Blocklist
I suggest not using the Remove all Bloatware option, remove all Bloatware at a time because the list is configured for Windows 10. So recommended to use Customize Block List instead of Remove all Bloatware.

The next window will appear as Customize Allow List & Block List. There is a list of applications that appear, choose the applications wisely and tick them to remove them from your device. Select particular applications which you won’t use. And click on Save Custom Allowlist and Blocklist to custom-lists.ps1.

Note! If you don’t understand which application to keep or remove, I recommend skipping this step.
Remove Bloatware with Custom Blocklist on Windows 11
After completing the above process, now click on Remove Bloatware with Custom Blocklist to continue the process. This process will take some time to complete, so keep patience and wait till the completion of the process.

All the Bloatware is deleted/removed from your Windows PC and cleaned up. This process will help us to debloat our system. Through this process, all the unnecessary applications and clean up unwanted packages. It is also shown in the PowerShell script.

After completion of the process, Restart the system for applicability of the changes made therein. When the system gets restarted, check the Start menu for the changes made. See the image below for the changes made.

Author
Alok is a Master of Computer Applications (MCA) graduate. He loves writing on Windows 11 and related technologies. He likes to share his knowledge, quick tips, and tricks with Windows 11 or Windows 10 with the community.


Wonderful. Works Like a charm
Actually worked!
not working
My computer Word fine non